How to Collaborate with External References in BricsCAD
Collaborating with external references in BricsCAD can significantly enhance productivity, streamline workflows, and ensure consistency across various projects. This comprehensive guide delves into the various aspects of working with external references (Xrefs) in BricsCAD, from understanding their importance to mastering advanced techniques for efficient collaboration.
Table of Contents
- Introduction to External References
- What are External References?
- Benefits of Using Xrefs
- Setting Up External References
- Attaching External References
- Managing Paths for Xrefs
- Overlay vs. Attachment
- Working with Xrefs
- Editing Xrefs
- Updating Xrefs
- Clipping Xrefs
- Advanced Techniques
- Nesting Xrefs
- Working with Layer States
- Using Xrefs in Layouts
- Best Practices for Collaboration
- Naming Conventions
- File Management
- Communication and Coordination
- Troubleshooting Common Issues
- Resolving Broken Links
- Handling Performance Issues
- Dealing with Xref Conflicts
- Conclusion
1. Introduction to External References
What are External References?
External references, commonly referred to as Xrefs, are files that are referenced within a primary drawing file. Instead of embedding the referenced file into the main drawing, BricsCAD links to the external file, allowing multiple users to work on different components of a project simultaneously.
Benefits of Using Xrefs
- Improved Collaboration: Xrefs enable multiple team members to work on separate parts of a project simultaneously, enhancing collaboration and reducing project completion time.
- File Size Management: Since Xrefs are linked rather than embedded, the main drawing file size remains manageable, improving performance and reducing load times.
- Consistency and Updates: Any changes made to an Xref are automatically updated in all drawings that reference it, ensuring consistency across the project.
- Modularity: Projects can be broken down into manageable parts, making it easier to organize and update individual components.
2. Setting Up External References
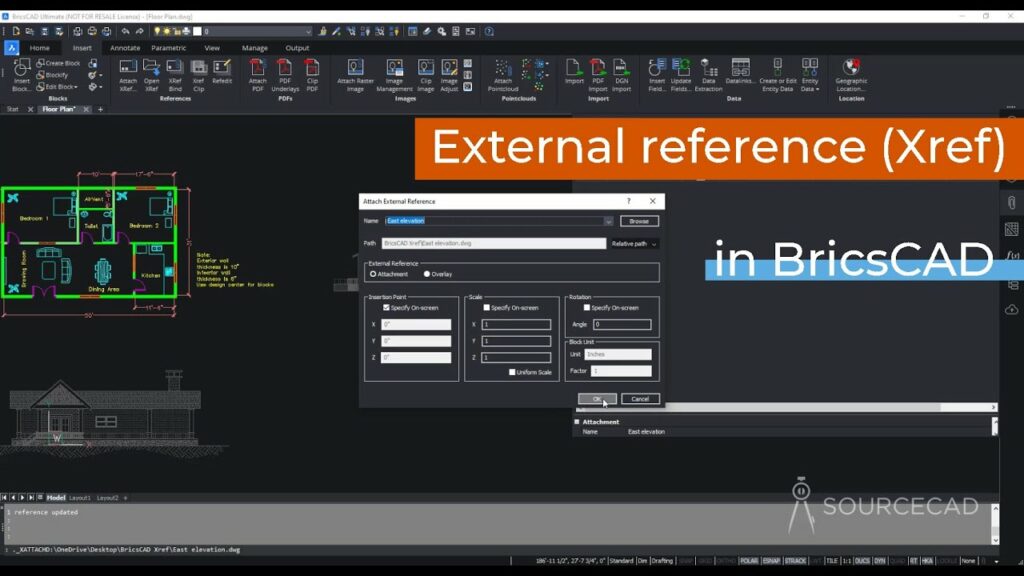
Attaching External References
To attach an external reference in BricsCAD:
- Open the Primary Drawing: Open the drawing file where you want to attach the external reference.
- Insert Command: Use the
INSERTcommand or go to theInsertmenu and selectAttach Xref. - Select File: In the dialog box, browse to the location of the external file you want to attach.
- Specify Path Type: Choose whether to use a full path, relative path, or no path for the Xref. Using a relative path is recommended for ease of file management and collaboration.
- Position Xref: Specify the insertion point, scale, and rotation angle for the Xref, or use the default settings.
Managing Paths for Xrefs
Managing paths is crucial for ensuring that Xrefs are correctly located and linked:
- Full Path: Stores the complete file path. While reliable, it can cause issues if files are moved.
- Relative Path: Stores the path relative to the current drawing location, making it easier to move projects without breaking links.
- No Path: Searches for the Xref in the same directory as the current drawing. This can be useful in controlled environments but risky otherwise.
To manage paths:
- Xref Manager: Open the Xref Manager by typing
XREFin the command line. - Select Xref: Select the Xref you want to manage.
- Change Path: Use the
Change Pathbutton to modify the path type or update the file location.
Overlay vs. Attachment
- Overlay: Xrefs attached as overlays do not get included if the drawing is used as an Xref in another drawing. This helps in avoiding circular references and keeps the Xref hierarchy clean.
- Attachment: Xrefs attached as attachments will be included in the main drawing and any other drawings that reference it. This is useful for nested Xrefs where you want all components included.
3. Working with Xrefs
Editing Xrefs
To edit an Xref:
- Open Xref: Open the external reference file directly from the Xref Manager or from the file location.
- Make Changes: Modify the file as needed.
- Save and Update: Save the changes and return to the primary drawing. Use the
XREFcommand to update the reference and reflect the changes.
Updating Xrefs
Xrefs automatically update when changes are detected. However, you can manually update them:
- Xref Manager: Open the Xref Manager.
- Select Xref: Choose the Xref you need to update.
- Reload: Click the
Reloadbutton to manually refresh the reference.
Clipping Xrefs
Clipping allows you to display only a portion of the Xref:
- Xclip Command: Use the
XCLIPcommand to start clipping. - Select Xref: Choose the Xref you want to clip.
- Specify Boundary: Define the clipping boundary using a rectangular or polygonal shape.
- Adjust Clipping: Modify the clipping boundary as needed using the
XCLIPoptions.
4. Advanced Techniques
Nesting Xrefs
Nesting Xrefs involves attaching an Xref within another Xref. This is useful for complex projects:
- Attach Xref: Attach the first Xref to the main drawing.
- Nested Attachment: Open the attached Xref and attach another Xref within it.
- Update Main Drawing: Save changes and update the main drawing to reflect the nested Xrefs.
Working with Layer States
Layer states help manage Xref layers effectively:
- Layer States Manager: Open the Layer States Manager from the Layer Properties panel.
- Create Layer State: Save the current layer configuration as a new state.
- Apply to Xrefs: Apply the layer state to Xrefs to ensure consistent visibility and properties.
Using Xrefs in Layouts
Using Xrefs in layouts can enhance the presentation and organization of your drawings:
- Attach Xref in Layout: Switch to the layout tab and attach the Xref as needed.
- Viewport Configuration: Configure viewports to display the desired portions of the Xref.
- Layer Control: Use layer states to control the visibility of Xref layers within each viewport.
5. Best Practices for Collaboration
Naming Conventions
Establish clear naming conventions for Xrefs to avoid confusion and ensure consistency:
- Project Prefix: Use a project-specific prefix for all Xrefs.
- Descriptive Names: Include descriptive names indicating the content or purpose of the Xref.
- Version Control: Incorporate version numbers or dates to track updates.
File Management
Effective file management is crucial for collaborative projects:
- Centralized Storage: Store all Xrefs in a centralized location accessible to all team members.
- Regular Backups: Perform regular backups to prevent data loss.
- Version Control: Implement version control systems to track changes and maintain history.
Communication and Coordination
Successful collaboration relies on clear communication and coordination:
- Project Meetings: Hold regular project meetings to discuss progress and address issues.
- Documentation: Maintain thorough documentation of Xref usage, paths, and updates.
- Responsibility Assignment: Assign responsibilities for different Xrefs to specific team members.
6. Troubleshooting Common Issues
Resolving Broken Links
Broken links occur when BricsCAD cannot locate an Xref:
- Xref Manager: Open the Xref Manager to identify broken links.
- Update Path: Use the
Change Pathoption to update the file location. - Check Paths: Ensure all paths are correctly set and accessible.
Handling Performance Issues
Large projects with multiple Xrefs can impact performance:
- Unload Unnecessary Xrefs: Temporarily unload Xrefs not needed for the current task.
- Purge Unused Elements: Regularly purge unused layers, blocks, and other elements from the drawing.
- Optimize Hardware: Ensure your computer meets the recommended hardware specifications for BricsCAD.
Dealing with Xref Conflicts
Conflicts arise when multiple Xrefs have overlapping elements or layers:
- Layer Management: Use the Layer Manager to control the visibility and properties of conflicting layers.
- Clipping: Use clipping boundaries to display only the relevant portions of each Xref.
- Consult Team: Communicate with team members to resolve conflicts collaboratively.
7. Conclusion
Collaborating with external references in BricsCAD is a powerful technique that enhances productivity, ensures consistency, and streamlines workflows in complex projects. By understanding the fundamentals, mastering advanced techniques, and adhering to best practices, you can effectively leverage Xrefs to achieve efficient and coordinated project outcomes. Whether you are a novice or an experienced BricsCAD user, the insights provided in this guide will help you optimize your use of external references and improve collaboration within your team.