Creating a new project in Autodesk PowerMill Ultimate involves several steps that ensure you set up your workspace, import your models, and prepare your settings for CNC (Computer Numerical Control) machining. This comprehensive guide will walk you through the entire process, from launching the software to exporting your toolpaths. By following these steps, you can efficiently manage your projects and optimize your CNC machining workflow.
1. Launching PowerMill Ultimate
- Open PowerMill Ultimate: Start by launching the PowerMill Ultimate application from your desktop or start menu.
- New Project: Once PowerMill is open, go to the ‘File’ menu and select ‘New Project’. This action creates a new project workspace where you can import models and create toolpaths.
2. Setting Up the Project Directory
- Create a Project Folder: It’s good practice to create a dedicated folder for each project. This helps in organizing all related files in one place. You can create this folder in your preferred location on your computer.
- Set Project Directory: In PowerMill, navigate to ‘File’ > ‘Set Project Directory’. Browse to the folder you created and select it. This ensures that all subsequent files related to this project are saved in the correct location.
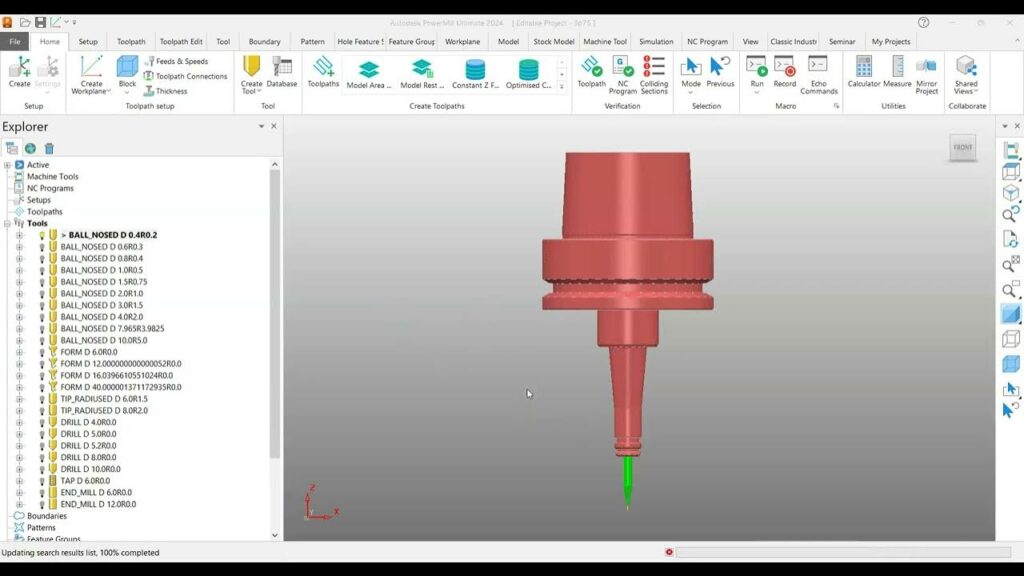
3. Importing the CAD Model
- Import Model: To import a CAD model, go to ‘File’ > ‘Import’ > ‘Model’. PowerMill supports various file formats, including IGES, STEP, STL, and others.
- Select File: Browse to the location of your CAD model file, select it, and click ‘Open’.
- Model Orientation: Once the model is imported, ensure it is correctly oriented. You can use the ‘Move’, ‘Rotate’, and ‘Scale’ tools within PowerMill to adjust the position of your model.
4. Defining the Stock
- Create Stock: The stock represents the raw material from which your part will be machined. Go to ‘Home’ > ‘Setup’ > ‘Stock’.
- Stock Dimensions: Enter the dimensions of your stock material. PowerMill allows you to define the stock as a rectangular block, a cylindrical shape, or import a custom shape.
- Position Stock: Position the stock relative to your model. You may need to move or align the stock to ensure it encompasses your model correctly.
5. Setting Up the Machine Tool
- Machine Tool Selection: Select the machine tool you will use for the project. Go to ‘Home’ > ‘Machine Tool’.
- Machine Library: PowerMill has a library of machine tools. Select the appropriate machine tool from the library or import a custom machine tool if needed.
- Machine Tool Parameters: Configure the machine tool parameters, such as spindle speed, feed rates, and other settings specific to your machine.
6. Creating Toolpaths
- Select Strategy: PowerMill offers various machining strategies, such as roughing, finishing, and drilling. Choose the appropriate strategy based on your machining requirements.
- Toolpath Parameters: Configure the parameters for your selected strategy. This includes setting the tool, defining step-over and step-down values, and other relevant settings.
- Generate Toolpath: Once the parameters are set, click ‘Calculate’ to generate the toolpath. PowerMill will display the toolpath on the model.
- Simulate Toolpath: Use the simulation tools to visualize the machining process. This helps in verifying the toolpath and ensuring there are no collisions or errors.
7. Editing Toolpaths
- Toolpath Adjustments: If needed, you can edit the toolpath by changing the parameters or using the toolpath editing tools in PowerMill.
- Toolpath Trimming: Use the ‘Trim’ function to remove unnecessary portions of the toolpath. This can help in optimizing the machining process.
- Toolpath Ordering: Adjust the order of toolpaths if you have multiple toolpaths. This ensures the machining sequence is optimal.
8. Post-Processing
- Select Post-Processor: Post-processing converts the toolpaths into G-code that your CNC machine can understand. Select the appropriate post-processor for your machine.
- Post-Processor Settings: Configure the settings for the post-processor, such as output file format and destination folder.
- Generate G-Code: Click ‘Post Process’ to generate the G-code. Save the G-code file in your project directory.
9. Exporting and Saving the Project
- Save Project: Regularly save your project to avoid losing any work. Go to ‘File’ > ‘Save Project’.
- Export Files: Export any necessary files, such as the model, stock, or toolpaths, for use outside of PowerMill. This can be done through the ‘Export’ options in the ‘File’ menu.
10. Backing Up Your Project
- Create Backups: It is essential to create backups of your project files. You can manually copy the project directory to a backup location or use automated backup software.
- Version Control: Consider using version control systems for large or complex projects. This helps in tracking changes and reverting to previous versions if needed.
Tips and Best Practices
- Regularly Update PowerMill: Ensure you are using the latest version of PowerMill Ultimate to benefit from the latest features and bug fixes.
- Use Templates: Create and use templates for recurring projects to save time on setup and ensure consistency.
- Tool Library: Maintain a well-organized tool library with accurate tool data. This helps in quickly selecting the right tools for your projects.
- Documentation: Keep detailed documentation of your project settings, parameters, and decisions. This helps in troubleshooting and future reference.
- Training and Tutorials: Continuously improve your skills by taking advantage of Autodesk’s training resources, tutorials, and community forums.
Troubleshooting Common Issues
- Model Import Issues: If you encounter issues importing your model, check the file format compatibility and ensure the model is free of errors or corruptions.
- Toolpath Calculation Errors: Verify that all toolpath parameters are correctly set and that there are no conflicts or invalid settings.
- Simulation Errors: If the simulation shows collisions or errors, review the toolpath and model orientation. Make necessary adjustments to avoid these issues.
- Post-Processing Errors: Ensure the selected post-processor is compatible with your CNC machine and that all settings are correctly configured.
Conclusion
Creating a new project in PowerMill Ultimate involves a systematic approach to ensure efficient and accurate CNC machining. By following the steps outlined in this guide, you can set up your workspace, import your models, define your machining strategies, and generate the necessary G-code for your CNC machine. Regularly saving and backing up your project, along with maintaining good documentation and continuously improving your skills, will contribute to successful and optimized machining projects.