How to Create and Manage Classes in QuickBooks
Introduction
QuickBooks is a versatile accounting software widely used by businesses of all sizes to manage their financial transactions and reports. One of the powerful features of QuickBooks is the ability to create and manage classes. Classes in QuickBooks are used to categorize and track income, expenses, and other financial data by department, location, project, or any other segment that makes sense for your business. This article provides a comprehensive guide on how to create and manage classes in QuickBooks, ensuring that your financial reporting is as detailed and insightful as possible.
Understanding Classes in QuickBooks
Before diving into the process of creating and managing classes, it’s essential to understand what classes are and how they can benefit your business:
- Classes: Think of classes as tags or labels that you can apply to transactions to group them according to specific criteria. For instance, if you have multiple departments within your business, you can create a class for each department. This allows you to run reports that show the financial performance of each department individually.
- Benefits: Using classes can provide detailed insights into different segments of your business, helping you make informed decisions. You can analyze income and expenses by class, create budgets, and track profitability.
Setting Up Classes in QuickBooks
Step 1: Enable Class Tracking
Before you can start using classes, you need to enable the class tracking feature in QuickBooks. Here’s how to do it:
- Open QuickBooks: Launch your QuickBooks application.
- Navigate to Preferences: Go to
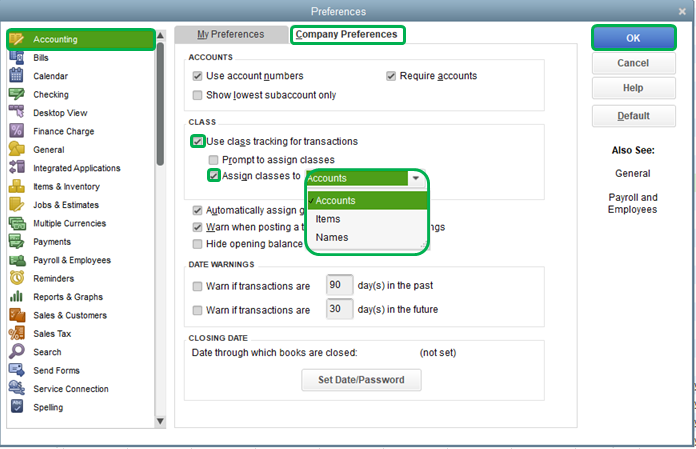
Editin the menu bar and selectPreferences. - Accounting Preferences: In the left panel, click on
Accounting, then go to theCompany Preferencestab. - Enable Class Tracking: Check the box that says
Use class tracking for transactions. - Prompt to Assign Classes: Optionally, you can also check the box that says
Prompt to assign classesif you want QuickBooks to remind you to assign classes to transactions.
Step 2: Create Classes
Once class tracking is enabled, you can create the classes you need. Here’s the process:
- Open the Class List: Go to
Listsin the menu bar and selectClass List. - New Class: In the Class List window, click on the
Classbutton at the bottom and selectNew. - Enter Class Information: Enter the name of the class and any additional information you want to include. For example, if you’re creating a class for a department, you might name it
Sales Department. - Save: Click
OKto save the new class.
Repeat this process for each class you need to create.
Assigning Classes to Transactions
Now that you have your classes set up, you can start assigning them to transactions. Here’s how you can do it for different types of transactions:
Sales Transactions
- Create a Sales Transaction: When creating an invoice, sales receipt, or any other sales transaction, you will see a
Classfield. - Assign a Class: Select the appropriate class from the dropdown menu. If the transaction applies to multiple classes, you can assign a class to each line item individually.
Expense Transactions
- Create an Expense Transaction: When recording an expense, check, or bill, locate the
Classfield. - Assign a Class: Select the appropriate class from the dropdown menu. Similar to sales transactions, you can assign classes to each line item if needed.
Journal Entries
- Create a Journal Entry: Go to
Companyin the menu bar and selectMake General Journal Entries. - Assign Classes: In the journal entry form, you can assign a class to each line item.
Managing and Editing Classes
Over time, you may need to edit or manage your existing classes. QuickBooks makes it easy to do so:
Editing a Class
- Open the Class List: Go to
Listsin the menu bar and selectClass List. - Select the Class: Double-click on the class you want to edit.
- Edit Information: Make the necessary changes to the class name or any other information.
- Save: Click
OKto save the changes.
Merging Classes
If you have duplicate or similar classes, you can merge them:
- Open the Class List: Go to
Listsand selectClass List. - Select the Class to Merge: Double-click on the class you want to keep.
- Rename the Class: Change the class name to the exact name of the class you want to merge it with.
- Save: Click
OK. QuickBooks will prompt you to confirm the merge.
Deleting a Class
If you no longer need a class, you can delete it:
- Open the Class List: Go to
Listsand selectClass List. - Select the Class: Right-click on the class you want to delete.
- Delete: Select
Delete Class. Note that QuickBooks will not allow you to delete a class if it has been used in any transactions. In such cases, you can make the class inactive instead.
Running Reports by Class
One of the significant advantages of using classes is the ability to run detailed reports. QuickBooks offers several reports that allow you to analyze your financial data by class:
Profit & Loss by Class
- Open Reports: Go to
Reportsin the menu bar. - Company & Financial: Select
Company & Financial, thenProfit & Loss by Class. - Customize Report: Customize the date range and other settings as needed.
- Run Report: Click
Run Reportto see the profit and loss statement broken down by class.
Class List Report
- Open Reports: Go to
Reportsin the menu bar. - Lists: Select
Lists, thenClass List. - Run Report: This report will show you all the classes you have created.
Transaction Detail by Class
- Open Reports: Go to
Reportsin the menu bar. - Custom Reports: Select
Custom Reports, thenTransaction Detail by Class. - Customize Report: Customize the report settings as needed.
- Run Report: Click
Run Reportto see a detailed list of transactions categorized by class.
Best Practices for Managing Classes
To ensure that you get the most out of using classes in QuickBooks, follow these best practices:
- Consistent Naming Conventions: Use clear and consistent naming conventions for your classes to avoid confusion.
- Regular Review: Periodically review your classes to ensure they still meet your reporting needs. Make adjustments as necessary.
- Train Your Team: If multiple people are entering transactions, make sure everyone understands how to use classes correctly.
- Use Subclasses: For more detailed tracking, consider using subclasses. For example, you can have a main class for
Marketingand subclasses forDigital Marketing,Print Advertising, etc. - Monitor Unassigned Transactions: Regularly check for transactions that have not been assigned a class to ensure your reports are accurate.
Troubleshooting Common Issues
While using classes in QuickBooks is generally straightforward, you might encounter some common issues:
Missing Class Field
If the class field is not appearing in your transaction forms:
- Check Preferences: Ensure that class tracking is enabled in your preferences.
- Form Customization: Make sure the class field is included in your customized forms.
Inactive Classes in Reports
If inactive classes are still appearing in your reports:
- Report Filters: Adjust the report filters to exclude inactive classes.
Incorrect Class Totals
If class totals in your reports do not seem accurate:
- Check Transactions: Review transactions to ensure they have been assigned the correct class.
- Rebuild Data: Use the
Rebuild Datautility in QuickBooks to fix any data integrity issues.
Conclusion
Creating and managing classes in QuickBooks is a powerful way to gain deeper insights into your business’s financial performance. By categorizing transactions by department, location, project, or any other segment, you can run detailed reports that help you make informed decisions. Follow the steps outlined in this guide to set up and use classes effectively, and implement best practices to ensure accurate and meaningful financial reporting. With proper class management, you can unlock the full potential of QuickBooks and drive your business towards greater success.


