How to Create and Manage Views in BricsCAD
Creating and managing views in BricsCAD is crucial for enhancing productivity, ensuring precision, and streamlining workflows in both 2D and 3D design projects. This comprehensive guide explores various techniques and best practices for effectively creating and managing views in BricsCAD, from basic setup to advanced manipulation.
Table of Contents
- Introduction to Views in BricsCAD
- Importance of Views
- Types of Views
- Creating Views
- Setting Up Basic Views
- Using Named Views
- Working with Viewports
- Managing Views
- Navigating Views
- Saving and Restoring Views
- Adjusting View Properties
- Advanced View Techniques
- 3D Views and Perspective
- Section and Detail Views
- Annotative Views
- Best Practices for View Management
- Organizing Views
- Layer Management
- View Templates
- Troubleshooting Common Issues
- Resolving View Corruptions
- Handling Performance Issues
- Dealing with Display Problems
- Conclusion
1. Introduction to Views in BricsCAD
Importance of Views
Views are essential in BricsCAD as they allow users to visualize, navigate, and manipulate different parts of their design efficiently. Properly managing views can significantly enhance the workflow, making it easier to switch between different aspects of the design and ensuring accuracy in detailing and presentations.
Types of Views
- 2D Views: Primarily used in drafting and layout creation, providing a flat representation of the design.
- 3D Views: Used for visualizing the model in three dimensions, offering perspectives and isometric views.
- Named Views: Custom views saved with specific settings for quick access and reuse.
- Viewports: Windows within layout tabs that display different views of the model space.
2. Creating Views
Setting Up Basic Views
- Zoom and Pan: Use the scroll wheel to zoom in and out and the middle mouse button to pan across the drawing.
- Orbit (3D): Use the
ORBITcommand or hold Shift + Middle Mouse Button to orbit around a 3D model. - Preset Views: Access preset views (Top, Front, Left, etc.) from the ViewCube or the View menu.
Using Named Views
Named views allow you to save specific views for easy recall:
- Define Named View:
- Navigate to the desired view using zoom, pan, or orbit.
- Type
VIEWin the command line and press Enter. - Click on
New, give the view a name, and clickOK.
- Access Named Views:
- Open the View Manager from the View menu.
- Select the named view and click
Set Current.
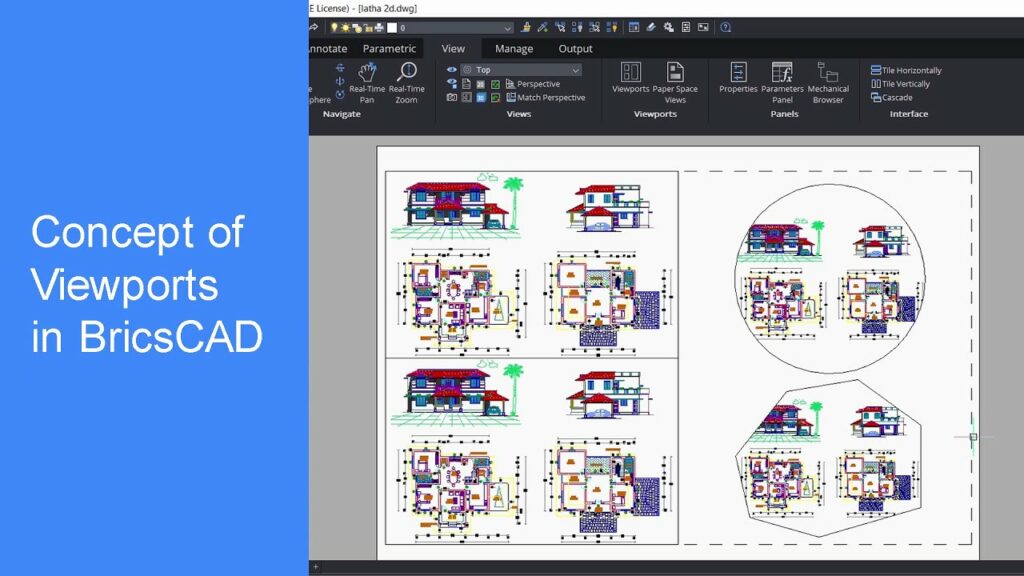
Working with Viewports
Viewports are essential for creating layouts and presentations:
- Create Viewport:
- Switch to a layout tab.
- Use the
MVcommand to create a new viewport. - Specify the viewport size and position in the layout.
- Adjust Viewport:
- Double-click inside the viewport to activate it.
- Use zoom and pan to adjust the view.
- Double-click outside the viewport to deactivate it.
3. Managing Views
Navigating Views
Efficient navigation is key to managing views:
- ViewCube: Use the ViewCube for quick access to standard views (Top, Front, Isometric, etc.).
- Navigation Bar: Utilize the navigation bar for tools like Pan, Zoom, Orbit, and more.
- Keyboard Shortcuts: Learn and use keyboard shortcuts for common navigation commands (e.g., Z for Zoom, P for Pan).
Saving and Restoring Views
Saving views ensures you can quickly return to specific points in your design:
- Save View:
- Navigate to the desired view.
- Use the
VIEWcommand to open the View Manager. - Click
New, name the view, and clickOK.
- Restore View:
- Open the View Manager.
- Select the view from the list and click
Set Current.
Adjusting View Properties
View properties determine how the view is displayed and rendered:
- View Settings:
- Access view settings from the Properties palette.
- Adjust properties like visual style, background color, and view direction.
- Visual Styles:
- Use different visual styles (Wireframe, Realistic, Hidden, etc.) to display the model.
- Access visual styles from the View menu or the Properties palette.
4. Advanced View Techniques
3D Views and Perspective
Creating and managing 3D views is crucial for visualizing designs in three dimensions:
- Isometric Views:
- Use the
ISOcommand to switch to isometric views. - Adjust the view angle for better visualization.
- Use the
- Perspective View:
- Use the
DVIEWcommand to create a perspective view. - Adjust the perspective settings to achieve the desired effect.
- Use the
Section and Detail Views
Section and detail views provide detailed insights into specific parts of the design:
- Create Section View:
- Use the
SECTIONPLANEcommand to create a section plane. - Adjust the section plane position and direction.
- Generate a section view from the section plane.
- Use the
- Create Detail View:
- Use the
DETAILVIEWcommand to create a detailed view. - Specify the area to be detailed and adjust the view settings.
- Use the
Annotative Views
Annotative views ensure that annotations scale correctly in different views and layouts:
- Create Annotative Objects:
- Set the annotative property for text, dimensions, and other annotations.
- Adjust the annotative scale to match the view scale.
- Manage Annotative Scales:
- Use the
SCALELISTEDITcommand to manage the list of annotative scales. - Apply the appropriate scale to ensure annotations display correctly in different views.
- Use the
5. Best Practices for View Management
Organizing Views
Effective organization of views enhances productivity:
- Consistent Naming: Use consistent and descriptive names for views.
- Group Views: Group related views for easy access and management.
- View Hierarchy: Establish a hierarchy for complex projects with multiple views.
Layer Management
Managing layers is crucial for controlling visibility and properties in different views:
- Layer States: Use layer states to save and restore layer configurations for specific views.
- Layer Overrides: Apply layer overrides in viewports to control layer properties independently from the model space.
View Templates
View templates standardize view settings across projects:
- Create View Template:
- Define the desired view settings (visual style, layer properties, etc.).
- Save the settings as a view template.
- Apply View Template:
- Apply the view template to other views to maintain consistency.
6. Troubleshooting Common Issues
Resolving View Corruptions
View corruptions can occur due to various reasons:
- Reset View: Use the
VIEWcommand to reset to a standard view if the current view is corrupted. - Audit and Recover: Run the
AUDITandRECOVERcommands to check and fix drawing errors.
Handling Performance Issues
Large projects and complex views can impact performance:
- Optimize Views: Simplify views by turning off unnecessary layers and reducing the level of detail.
- Hardware Upgrade: Ensure your hardware meets the recommended specifications for BricsCAD.
Dealing with Display Problems
Display problems can affect the visualization of views:
- Update Drivers: Ensure your graphics drivers are up to date.
- Adjust Settings: Modify display settings in BricsCAD to improve performance and visualization.
7. Conclusion
Creating and managing views in BricsCAD is essential for efficient design workflows, accurate visualization, and effective collaboration. By understanding the basics, mastering advanced techniques, and following best practices, you can optimize your use of views to achieve superior results in your design projects. Whether you are working on simple 2D drafts or complex 3D models, the insights provided in this guide will help you harness the full potential of BricsCAD’s view management capabilities.