How to Customize the User Interface in PowerDirector
PowerDirector is a powerful video editing software widely used by both amateur and professional video editors. One of its many strengths is its highly customizable user interface (UI), which allows users to tailor the workspace to fit their specific needs and preferences. This guide will walk you through the various ways you can customize the user interface in PowerDirector to optimize your editing workflow.
1. Understanding the User Interface
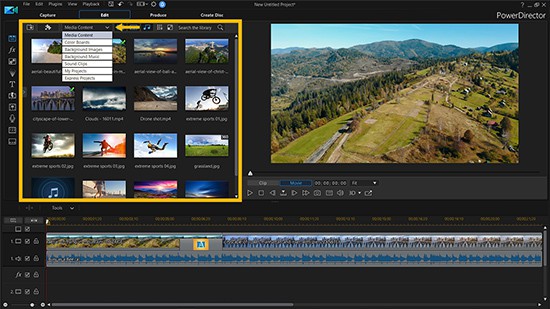
Before diving into customization, it’s essential to understand the different components of PowerDirector’s user interface. The main elements include:
- Timeline: Where you arrange and edit your video clips, audio tracks, and effects.
- Preview Window: Allows you to view your project as you edit.
- Media Library: Stores all your imported media, including video clips, images, and audio files.
- Toolbar: Contains tools and shortcuts for various editing functions.
- Settings and Preferences: Access to customize the behavior and appearance of the software.
2. Customizing the Workspace Layout
a. Resizing Panels
Each panel in PowerDirector can be resized to better suit your workflow. To resize a panel, hover over the edge of the panel until the cursor changes to a resize icon, then click and drag to adjust the size.
b. Moving Panels
You can move panels to different areas of the screen to create a layout that works best for you. Click and drag the title bar of a panel to move it to a new location. PowerDirector will highlight possible drop zones where you can dock the panel.
c. Undocking Panels
For even greater flexibility, you can undock panels and move them to a secondary monitor. To undock a panel, click the “Undock” button (usually a small square icon with an arrow) located on the panel’s title bar. To redock a panel, click the “Redock” button.
3. Customizing the Timeline
a. Track Height and View Options
The timeline is the heart of PowerDirector, and customizing it can significantly improve your editing efficiency. You can adjust the height of individual tracks by clicking and dragging the top or bottom edge of a track. Additionally, right-clicking on a track will give you options to show or hide specific elements, such as waveforms or keyframes.
b. Track Order and Naming
Reordering tracks can help keep your timeline organized. To move a track, click and drag its name to a new position. You can also rename tracks by double-clicking on the track name and entering a new name. This is particularly useful for complex projects with many tracks.
c. Timeline Display Settings
Access the timeline display settings by clicking on the gear icon in the lower-left corner of the timeline panel. Here, you can adjust settings such as timecode display format, grid lines, and snapping behavior.
4. Customizing the Toolbar
The toolbar provides quick access to commonly used tools and functions. PowerDirector allows you to customize the toolbar to include only the tools you use most frequently.
a. Adding and Removing Tools
To customize the toolbar, right-click on it and select “Customize Toolbar.” A dialog box will appear, showing a list of available tools. You can add or remove tools by dragging them to or from the toolbar.
b. Rearranging Tools
Rearrange the tools on the toolbar by clicking and dragging them to new positions. This allows you to group related tools together for easier access.
5. Customizing the Media Library
The media library stores all your project assets, and organizing it can save you time during editing.
a. Creating Folders and Bins
Organize your media by creating folders and bins. Right-click in the media library and select “New Folder” or “New Bin.” You can then drag and drop media files into these folders or bins to keep everything organized.
b. Sorting and Filtering
PowerDirector offers several options for sorting and filtering your media. Click on the “Sort” button in the media library to sort your files by name, date, type, or size. Use the “Filter” button to display only specific types of media, such as video files, audio files, or images.
6. Customizing Keyboard Shortcuts
Keyboard shortcuts can significantly speed up your editing process. PowerDirector allows you to customize these shortcuts to suit your workflow.
a. Accessing Keyboard Shortcuts
To customize keyboard shortcuts, go to the “Preferences” menu and select “Keyboard Shortcuts.” A dialog box will appear, showing a list of all available shortcuts.
b. Editing Shortcuts
To edit a shortcut, click on the current shortcut and press the new key combination you want to assign. If the new combination is already in use, PowerDirector will prompt you to choose a different combination or overwrite the existing one.
7. Customizing the Preview Window
The preview window is essential for reviewing your edits, and customizing it can enhance your viewing experience.
a. Playback Quality
Adjust the playback quality to match your computer’s performance capabilities. Lowering the playback quality can result in smoother playback, especially when working with high-resolution footage. Click on the quality button (usually a gear icon) in the preview window and select the desired quality setting.
b. Display Settings
Customize the display settings of the preview window by clicking on the settings button (usually a gear icon). Here, you can adjust settings such as aspect ratio, safe zone display, and background color.
8. Saving and Loading Custom Workspaces
After spending time customizing your workspace, you can save it for future use. This is especially useful if you work on different types of projects that require different layouts.
a. Saving a Workspace
To save your current workspace, go to the “Window” menu and select “Save Workspace.” Enter a name for your workspace and click “Save.” Your workspace configuration will be saved and can be loaded at any time.
b. Loading a Workspace
To load a previously saved workspace, go to the “Window” menu and select “Load Workspace.” Choose the desired workspace from the list and click “Load.” PowerDirector will rearrange the panels and settings to match the saved configuration.
9. Customizing the Color Scheme
PowerDirector allows you to change the color scheme of the user interface to reduce eye strain and match your personal preferences.
a. Accessing Color Scheme Settings
To change the color scheme, go to the “Preferences” menu and select “General.” In the “Color Scheme” section, choose from the available options, such as dark, light, or custom.
b. Creating a Custom Color Scheme
If you prefer a unique color scheme, select “Custom” and use the color pickers to choose your desired colors for various UI elements, such as the background, text, and highlights.
10. Customizing the Startup Behavior
You can customize how PowerDirector behaves when you start the application.
a. Setting the Default Workspace
If you have a preferred workspace configuration, you can set it as the default workspace to be loaded every time you start PowerDirector. Go to the “Preferences” menu, select “General,” and choose your preferred workspace from the “Default Workspace” dropdown menu.
b. Customizing the Welcome Screen
PowerDirector displays a welcome screen when you start the application. You can customize this screen to show recent projects, tutorials, or other useful information. Go to the “Preferences” menu and select “General.” In the “Startup” section, customize the welcome screen settings to your liking.
11. Using Customizable Templates
PowerDirector offers customizable templates for various aspects of your project, such as titles, transitions, and effects.
a. Creating and Saving Templates
To create a custom template, design your element (e.g., title, transition) in the editor. Once you’re satisfied with your design, right-click on the element and select “Save as Template.” Give your template a name and click “Save.” Your custom template will be available for use in future projects.
b. Importing and Exporting Templates
You can import and export templates to share with other PowerDirector users or use on different devices. To export a template, right-click on it in the library and select “Export.” Choose a location to save the template file. To import a template, go to the “File” menu, select “Import,” and choose “Import Template.”
Conclusion
Customizing the user interface in PowerDirector can greatly enhance your editing experience by creating a workspace that fits your specific needs and preferences. By adjusting the layout, timeline, toolbar, media library, keyboard shortcuts, preview window, color scheme, startup behavior, and using customizable templates, you can streamline your workflow and make the editing process more efficient and enjoyable. Take the time to experiment with different configurations and find what works best for you. Happy editing!