How to import media files in PowerDirector
Importing media files into PowerDirector is a fundamental step in creating video projects, allowing users to compile various types of media such as videos, images, and audio files into a cohesive project. This article will provide an in-depth guide on how to import media files into PowerDirector, covering different methods, file types supported, tips for organizing media, troubleshooting common issues, and maximizing efficiency during the import process.
Introduction
PowerDirector, developed by CyberLink, is a popular video editing software known for its user-friendly interface and powerful editing tools. Whether you are a beginner or an experienced editor, understanding how to import media files efficiently is crucial for a smooth editing workflow. This comprehensive guide will walk you through the various aspects of importing media into PowerDirector, ensuring you can start your projects with ease.
Supported Media File Types
PowerDirector supports a wide range of media file types, including:
Video Formats
- MP4
- AVI
- MOV
- WMV
- MKV
- MPEG-2
- FLV
- AVCHD
- HEVC (H.265)
Audio Formats
- MP3
- WAV
- AAC
- FLAC
- WMA
- M4A
Image Formats
- JPEG
- PNG
- BMP
- GIF
- TIFF
Understanding the supported file types ensures that your media will be compatible with PowerDirector, preventing any issues during the import process.
Methods of Importing Media Files
Method 1: Using the Media Room
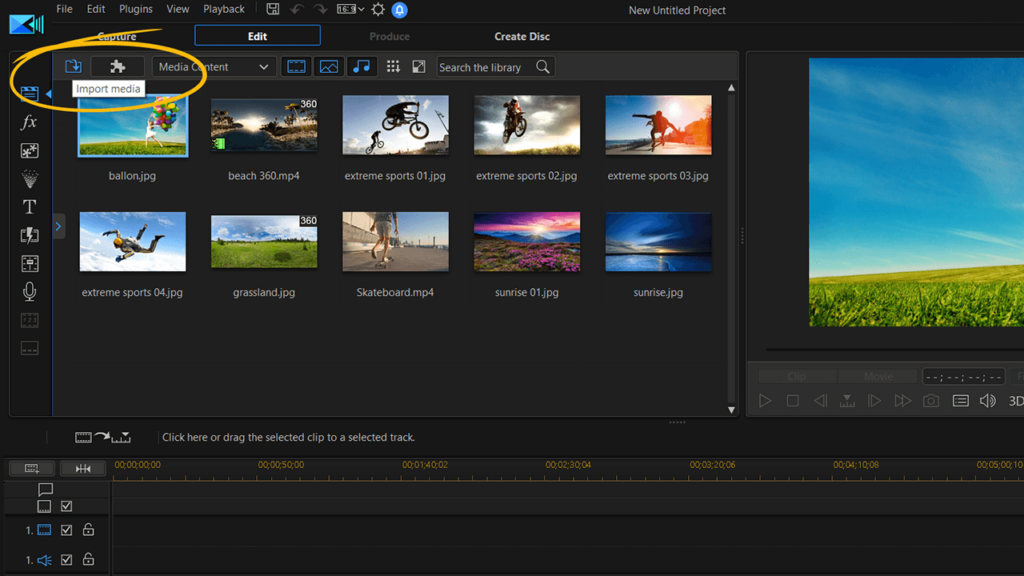
The Media Room is the primary interface in PowerDirector for managing and importing media files. Here’s a step-by-step guide:
- Open PowerDirector: Launch PowerDirector and open the project where you want to import media files.
- Access the Media Room: Click on the “Media Room” icon, usually located in the top left corner of the screen.
- Import Media Files:
- Click on the “Import Media” button.
- Choose “Import Media Files” to import individual files, or “Import Media Folder” to import an entire folder of media.
- Select Files: Browse your computer’s directories to select the media files you want to import. Hold down the “Ctrl” key to select multiple files.
- Open Files: Click “Open” to import the selected files into the Media Room.
Method 2: Drag and Drop
A quick and easy method to import media files is using the drag-and-drop feature:
- Open PowerDirector: Ensure PowerDirector is open and your project is loaded.
- Locate Media Files: Open your file explorer (Windows) or Finder (Mac) and navigate to the media files you wish to import.
- Drag and Drop: Select the files and drag them directly into the Media Room or onto the timeline.
Method 3: Capture from Devices
PowerDirector allows you to capture media directly from devices such as cameras, webcams, and screen recordings:
- Open PowerDirector: Start PowerDirector and open your project.
- Capture Media: Click on the “Capture” button, usually represented by a camera icon.
- Select Device: Choose the device from which you want to capture media (e.g., webcam, screen, microphone).
- Start Capture: Follow the on-screen instructions to start capturing media. The captured media will be automatically imported into the Media Room.
Method 4: Using the Import Media Folder
This method is particularly useful when you have organized your media into folders:
- Open PowerDirector: Launch the software and open your project.
- Media Room: Navigate to the Media Room.
- Import Folder: Click on the “Import Media” button and select “Import Media Folder.”
- Select Folder: Browse and select the folder containing your media files.
- Import: Click “OK” to import all media files within the selected folder.
Tips for Organizing Media
Efficiently organizing your media files can save time and streamline your editing process. Here are some tips:
Create Project Folders
Organize your media files into project-specific folders on your computer. For example:
- Project_Name/Video
- Project_Name/Audio
- Project_Name/Images
Use Descriptive File Names
Rename your media files with descriptive names to easily identify them. For example:
- Interview_John_Doe.mp4
- Background_Music.mp3
- Logo.png
Utilize PowerDirector’s Library Management
Use PowerDirector’s media library features to organize and manage imported files:
- Tags: Assign tags to media files for easy searching.
- Folders: Create and organize folders within the Media Room.
- Search: Utilize the search function to quickly locate specific files.
Troubleshooting Common Issues
Unsupported File Formats
If a file cannot be imported, check if it is in a supported format. Convert unsupported files to a compatible format using a file conversion tool.
Large File Sizes
Large media files can cause slow import times or performance issues. Consider compressing files or using proxy files to improve performance.
Missing Codecs
If PowerDirector cannot read a file, it may be due to missing codecs. Ensure your system has the necessary codecs installed. Tools like K-Lite Codec Pack can be helpful.
File Corruption
Corrupted files may not import correctly. Check the integrity of your media files and use file repair tools if necessary.
Maximizing Efficiency During Import
Batch Import
Import multiple files at once by selecting multiple files or entire folders, saving time compared to importing files individually.
Use High-Performance Hardware
Ensure your computer meets PowerDirector’s system requirements and consider upgrading hardware components (e.g., SSDs, RAM) for better performance.
Organize Before Importing
Organize your media files into folders and rename them appropriately before importing into PowerDirector to streamline the editing process.
Utilize Proxy Files
For high-resolution media, use proxy files (lower resolution copies) to improve editing performance. PowerDirector allows you to switch between original and proxy files seamlessly.
Keep Software Updated
Ensure you are using the latest version of PowerDirector to benefit from performance improvements and bug fixes.
Conclusion
Importing media files into PowerDirector is a fundamental step that sets the stage for your video editing projects. By understanding the different methods of importing media, organizing your files efficiently, and troubleshooting common issues, you can streamline your workflow and focus on the creative aspects of video editing. PowerDirector’s robust features and user-friendly interface make it an excellent choice for editors of all skill levels, and mastering the import process is the first step toward creating compelling and professional video content.