How to Manage Accounts Receivable in QuickBooks: A Comprehensive Guide
Managing accounts receivable (AR) is crucial for maintaining healthy cash flow and ensuring the financial stability of any business. QuickBooks, a leading accounting software, offers a robust set of tools for managing AR effectively. This comprehensive guide will walk you through the process of setting up, managing, and optimizing your accounts receivable in QuickBooks, ensuring that you can efficiently track and collect payments from your customers.
Why Manage Accounts Receivable in QuickBooks?
Proper management of accounts receivable is essential for several reasons:
- Cash Flow Management: Timely collection of receivables ensures a steady cash flow, which is vital for meeting operational expenses and investing in growth.
- Financial Accuracy: Accurate tracking of receivables helps maintain precise financial records, which is crucial for reporting and analysis.
- Customer Relationships: Effective AR management improves customer relationships by ensuring clear and timely communication regarding invoices and payments.
- Efficiency: Automating AR processes in QuickBooks saves time and reduces the risk of errors, enhancing overall efficiency.
Setting Up Accounts Receivable in QuickBooks
Before managing your accounts receivable, you need to set up the necessary accounts and preferences in QuickBooks.
Step 1: Set Up Customer Accounts
- Open QuickBooks: Launch QuickBooks and sign in to your account.
- Navigate to Customer Center: Go to the “Customers” menu and select “Customer Center.”
- Add New Customers: Click “New Customer & Job” and select “New Customer.” Enter the customer’s details, including name, contact information, billing address, and payment terms.
- Save Customer Information: Click “OK” to save the customer details.
Step 2: Set Up Products and Services
- Navigate to Item List: Go to the “Lists” menu and select “Item List.”
- Add New Items: Click “Item” at the bottom of the list and select “New.” Choose the item type (e.g., service, inventory part, non-inventory part).
- Enter Item Details: Enter the item name, description, rate, and account to track sales. For inventory items, also enter purchase information and inventory tracking details.
- Save Item Information: Click “OK” to save the item details.
Step 3: Configure Payment Terms
- Navigate to Payment Terms List: Go to the “Lists” menu and select “Customer & Vendor Profile Lists,” then “Terms List.”
- Add New Terms: Click “Terms” at the bottom of the list and select “New.” Enter the term name (e.g., Net 30) and specify the due date calculation method (e.g., days after invoice date).
- Save Payment Terms: Click “OK” to save the payment terms.
Creating and Managing Invoices
Invoices are central to managing accounts receivable. QuickBooks makes it easy to create, send, and track invoices.
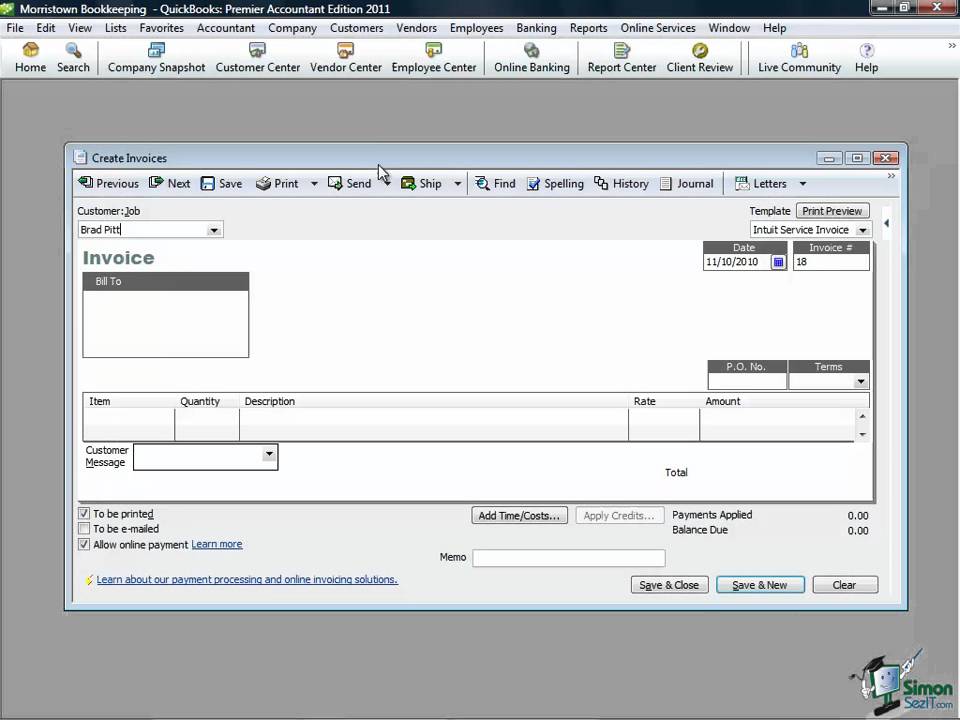
Creating an Invoice
- Open QuickBooks: Launch QuickBooks and sign in to your account.
- Navigate to Create Invoices: Go to the “Customers” menu and select “Create Invoices.”
- Select Customer: Choose the customer you are invoicing from the drop-down list.
- Enter Invoice Details: Fill in the invoice date, due date, and invoice number. Add items or services by selecting them from the item list. QuickBooks will automatically calculate the total amount.
- Customize Invoice: Customize the invoice with your logo and additional fields if necessary. You can use templates or create your own.
- Save and Send Invoice: Click “Save & Close” to save the invoice or “Save & Send” to email it directly to the customer.
Tracking and Managing Invoices
- Navigate to the Customer Center: Go to the “Customers” menu and select “Customer Center.”
- Review Open Invoices: In the Customer Center, you can view all open invoices. Click on a customer’s name to see their specific open invoices.
- Send Reminders: For overdue invoices, select the invoice and click “Send Reminder.” Customize the reminder email if necessary.
- Record Payments: When a payment is received, go to the “Customers” menu and select “Receive Payments.” Choose the customer, select the invoice, and enter the payment details. Click “Save & Close” to record the payment.
Managing Customer Payments
Efficiently managing customer payments ensures timely cash flow and minimizes outstanding receivables.
Recording Customer Payments
- Open QuickBooks: Launch QuickBooks and sign in to your account.
- Navigate to Receive Payments: Go to the “Customers” menu and select “Receive Payments.”
- Select Customer: Choose the customer making the payment.
- Enter Payment Details: Select the invoices being paid, enter the payment amount, payment date, and payment method. You can also enter any discounts or credits applied.
- Save Payment: Click “Save & Close” to record the payment.
Applying Credits and Discounts
- Open QuickBooks: Launch QuickBooks and sign in to your account.
- Navigate to Receive Payments: Go to the “Customers” menu and select “Receive Payments.”
- Select Customer: Choose the customer receiving the credit or discount.
- Apply Credit or Discount: In the “Receive Payments” window, click “Discounts and Credits.” Select the credit or discount to apply and click “Done.”
- Save Changes: Click “Save & Close” to record the payment with the applied credit or discount.
Generating Accounts Receivable Reports
QuickBooks offers a variety of reports to help you monitor and manage your accounts receivable effectively.
Running Standard AR Reports
- Open QuickBooks: Launch QuickBooks and sign in to your account.
- Navigate to Reports: Go to the “Reports” menu and select “Customers & Receivables.”
- Select Report Type: Choose the report you want to run, such as “A/R Aging Summary,” “Open Invoices,” or “Customer Balance Detail.”
- Customize Report: Customize the report by setting the date range, adding filters, and selecting the desired columns.
- Generate Report: Click “Run Report” to generate the report. Review the information and make any necessary adjustments.
Customizing AR Reports
- Open QuickBooks: Launch QuickBooks and sign in to your account.
- Navigate to Reports: Go to the “Reports” menu and select “Customers & Receivables.”
- Select Report Type: Choose the report you want to run.
- Customize Report: Click “Customize Report” to open the customization window. Here, you can adjust the display settings, add or remove columns, and apply filters.
- Save Customization: Once you’ve customized the report to your liking, click “OK” to save the changes. You can also save the customized report for future use.
Automating Accounts Receivable Processes
Automating AR processes can save time and reduce errors, ensuring efficient and accurate management of receivables.
Setting Up Recurring Invoices
- Open QuickBooks: Launch QuickBooks and sign in to your account.
- Navigate to Create Invoices: Go to the “Customers” menu and select “Create Invoices.”
- Create a New Invoice: Enter the invoice details as you would for a regular invoice.
- Set Up Recurring Schedule: Click “Make Recurring” at the bottom of the invoice window. Set the recurrence schedule (e.g., daily, weekly, monthly), start date, and end date (if applicable).
- Save Recurring Invoice: Click “Save Template” to save the recurring invoice schedule.
Automating Payment Reminders
- Open QuickBooks: Launch QuickBooks and sign in to your account.
- Navigate to Reminders: Go to the “Edit” menu, select “Preferences,” then “Reminders.”
- Set Reminder Preferences: Choose the types of reminders you want to automate (e.g., overdue invoices, upcoming payments). Customize the reminder settings and frequency.
- Save Preferences: Click “OK” to save your reminder preferences.
Integrating with Third-Party AR Tools
There are numerous third-party tools available that can enhance your AR management capabilities. These tools often offer advanced features such as automated invoice processing, payment tracking, and detailed analytics. Some popular third-party AR tools include:
- Bill.com: Automates invoicing and payment processes, integrates seamlessly with QuickBooks.
- Fundbox: Provides credit lines based on your AR, helping improve cash flow.
- InvoiceSherpa: Automates invoice reminders and collections, integrates with QuickBooks.
To integrate a third-party tool:
- Choose a Tool: Select a tool that meets your AR management needs.
- Sign Up and Set Up: Sign up for the tool and follow the setup instructions.
- Connect to QuickBooks: Follow the tool’s instructions to connect it to your QuickBooks account.
- Configure Settings: Configure the tool’s settings to match your AR management preferences.
Best Practices for Managing Accounts Receivable in QuickBooks
To ensure efficient and accurate management of accounts receivable, follow these best practices:
- Regularly Update Customer Information: Keep customer contact information and payment terms up to date to avoid delays and errors.
- Set Clear Payment Terms: Establish clear payment terms and communicate them to your customers to ensure timely payments.
- Monitor AR Reports Regularly: Run AR reports regularly to monitor outstanding invoices and follow up on overdue payments.
- Automate Where Possible: Use automation to streamline invoicing, payment reminders, and report generation.
- Reconcile Accounts Regularly: Regularly reconcile your AR accounts to ensure accuracy and identify any discrepancies early.
- Follow Up on Overdue Invoices Promptly: Establish a routine for following up on overdue invoices to maintain healthy cash flow.
- Offer Multiple Payment Options: Provide customers with various payment options (e.g., credit card, ACH, checks) to facilitate timely payments.
- Maintain Clear Communication: Keep open lines of communication with your customers regarding their accounts and any issues that arise.
Troubleshooting Common AR Issues in QuickBooks
Despite careful management, you may encounter issues with accounts receivable in QuickBooks. Here are some common problems and their solutions:
- Invoice Not Showing as Paid: Ensure that the payment was recorded correctly and applied to the correct invoice. Check for duplicate payments or incorrect dates.
- Overdue Invoices: Run an A/R Aging Summary report to identify overdue invoices and follow up promptly with customers.
- Customer Payment Not Matching Invoice: Verify the payment details with the customer and ensure that any discrepancies are resolved. Adjust the payment amount or apply credits as necessary.
- Incorrect Customer Balances: Run a Customer Balance Detail report to identify discrepancies. Check for duplicate invoices, incorrect payments, or unapplied credits.
- Errors in AR Reports: Customize the report settings to ensure that all relevant data is included. Verify that the date ranges and filters are set correctly.
Conclusion
Managing accounts receivable in QuickBooks is essential for maintaining healthy cash flow and ensuring accurate financial records. By following the steps and best practices outlined in this guide, you can effectively set up, manage, and optimize your accounts receivable processes. Whether you’re creating and tracking invoices, recording payments, or generating AR reports, QuickBooks provides the tools and flexibility to meet your needs. Remember, regular monitoring and prompt follow-up are key to successful AR management, so make it a priority to stay on top of your accounts receivable to ensure your business’s financial health.


