How to Manage Multiple Company Files in QuickBooks
Managing multiple company files in QuickBooks can be a daunting task, but with the right approach, you can streamline the process and maintain accurate, organized financial records for each business entity. This comprehensive guide will walk you through the steps and best practices for managing multiple company files in QuickBooks.
1. Understanding Multiple Company Files
A. What are Company Files?
Company files in QuickBooks contain all the financial data for a specific business. Each file includes information on transactions, accounts, customers, vendors, employees, and more.
B. Why Manage Multiple Company Files?
There are several reasons why you might need to manage multiple company files:
- You own or manage multiple businesses.
- Your business has distinct divisions that require separate accounting records.
- You need to maintain historical data for different fiscal periods.
2. Setting Up Multiple Company Files
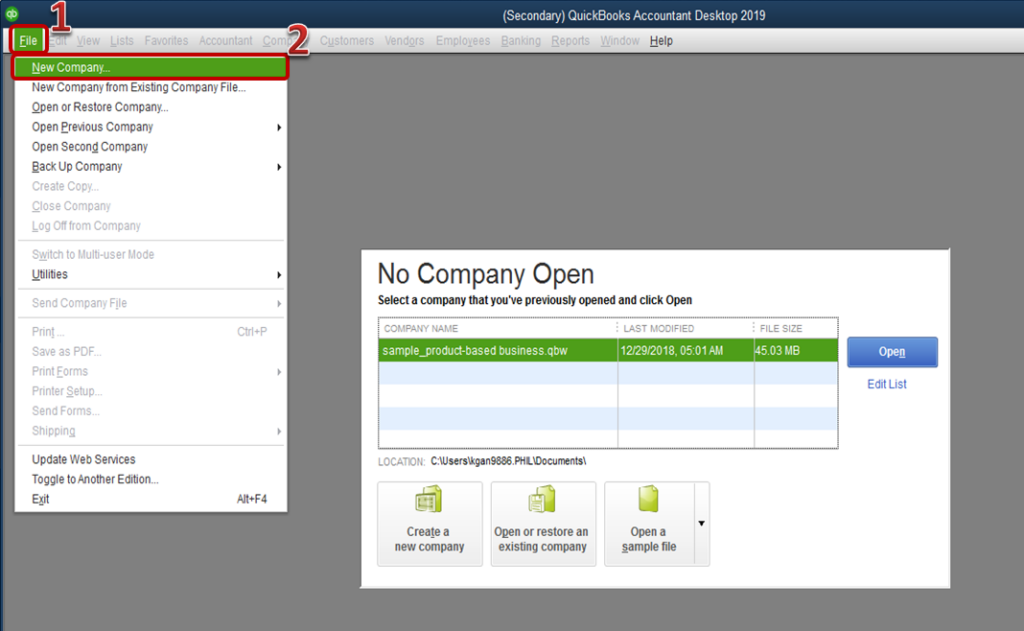
A. Creating a New Company File
1. Launch QuickBooks
Open QuickBooks and navigate to the “No Company Open” window. If you have an existing company file open, close it first.
2. Start the Setup Process
- Click on “Create a new company.”
- Choose “Detailed Start” for a comprehensive setup.
3. Enter Company Information
- Follow the prompts to enter your company’s name, industry, type of business, and fiscal year start date.
- Provide your contact information and other relevant details.
4. Customize Your Company File
- Customize the chart of accounts based on your industry.
- Set up tax information, including sales tax, payroll tax, and income tax settings.
B. Setting Up Additional Company Files
1. Repeat the Setup Process
- Follow the same steps as above to create additional company files for each business entity or division.
- Ensure that each company file has a unique name and is saved in a distinct location to avoid confusion.
2. Organize Company Files
- Create a dedicated folder for each company file on your computer or network drive.
- Use clear and descriptive names for each folder and company file to ensure easy identification.
3. Switching Between Company Files
A. Opening a Different Company File
1. Close the Current Company File
- Go to “File” > “Close Company” to close the currently open company file.
2. Open a New Company File
- Go to “File” > “Open or Restore Company.”
- Select “Open a company file” and click “Next.”
- Browse to the location of the company file you want to open and select it.
B. Using QuickBooks Desktop Enterprise
If you’re using QuickBooks Desktop Enterprise, you can open multiple company files simultaneously. This feature is not available in QuickBooks Pro or Premier.
1. Open Multiple Files
- Go to “File” > “Open Second Company.”
- Follow the prompts to open an additional company file.
2. Switching Between Open Files
- Use the “Window” menu to switch between the open company files.
4. Managing Users and Permissions
A. Setting Up Users
1. Add Users
- Go to “Company” > “Users” > “Set Up Users and Roles.”
- Click “New” to add a new user.
- Enter the user’s name and password.
2. Assign Roles
- Assign roles to each user based on their responsibilities.
- Customize the permissions for each role to control access to specific areas of QuickBooks.
B. Managing User Permissions
1. Review and Adjust Permissions
- Regularly review user roles and permissions to ensure they align with current responsibilities.
- Go to “Company” > “Users” > “Set Up Users and Roles” to make adjustments.
2. Limit Access to Sensitive Information
- Restrict access to sensitive financial data and settings to authorized users only.
- Use role-based permissions to control what each user can view and modify.
5. Consolidating Financial Data
A. Exporting and Importing Data
1. Export Data
- Go to “File” > “Utilities” > “Export” > “Lists to IIF Files.”
- Select the lists you want to export (e.g., chart of accounts, customers, vendors).
- Save the exported IIF file to your computer.
2. Import Data
- Open the destination company file.
- Go to “File” > “Utilities” > “Import” > “IIF Files.”
- Browse to the exported IIF file and import the data.
B. Using Excel for Consolidation
1. Export Reports to Excel
- Generate financial reports from each company file.
- Go to “Reports” > “Company & Financial” > select the desired report.
- Click “Excel” to export the report to an Excel spreadsheet.
2. Consolidate Data in Excel
- Open the exported reports in Excel.
- Use Excel formulas and functions to consolidate data from multiple company files into a single spreadsheet.
6. Managing Sales Tax for Multiple Companies
A. Setting Up Sales Tax
1. Enable Sales Tax
- Go to “Edit” > “Preferences.”
- Select “Sales Tax” and click “Company Preferences.”
- Choose “Yes” to turn on sales tax.
2. Set Up Sales Tax Items
- Go to “Lists” > “Item List.”
- Click “Item” > “New.”
- Select “Sales Tax Item” or “Sales Tax Group.”
- Enter the sales tax name, description, and rate.
B. Applying Sales Tax
1. Assign Sales Tax Codes to Customers
- Go to “Customers” > “Customer Center.”
- Select a customer and click “Edit.”
- Under “Additional Info,” choose the appropriate sales tax code.
2. Sales Tax Reporting
- Generate the “Sales Tax Liability” report for each company file.
- Go to “Reports” > “Vendors & Payables” > “Sales Tax Liability.”
- Review the report and prepare sales tax returns for each company.
7. Payroll Management Across Multiple Companies
A. Setting Up Payroll
1. Enable Payroll
- Go to “Employees” > “Payroll Center.”
- Choose “Get Started with Payroll” and select a payroll service plan.
2. Set Up Payroll Items
- Go to “Lists” > “Payroll Item List.”
- Click “Payroll Item” > “New.”
- Follow the Payroll Item Setup Wizard to create payroll items for wages, taxes, and deductions.
B. Processing Payroll
1. Enter Employee Information
- Go to “Employees” > “Employee Center.”
- Click “New Employee” and enter employee details.
- Under the “Payroll Info” tab, assign payroll items and tax information.
2. Run Payroll
- Go to “Employees” > “Pay Employees.”
- Follow the prompts to run payroll for each company file.
C. Managing Payroll Taxes
1. Tax Tables
- Ensure your payroll tax tables are up to date. QuickBooks updates these automatically with an active payroll subscription.
2. Filing and Payments
- Go to “Employees” > “Payroll Center.”
- Use the “Pay Liabilities” and “File Forms” tabs to manage payroll tax payments and filings.
8. Generating and Customizing Reports
A. Financial Reports
1. Profit and Loss Statement
- Go to “Reports” > “Company & Financial” > “Profit & Loss Standard.”
- Customize the date range and filters as needed.
2. Balance Sheet
- Go to “Reports” > “Company & Financial” > “Balance Sheet Standard.”
- Review your assets, liabilities, and equity.
B. Tax Reports
1. Sales Tax Liability Report
- Go to “Reports” > “Vendors & Payables” > “Sales Tax Liability.”
- Customize the date range to view your sales tax liabilities.
2. Payroll Tax Reports
- Go to “Reports” > “Employees & Payroll.”
- Generate reports such as “Payroll Summary” and “Payroll Detail Review.”
C. Customizing Reports
1. Modify Report Settings
- Open the desired report and click “Customize Report.”
- Adjust the display, filters, and formatting options.
2. Save Customized Reports
- Click “Memorize” to save the customized report settings.
- Access memorized reports from the “Reports” menu.
9. Backing Up and Restoring Company Files
A. Regular Backups
1. Scheduled Backups
- Set up automatic backups to prevent data loss.
- Go to “File” > “Back Up Company” > “Create Local Backup.”
2. Cloud Backups
- Use QuickBooks Online Backup or another cloud service to store your backups securely.
B. Restoring Company Files
1. Locate Backup Files
- Identify the location of your backup files.
- Ensure you have access to the latest backup.
2. Restore from Backup
- Go to “File” > “Open or Restore Company.”
- Select “Restore a backup copy” and click “Next.”
- Choose “Local backup” or “Online backup” and follow the prompts to restore the file.
10. Best Practices for Managing Multiple Company Files
A. Regular Reconciliation
1. Monthly Reconciliation
- Reconcile your accounts monthly to ensure all transactions are recorded accurately.
- Go to “Banking” > “Reconcile” and follow the prompts.
2. Year-End Reconciliation
- Perform a thorough reconciliation at year-end to prepare for tax filing.
B. Consistent Naming Conventions
1. File Naming
- Use clear and consistent naming conventions for company files.
- Include the company name, year, and other relevant details in the file name.
2. Folder Organization
- Create dedicated folders for each company file.
- Use descriptive folder names to ensure easy identification.
C. Regular Reviews and Audits
1. Internal Audits
- Conduct regular internal audits to review financial data and ensure accuracy.
- Use the “Audit Trail” report to track changes and identify discrepancies.
2. External Audits
- Engage an external auditor to review your financial records periodically.
- Provide the auditor with access to the necessary company files and documentation.
11. Troubleshooting Common Issues
A. Company File Errors
1. Verify and Rebuild Data
- Go to “File” > “Utilities” > “Verify Data” to check for errors.
- If errors are found, use “Rebuild Data” to fix them.
2. File Corruption
- Restore from a recent backup if the company file is corrupted.
- Consider using QuickBooks File Doctor for additional troubleshooting.
B. Performance Issues
1. Optimize File Size
- Archive old transactions to reduce the file size.
- Go to “File” > “Utilities” > “Condense Data” to condense the file.
2. System Resources
- Ensure your system meets the recommended requirements for QuickBooks.
- Close other applications to free up system resources.
C. User Access Issues
1. Password Reset
- Go to “Company” > “Users” > “Set Up Users and Roles.”
- Select the user and click “Edit” to reset the password.
2. User Permissions
- Review and adjust user roles and permissions as needed.
- Ensure users have the necessary access to perform their tasks.
By following these detailed steps and best practices, you can effectively manage multiple company files in QuickBooks, ensuring accurate financial records and efficient accounting operations for each business entity. Regular maintenance, updates, and collaboration with your accountant will help you manage your company files efficiently and avoid potential issues.


