How to Set Up QuickBooks for Taxes
Setting up QuickBooks for tax purposes can streamline your accounting processes and ensure compliance with tax regulations. This comprehensive guide will walk you through the steps necessary to set up QuickBooks for taxes, from initial configuration to generating tax reports.
1. Initial Setup
A. Installing QuickBooks
1. System Requirements
Before installing QuickBooks, ensure your system meets the necessary requirements:
- Operating System: Windows 10, macOS 10.15 (or later)
- Processor: 2.4 GHz minimum
- RAM: 4 GB minimum (8 GB recommended)
- Disk Space: 2.5 GB minimum
2. Download and Install
- Download the installer from the QuickBooks official website.
- Run the installer and follow the on-screen instructions.
- Activate your software with the provided license key.
B. Creating a Company File
1. Launch QuickBooks
Open QuickBooks and select “Create a new company.”
2. Easy Step Interview
- Follow the Easy Step Interview guide.
- Enter your business name, industry, and type of organization.
- Set your fiscal year start date.
3. Customize Settings
- Go to “Edit” > “Preferences” to customize settings for your business, such as accounting method (cash or accrual) and time tracking.
2. Chart of Accounts
A. Understanding the Chart of Accounts
The Chart of Accounts is a list of all accounts used by your business to record transactions. It includes assets, liabilities, income, expenses, and equity accounts.
B. Setting Up the Chart of Accounts
1. Default Accounts
QuickBooks provides default accounts based on your industry. Review and modify these as needed.
2. Adding Accounts
- Go to “Lists” > “Chart of Accounts.”
- Click “Account” > “New.”
- Select the type of account (e.g., income, expense).
- Enter the account name and details.
3. Organizing Accounts
- Use account numbers for easy identification.
- Create sub-accounts to categorize expenses (e.g., Utilities > Electricity, Water).
3. Sales Tax Setup
A. Configuring Sales Tax
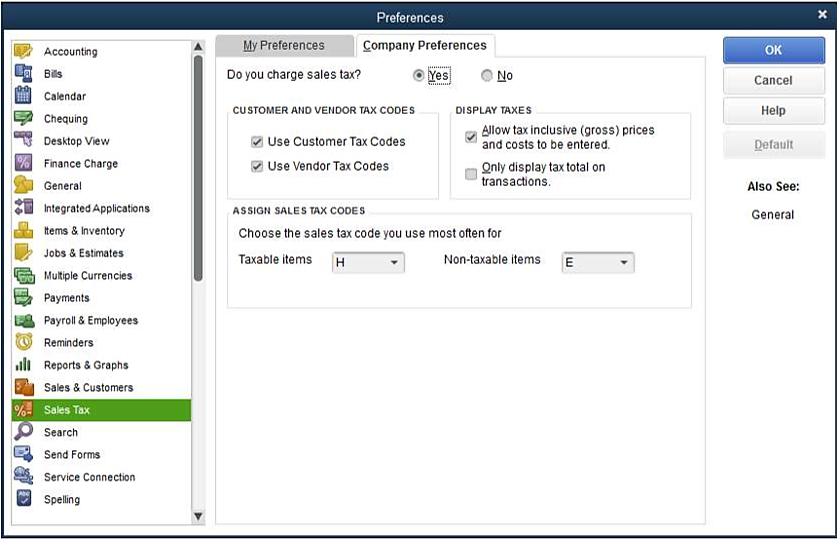
1. Enable Sales Tax
- Go to “Edit” > “Preferences.”
- Select “Sales Tax” and click “Company Preferences.”
- Choose “Yes” to turn on sales tax.
2. Set Up Sales Tax Items
- Go to “Lists” > “Item List.”
- Click “Item” > “New.”
- Select “Sales Tax Item” or “Sales Tax Group.”
- Enter the sales tax name, description, and rate.
3. Assign Sales Tax Codes
- Go to “Lists” > “Sales Tax Code List.”
- Click “Sales Tax Code” > “New.”
- Enter the code (e.g., TAX for taxable, NON for non-taxable).
- Assign the appropriate sales tax items to each code.
B. Applying Sales Tax to Transactions
1. Customers
- Go to “Customers” > “Customer Center.”
- Select a customer and click “Edit.”
- Under “Additional Info,” choose the appropriate sales tax code.
2. Invoices and Sales Receipts
- When creating an invoice or sales receipt, select the sales tax item from the drop-down menu.
- QuickBooks will automatically calculate the sales tax based on the items and the customer’s tax code.
4. Payroll Tax Setup
A. Configuring Payroll
1. Enable Payroll
- Go to “Employees” > “Payroll Center.”
- Choose “Get Started with Payroll” and select a payroll service plan.
2. Set Up Payroll Items
- Go to “Lists” > “Payroll Item List.”
- Click “Payroll Item” > “New.”
- Follow the Payroll Item Setup Wizard to create payroll items for wages, taxes, and deductions.
3. Employee Setup
- Go to “Employees” > “Employee Center.”
- Click “New Employee” and enter employee details.
- Under the “Payroll Info” tab, assign payroll items and tax information.
B. Managing Payroll Taxes
1. Tax Tables
- Ensure your payroll tax tables are up to date. QuickBooks updates these automatically with an active payroll subscription.
2. Filing and Payments
- Go to “Employees” > “Payroll Center.”
- Use the “Pay Liabilities” and “File Forms” tabs to manage payroll tax payments and filings.
5. Income Tax Preparation
A. Categorizing Income and Expenses
1. Use Classes and Locations
- Go to “Edit” > “Preferences.”
- Select “Accounting” and enable “Use class tracking” and “Use location tracking.”
- Categorize transactions by class (e.g., department) and location (e.g., store).
2. Assigning Categories
- When entering transactions, assign the appropriate class and location to each line item.
B. Generating Financial Reports
1. Profit and Loss Statement
- Go to “Reports” > “Company & Financial” > “Profit & Loss Standard.”
- Customize the date range and filters as needed.
2. Balance Sheet
- Go to “Reports” > “Company & Financial” > “Balance Sheet Standard.”
- Review your assets, liabilities, and equity.
3. Tax Preparation Reports
- Go to “Reports” > “Accountant & Taxes.”
- Generate reports such as “Income Tax Preparation” and “Income Tax Summary.”
6. Sales Tax Reporting
A. Generating Sales Tax Reports
1. Sales Tax Liability Report
- Go to “Reports” > “Vendors & Payables” > “Sales Tax Liability.”
- Customize the date range to view your sales tax liabilities.
2. Sales Tax Revenue Summary
- Go to “Reports” > “Vendors & Payables” > “Sales Tax Revenue Summary.”
- Review the total sales tax collected over a specified period.
B. Filing Sales Tax Returns
1. Prepare Sales Tax Return
- Use the Sales Tax Liability report to determine the amount of sales tax owed.
- Log in to your state’s tax filing portal and enter the necessary details.
2. Record Sales Tax Payment
- Go to “Vendors” > “Sales Tax” > “Pay Sales Tax.”
- Enter the payment details and print a check or record an electronic payment.
7. End-of-Year Tax Preparation
A. Reviewing and Adjusting Accounts
1. Reconcile Accounts
- Go to “Banking” > “Reconcile.”
- Reconcile your bank and credit card accounts to ensure all transactions are recorded accurately.
2. Review Financial Statements
- Generate and review your Profit and Loss Statement and Balance Sheet.
- Make any necessary adjustments or reclassifications.
B. Preparing for Your Accountant
1. Create an Accountant’s Copy
- Go to “File” > “Send Company File” > “Accountant’s Copy.”
- Follow the prompts to create and send an Accountant’s Copy of your QuickBooks file.
2. Provide Necessary Documents
- Gather supporting documents such as receipts, invoices, and bank statements.
- Provide your accountant with any additional information they may need.
8. Utilizing QuickBooks Tools for Tax Management
A. QuickBooks Tool Hub
1. Download and Install
- Download QuickBooks Tool Hub from the Intuit website.
- Install and open the tool.
2. Using Tools
- Access tools like the “Company File Issues,” “Program Problems,” and “Network Issues” to troubleshoot any issues that may affect your tax setup.
B. QuickBooks Online Accountant
1. Connecting with an Accountant
- Go to “My Accountant” in QuickBooks Online.
- Invite your accountant to access your QuickBooks file.
2. Collaborating on Tax Preparation
- Work with your accountant to review and adjust transactions, generate reports, and prepare tax returns.
9. Additional Tips and Best Practices
A. Regularly Update QuickBooks
1. Software Updates
- Check for software updates regularly to ensure you have the latest features and bug fixes.
- Go to “Help” > “Update QuickBooks Desktop” and follow the prompts.
2. Payroll and Tax Table Updates
- Ensure your payroll and tax tables are up to date. QuickBooks updates these automatically with an active subscription.
B. Back Up Your Data
1. Scheduled Backups
- Set up automatic backups to prevent data loss.
- Go to “File” > “Back Up Company” > “Create Local Backup.”
2. Cloud Backups
- Use QuickBooks Online Backup or another cloud service to store your backups securely.
C. Regular Reconciliation
1. Monthly Reconciliation
- Reconcile your accounts monthly to ensure all transactions are recorded accurately.
- Go to “Banking” > “Reconcile” and follow the prompts.
2. Year-End Reconciliation
- Perform a thorough reconciliation at year-end to prepare for tax filing.
10. Common Tax Issues and Troubleshooting
A. Incorrect Sales Tax Calculation
1. Review Sales Tax Setup
- Ensure sales tax items and codes are set up correctly.
- Go to “Lists” > “Item List” and “Sales Tax Code List.”
2. Verify Customer Tax Codes
- Check that customers have the correct tax codes assigned.
- Go to “Customers” > “Customer Center” and edit customer details.
B. Payroll Tax Issues
1. Update Payroll Items
- Ensure payroll items are set up and updated correctly.
- Go to “Lists” > “Payroll Item List” and review items.
2. Verify Employee Tax Information
- Check that employee tax information is accurate.
- Go to “Employees” > “Employee Center” and edit employee details.
C. Discrepancies in Financial Reports
1. Review Transactions
- Review and adjust any incorrect transactions.
- Go to “Reports” > “Accountant & Taxes” > “Audit Trail” to see a history of changes.
2. Rebuild Data File
- Use the “Verify Data” and “Rebuild Data” tools to fix data issues.
- Go to “File” > “Utilities” > “Verify Data” and “Rebuild Data.”
D. Filing and Payment Errors
1. Double-Check Entries
- Ensure all entries are correct before filing and making payments.
- Review financial statements and tax reports thoroughly.
2. Use QuickBooks Support
- If you encounter issues, contact QuickBooks Support for assistance.
- Visit the QuickBooks Support website for help.
By following these detailed steps and best practices, you can effectively set up QuickBooks for tax purposes, ensuring accurate financial records and compliance with tax regulations. Regular maintenance, updates, and collaboration with your accountant will help you manage your taxes efficiently and avoid potential issues.