Identifying Parts of the Word XP Window: A Comprehensive Guide

Microsoft Word XP, also known as Word 2002, is a versatile word processing program that has been a staple in offices, schools, and homes for decades. With its extensive features and functionalities, navigating through its interface can sometimes be overwhelming, especially for beginners. However, once you become familiar with the various parts of the Word XP window, you’ll find yourself working more efficiently and effectively. In this comprehensive guide, we’ll delve deep into each component of the Word XP window, helping you identify and understand its purpose.
1. Title Bar
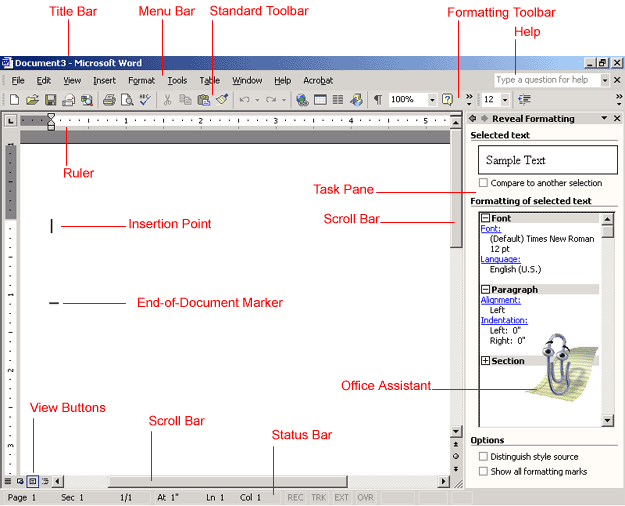
The Title Bar is located at the very top of the Word XP window. It displays the name of the current document and the application title, which is “Microsoft Word” by default. You can click on the title bar to move the Word XP window around your screen.
2. Menu Bar
Directly below the Title Bar is the Menu Bar, which houses a series of drop-down menus such as File, Edit, View, Insert, Format, Tools, Table, Window, and Help. Each menu contains a list of commands and options that you can use to perform various tasks within Word XP.
3. Standard Toolbar
The Standard Toolbar is located below the Menu Bar and consists of commonly used tools represented by icons. These tools include commands such as Save, Undo, Redo, Cut, Copy, Paste, and Print. You can customize the Standard Toolbar by adding or removing buttons to suit your workflow.
4. Formatting Toolbar
Situated below the Standard Toolbar, the Formatting Toolbar provides quick access to text formatting options such as font style, font size, bold, italic, underline, alignment, and more. It allows you to modify the appearance of your text with just a few clicks.
5. Ruler
The Ruler appears at the top and left side of the document window. It helps you align text, paragraphs, and objects within your document accurately. You can use the markers on the ruler to set margins, indents, and tab stops.
6. Document Area
The Document Area is the main workspace where you create, edit, and format your documents. It occupies the majority of the Word XP window and displays the content of your document, including text, images, tables, and other elements.
7. Vertical Scroll Bar
The Vertical Scroll Bar is located on the right side of the Document Area and allows you to scroll up and down through your document. You can click and drag the scroll box or use the arrow buttons to navigate through long documents.
8. Horizontal Scroll Bar
If your document extends beyond the width of the Word XP window, the Horizontal Scroll Bar will appear at the bottom, enabling you to scroll left and right to view hidden content. Similar to the Vertical Scroll Bar, you can click and drag the scroll box or use the arrow buttons to navigate horizontally.
9. Status Bar
The Status Bar is situated at the bottom of the Word XP window and provides information about the current document, such as page number, word count, line number, language, and zoom level. It also contains several buttons for toggling between different views and adjusting settings.
10. Task Pane
The Task Pane is a dynamic sidebar that can be docked on the right or left side of the Word XP window. It offers access to various tools, options, and features, depending on the task you’re performing. You can open or close the Task Pane from the View menu or by pressing Ctrl+F1.
Conclusion
Familiarizing yourself with the different parts of the Word XP window is essential for maximizing your productivity and efficiency when working with documents. By understanding the purpose of each component, you’ll be able to navigate through Word XP with ease and accomplish your tasks more effectively. Whether you’re writing a simple letter or creating a complex report, knowing how to identify and utilize the various elements of the Word XP interface will undoubtedly enhance your overall experience.


