Unleashing Precision: A Comprehensive Exploration of the Magnetic Lasso Tool in Adobe Photoshop
Introduction:
In the dynamic world of digital image editing, Adobe Photoshop stands as a cornerstone, providing an extensive array of tools that empower creatives to transform their visions into visual masterpieces. Among the arsenal of selection tools, the Magnetic Lasso Tool shines as a precise and versatile instrument for extracting complex shapes from images. This comprehensive guide will navigate through the intricacies of the Magnetic Lasso Tool in Photoshop, unlocking its potential for achieving detailed selections with unparalleled accuracy.
I. Understanding the Magnetic Lasso Tool:
The Magnetic Lasso Tool is a magnetic, edge-detection-based selection tool in Photoshop that automatically adheres to the contours of an object or shape. Its magnetic nature enables users to create selections that closely follow the edges of the desired element, making it an invaluable asset for extracting objects with irregular shapes or complex outlines.
II. Accessing the Magnetic Lasso Tool:
A. Opening Photoshop: Launch Adobe Photoshop and open the image you wish to edit. Familiarize yourself with the Photoshop interface, including the toolbar on the left side.
B. Locating the Magnetic Lasso Tool: In the toolbar, the Magnetic Lasso Tool is typically grouped with other lasso tools. Click and hold on the Lasso Tool icon to reveal the flyout menu, then select the Magnetic Lasso Tool.
III. Customizing Magnetic Lasso Settings:
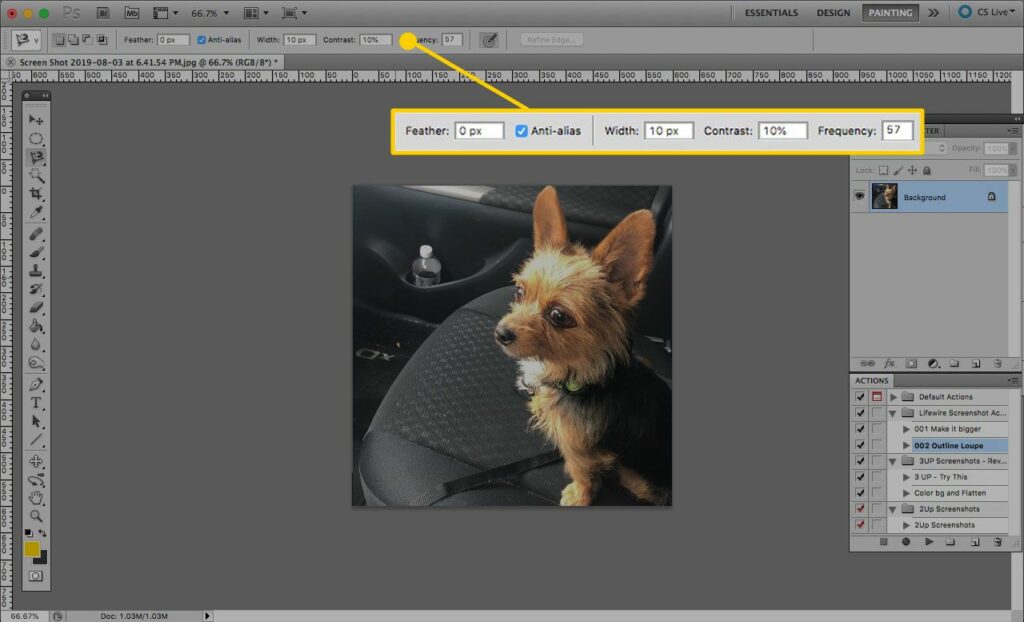
A. Feather and Width Options: Before using the Magnetic Lasso Tool, acquaint yourself with its settings. Adjust the “Feather” setting to control the softness of the selection edges, and modify the “Width” option to define the width of the tool’s detection border.
B. Contrast and Frequency: Utilize the “Contrast” setting to enhance or reduce the tool’s sensitivity to changes in contrast along the edges. The “Frequency” setting determines how often the tool places anchor points, affecting the level of detail in your selection.
IV. Mastering Magnetic Lasso Selections:
A. Click to Anchor: To start your selection, click once at a point along the object’s edge. The Magnetic Lasso Tool will automatically place anchor points along the contours based on the detected edges.
B. Navigate Along Edges: Move the cursor along the edges of the object you’re selecting. The tool will dynamically adjust, sticking closely to the detected edges. Click occasionally to anchor the selection points.
C. Closing the Selection: To close the selection and create a loop, either double-click or press Enter/Return. Alternatively, connect the last anchor point to the starting point, creating a closed selection.
V. Refining Magnetic Lasso Selections:
A. Backtracking: If the Magnetic Lasso Tool deviates from the desired path, press the Backspace key (Windows) or Delete key (Mac) to backtrack and remove the last anchor point. This allows for real-time corrections during the selection process.
B. Adding and Subtracting Selection: Utilize keyboard shortcuts to refine your selection. Hold down the Shift key to add to the selection, and hold down the Alt key (Windows) or Option key (Mac) to subtract from the selection. This provides flexibility in refining complex selections.
VI. Advanced Techniques for Precision:
A. Zooming In: For intricate selections, zoom in on the image to ensure precision. The Magnetic Lasso Tool’s effectiveness increases when working at higher magnifications, allowing for more accurate placement of anchor points.
B. Combining with Other Selection Tools: Combine the Magnetic Lasso Tool with other selection tools in Photoshop for optimal results. For instance, use the Polygonal Lasso Tool to create straight segments in conjunction with the Magnetic Lasso for curved portions.
VII. Real-World Applications and Creative Possibilities:
A. Object Extraction: Use the Magnetic Lasso Tool to extract objects from their backgrounds with finesse. This is particularly useful for isolating subjects with irregular shapes or intricate details.
B. Detailed Image Editing: Employ the tool for detailed image editing, such as selecting intricate patterns, creating custom shapes, or isolating specific elements within a composition.
VIII. Troubleshooting Common Challenges:
A. Adjusting Tool Settings: If the Magnetic Lasso Tool is not adhering accurately to the edges, experiment with adjusting the tool’s settings such as contrast, frequency, width, and feather until the desired results are achieved.
B. Iterative Selections: For particularly complex shapes, consider making iterative selections with the Magnetic Lasso Tool, focusing on different sections before combining them into a cohesive selection.
IX. Conclusion:
In conclusion, the Magnetic Lasso Tool in Adobe Photoshop emerges as a precise and indispensable selection instrument for photographers, designers, and digital artists. Mastering its intricacies allows for detailed and accurate selections, opening doors to endless creative possibilities. As you embark on your journey to harness the power of the Magnetic Lasso Tool, remember that practice and experimentation are key. So, dive into your Photoshop workspace, explore its nuances, and witness how this magnetic marvel transforms your digital editing endeavors into a seamless and precise experience.