A Comprehensive Guide on How to Pin a Website to Windows 10’s Start Menu
Introduction:
In the digital age, where information is at our fingertips and the web is an integral part of our daily lives, convenience and accessibility are paramount. Windows 10, the latest operating system from Microsoft, offers a myriad of features to enhance user experience. One such feature is the ability to pin websites to the Start Menu, providing quick and direct access to your favorite online destinations. In this comprehensive guide, we will walk you through the step-by-step process of pinning a website to Windows 10’s Start Menu, ensuring that you can effortlessly launch your preferred sites with just a click.
Understanding the Importance of Pinning Websites:
Pinning a website to the Start Menu serves several purposes. Firstly, it eliminates the need to open a web browser and type in the URL each time you want to visit a particular site. Instead, the pinned website icon acts as a shortcut, streamlining the navigation process. Secondly, it helps to keep your frequently visited websites organized and easily accessible in one centralized location – the Start Menu.
Step 1: Open Your Preferred Web Browser
Before you can pin a website to the Start Menu, you need to have your chosen web browser open. Windows 10 is compatible with popular browsers like Microsoft Edge, Google Chrome, Mozilla Firefox, and others. Ensure that the website you want to pin is already loaded in the browser.
Step 2: Navigate to the Website
Once your web browser is open, navigate to the website you wish to pin. Use the address bar to enter the URL manually or click on a bookmark if you have one set up.
Step 3: Access the Browser Menu
In the top-right corner of the browser window, you will find the menu icon (usually represented by three dots or lines). Click on this icon to open the browser menu. From the menu, look for an option related to pinning or adding to the Start Menu.
Step 4: Pinning the Website
The specific steps for pinning a website to the Start Menu may vary slightly depending on the browser you are using. Here are instructions for some of the popular browsers:
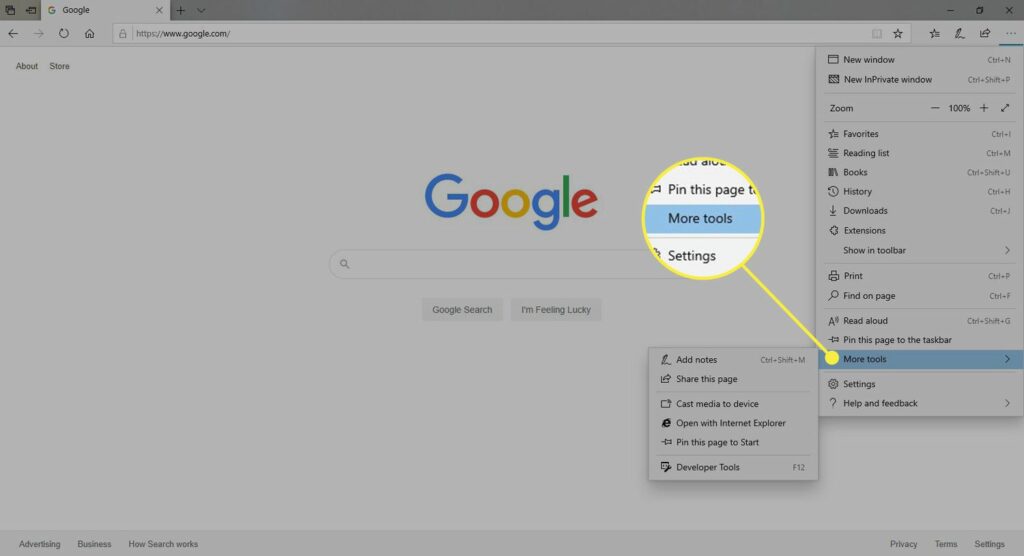
a. Microsoft Edge:
- Click on the three dots in the top-right corner to open the menu.
- Hover over “More tools” in the menu.
- Select “Pin to Start.”
b. Google Chrome:
- Click on the three dots in the top-right corner to open the menu.
- Hover over “More tools” in the menu.
- Choose “Create shortcut.”
- Check the option to “Open as window” if you prefer.
c. Mozilla Firefox:
- Click on the three horizontal lines in the top-right corner to open the menu.
- Select “Web Developer” and then “Install Site as App.”
- Confirm the installation by clicking “Install.”
Step 5: Customize the Pinned Tile (Optional)
Once you have pinned the website to the Start Menu, you may want to customize the tile for easy identification. Right-click on the newly created tile and choose “Resize” or “Name,” depending on your preferences. This step is optional but can be beneficial for keeping your Start Menu organized and visually appealing.
Step 6: Accessing Pinned Websites
With your website successfully pinned to the Start Menu, accessing it is a breeze. Simply click on the Start Menu icon in the bottom-left corner of your screen, locate the pinned tile, and click on it. Windows 10 will open your default web browser and take you directly to the pinned website.
Conclusion:
Pinning a website to Windows 10’s Start Menu is a simple yet effective way to streamline your digital workflow and enhance accessibility to your favorite online destinations. By following the step-by-step guide outlined above, you can effortlessly pin websites using various popular browsers, making the most of Windows 10’s features. Take advantage of this functionality to create a customized Start Menu tailored to your preferences, ultimately saving time and improving your overall computing experience.


