How to Create Non-Destructive “Vintage Film” Effects in Photoshop Using Camera Raw as a Filter
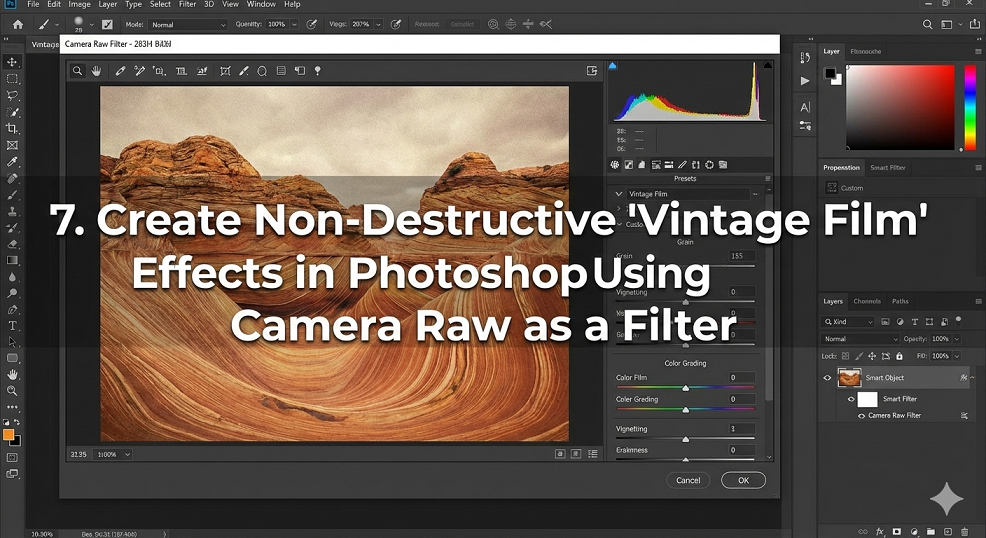
How to Create Non-Destructive “Vintage Film” Effects in Photoshop Using Camera Raw as a Filter
It is because vintage film visuals create feelings of nostalgia and emotion, as well as a sense of authenticity, that they are so popular. This is something that current digital photographs often lack. As opposed to photographs taken with genuine film, digital photographs are often too crisp, too clean, and too flawless. Images were given a distinct personality as a result of the faults that were imparted by film photography. These imperfections included grain, fading hues, soft contrast, and subtle color changes. Understanding how film operates and then digitally mimicking those qualities is necessary in order to recreate this appearance in Photoshop. It is not enough to just replicate a single filter in order to get this effect. The use of Camera Raw as a filter enables you to do this in a manner that is fully non-destructive. This means that you are able to return to the original picture at any time, make adjustments, and tweak the effect without permanently destroying it.
When it comes to film effects, why non-destructive editing is very important
Because the creative direction is often altered, non-destructive editing is an essential component in the process of developing artistic effects. In the future, a film look that is appropriate now can be seen as being too powerful or too weak. In the event that you perform destructive modifications, such as flattening layers or painting directly on the picture, you will lose the ability to exercise flexibility and control. The use of Camera Raw as a filter is compatible with Smart Objects, which allows the original picture to be preserved below. You will be able to make adjustments to the grain, color changes, contrast, and tone at any moment thanks to this. When it comes to professional processes, non-destructive approaches are crucial because they enable experimentation without the danger of failure, which is particularly critical for creative grading.
Getting Your Image Ready to Be Used as a Smart Object
Once the picture has been transformed into a Smart Object, any vintage effect that you want to apply should be applied. By doing this step, you guarantee that Camera Raw operates more like a layer that can be adjusted, rather than a change that is irreversible. After the conversion is complete, any filter that you apply will be modifiable. Because antique styles are very subjective and rely on mood, subject matter, and lighting, this is a crucial point to keep in mind. If you are taking a portrait, you may want to use softer tones and warmer highlights, but if you are taking a street shot, you might want to use less contrast and more grain. With the help of Smart Objects, you will have the ability to modify the same process to accommodate a wide variety of styles without having to begin each time from blank.
Comprehending the Factors That Cause a Film to Appear Like Film
Unlike digital sensors, film does not react to light in the same way digital sensors do. There is a more gradual transition from highlights to shadows, shadows keep more of their texture, and colors move in non-linear patterns. Additionally, film compresses dynamic range in a different way, which results in bright regions of the image seeming softer rather than clipped. Another significant component is grain, which is not the same thing as random noise. The structure of film grain is such that it interacts with the details of the picture in a natural manner. Rather of just applying a generic preset that has a fake feel to it, it is helpful to have an understanding of these features so that you may replicate film looks that are more authentic.
Adjustments of a Basic Nature to Shape the Appearance of the Film
When using Camera Raw, the Basic panel is where the general tone of the picture is determined. When the contrast is somewhat reduced and the clarity is decreased, the picture becomes more muted and the digital sharpness is eliminated. It is common practice to bring down the highlights while lifting the shadows in order to get a flattering and more dynamic range-compressed appearance. This simulates the way cinema deals with light in a quieter manner. Because film photos often have a feeling of being slightly underexposed or organically muted, exposure changes are typically minimal. This is because film images are not bright and precisely balanced.
Making Use of the Tone Curve to Produce a Gentle Contrast
A retro look may be achieved with the help of the Tone Curve, which is one of the most powerful tools available. Film curves are often more gentle and understated than the aggressive S-curves that are employed in current grading. When the black point is raised slightly, fading blacks are produced, which is a characteristic that is characteristic of films. Moreover, highlights are rolled off in a gentle manner rather than being pushed to a completely white state. A washed, atmospheric sense is produced as a result of this, which instantly eliminates the hard digital edge from the picture and replaces it with something that is more organic and theatrical.
Making Use of Color Grading in Order to Recreate Film Stock
The color properties of several film stocks are diverse from one another. While some are warmer, others are colder, and others have shadows that are greenish or highlights that are yellow. You are able to apply minor color changes into shadows, midtones, and highlights by using the Color Grading or Split Toning panels throughout the editing process. By way of illustration, a traditional cinematic balance may be achieved by incorporating warm tones into the highlights and cooler tones into the shadows. Due to the fact that film colors are seldom severe, these alterations should be very mild. The objective is not to re-paint the picture but rather to subtly affect the emotions.
Restoring Color Balance While Desaturating Colors
When compared to digital photographs taken today, vintage film photographs often have colors that are somewhat subdued. The feeling of full saturation is far too clean and artificial. It is possible to bring colors into a more realistic range by reducing the overall saturation or vibrance of the image. It is possible to carefully diminish certain hues, such as greens and blues, in order to prevent them from dominating the picture. This results in a palette that is more unified and harmonic, seeming more aged and emotive, and having less of a strong digital quality.
Including Movie Grain That Is Realistic
Although grain is necessary for achieving a genuine film effect, it must be used with caution. Both an excessive amount of grain and an insufficient amount of grain seem to be manufactured. Within Camera Raw, the Grain settings provide you the ability to apply structured grain that adjusts itself according to the resolution of the picture. When it comes to the aesthetics of 35mm film, smaller grain works better, whereas greater grain is more suitable for medium or large format filmmakers. It is important for grain to interact with detail, which means that it should be evident in sections that are flat but less noticeable in edges that have a strong contrast.
Simulating the appearance of lifted shadows and faded blacks
The use of fading blacks is one of the most identifiable characteristics of films. In contrast to film blacks, which sometimes include grayscale and color information, digital blacks are typically unadulterated and profound. A simulation of this effect may be achieved by raising the shadow curve and slightly diminishing contrast in places that are very black. This results in a gentle and nostalgic appearance, with shadows that have a light and airy feel rather than a heavy one. Additionally, it assists in the preservation of detail in dark places, which is a characteristic of genuine film scans.
Utilizing Vignettes as a Means of Subtle Focus
The edges of the picture were often somewhat darker when using vintage lenses because of the natural vignetting that they created. This provides depth to the composition while also drawing attention to the center. These vignettes may be discreetly created in Camera Raw in order to approximate the optical behavior of the subject. The secret is to exercise self-control. Vignettes that are strong have an unnatural and highly stylized presence. Through the use of subtle darkening around the margins, realism may be enhanced without drawing attention away from the topic.
Integrating Texture and Flaws into the Design
Real film is never produced in a spotless state. The item has a few imperfections, including dust, scratches, uneven exposure, and small color irregularities. Camera Raw can not directly add scratches; rather, you may approximate defects by applying minor texture overlays or slightly uneven tweaks. This allows you to create the illusion of imperfections. The emotional impact of a film is mostly due to the faults that it contains. When compared to imperfect photographs, perfect images have a more human and authentic sense to them.
Aligning the Effect with the Subject of the Study
It is not possible to apply the same antique treatment to every single photograph. For a fashion picture, it is possible that the tones should be soft and the grain should be minimal. On the other hand, a journey photograph can appear better with more grain and more color fading. It is important that the film’s visual style does not dominate the subject matter. This is the reason why processes that are non-destructive are so effective. The intensity, tone, and color of each picture may be simply adjusted to meet the specific emotional requirements of the image.
Reasons Why Camera Raw Is the Best Option for Copying Film
Camera Raw is an excellent choice since it operates in an environment that is color-managed and has a high bit-depth. Because of this, smooth gradients are maintained, and banding is avoided, both of which are essential for cinematic appearances. Additionally, it offers adjustments for tone, color, and grain that are of a professional standard in a single location. The fact that Camera Raw integrates directly into Photoshop and supports Smart Objects makes it an ideal choice for iterative creative processes, in contrast to filters that are provided by third-party developers.
Making Your Own Film Presets from Scratch
If you create a film look that you like, you may save it as a preset once you have developed it. Making use of this feature enables you to apply uniform style to a number of different photos. It is possible to amass a collection of individualized film profiles that may be used for a variety of tasks and moods throughout time. This is the method that professional colorists and photographers use to ensure that their work has a consistent visual aesthetic. Utilizing presets is another way to expedite production without compromising creative flexibility.
The Reasons Why Non-Destructive Film Effects Are the Standard in the Professional World
When working in professional settings, disruptive editing is avoided since it reduces the amount of flexibility available and raises the danger involved. Film effects that are non-destructive provide you the ability to review and improve creative choices even after many months have passed. Changes are often requested by customers, and having filters that can be updated helps save hours of effort. When it comes to this strategy, safety is not the only concern; it is also about functioning in an intelligent and effective manner.
The Role of Vintage Film in the Creative Process
Film from the past is more than simply an effect; it is a visual language unto itself. It conveys both sentimentality and sincerity, as well as feelings of nostalgia and passion. This technique, when used with care, has the ability to turn contemporary digital photographs into enduring visual narratives. If you use Camera Raw as a non-destructive filter, you will have complete creative freedom to explore this language without being forced to make judgments that cannot be undone as a result of your actions. What makes film emulation such a strong and lasting approach in digital photography is the fact that it strikes a balance between creative expression and technical control.