Mastering the Art of Navigation: A Comprehensive Guide to Navigating the Ableton Live Interface
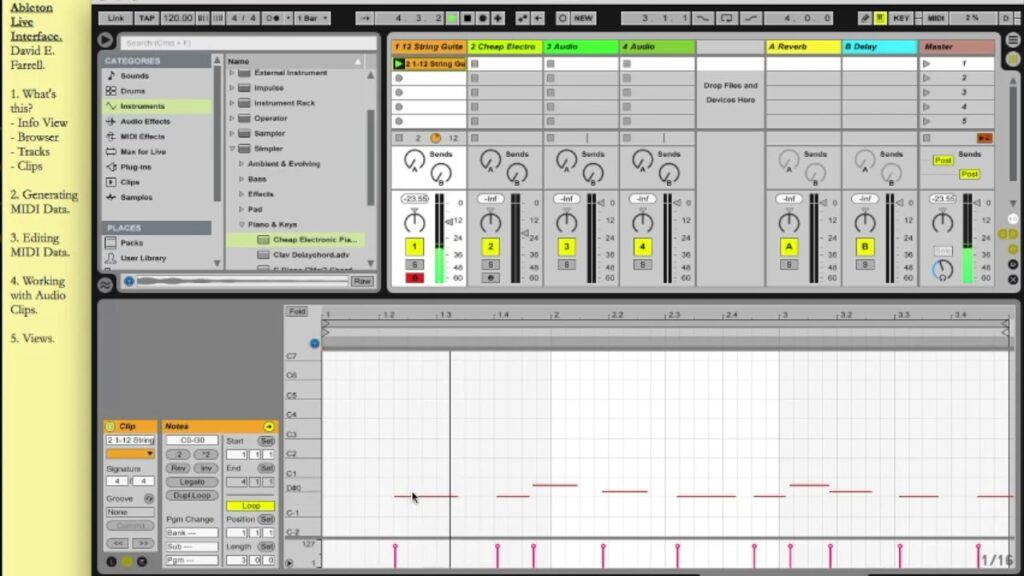
Ableton Live stands as a powerhouse in the world of music production software, renowned for its innovative features, intuitive workflow, and seamless integration of performance and production capabilities. Central to harnessing the full potential of Ableton Live is mastering its interface, which serves as the gateway to a world of creative possibilities. In this extensive guide, we’ll delve deep into every aspect of the Ableton Live interface, empowering you to navigate with confidence and efficiency.
Understanding the Interface:
Before we embark on our journey through the Ableton Live interface, let’s take a moment to familiarize ourselves with its key components:
- Session View:
- The Session View is where creativity thrives in Ableton Live. It resembles a grid-based workspace where you can trigger and arrange musical ideas in the form of clips.
- Each track in the Session View represents a different instrument, audio sample, or MIDI sequence, while each column corresponds to a scene containing multiple clips.
- The Session View is ideal for sketching out ideas, experimenting with arrangements, and performing live.
- Arrangement View:
- The Arrangement View provides a linear timeline for traditional composition and detailed arrangement of your musical ideas.
- Tracks in the Arrangement View appear horizontally, allowing you to sequence and manipulate audio and MIDI clips over time.
- This view is well-suited for fine-tuning arrangements, recording automation, and producing finished tracks.
- Browser and Library:
- Located on the left side of the interface, the Browser houses Ableton Live’s vast library of instruments, audio effects, MIDI effects, samples, and presets.
- Use the Browser to browse, search, and audition sounds, devices, and content, making it easy to find the perfect element for your project.
- Mixer and Devices:
- The Mixer section resides at the bottom of the interface and provides control over track volume, panning, and sends.
- Each track in Ableton Live can host multiple devices, including instruments, audio effects, MIDI effects, and audio clips.
Navigating the Interface:
Now that we have a foundational understanding of the Ableton Live interface, let’s dive deeper into navigating each component:
- Session View Navigation:
- To navigate the Session View, simply click and drag to scroll horizontally and vertically through the grid.
- Use the zoom controls at the bottom right corner of the interface to adjust the grid size and visibility of tracks and scenes.
- Utilize the overview box in the top right corner to quickly navigate large projects by clicking and dragging within the box.
- Arrangement View Navigation:
- In the Arrangement View, use the horizontal scrollbar at the bottom of the interface to navigate the timeline.
- Zoom in and out of the timeline using the zoom controls or by holding down the Ctrl key (Cmd on Mac) and scrolling with the mouse wheel.
- Use keyboard shortcuts such as Ctrl + Arrow Keys (Cmd + Arrow Keys on Mac) to navigate horizontally and vertically through the timeline.
- Browser Navigation:
- Browse Ableton Live’s library by clicking on the desired category in the Browser, such as Instruments, Audio Effects, MIDI Effects, Samples, or Packs.
- Narrow down your search by typing keywords into the search bar or applying filters such as Type, Category, or Creator.
- Drag and drop items from the Browser directly into the Session or Arrangement View to add them to your project.
- Mixer and Device Navigation:
- Access the Mixer by clicking on the Mixer icon in the bottom left corner of the interface.
- Adjust track volume, panning, and sends by clicking and dragging the corresponding controls within the Mixer.
- Double-click on a track to expand it and reveal its devices, then click and drag devices to rearrange their order or remove them from the track.
Pro Tips for Efficient Navigation:
To maximize your efficiency and productivity when navigating the Ableton Live interface, consider implementing the following tips and techniques:
- Customize Your Workflow:
- Tailor Ableton Live’s interface to suit your preferences by adjusting settings such as track colors, grid size, and display options.
- Save custom layouts and templates for different types of projects to streamline your workflow and eliminate repetitive tasks.
- Learn Keyboard Shortcuts:
- Familiarize yourself with Ableton Live’s extensive array of keyboard shortcuts for quickly navigating the interface, triggering commands, and performing common actions.
- Refer to the built-in shortcut list (accessible via the Help menu) or create your own cheat sheet to reference as you work.
- Utilize Navigation Aids:
- Take advantage of features such as Live’s navigation box and overview box to quickly navigate large projects and maintain context within the interface.
- Use markers and locator points to mark important sections within your arrangement and facilitate navigation during editing and playback.
- Experiment and Explore:
- Don’t be afraid to experiment with different workflows, techniques, and navigation methods within Ableton Live.
- Explore the myriad of online tutorials, forums, and resources available to learn new tips and tricks for navigating the interface and optimizing your production process.
Conclusion:
Mastering the Ableton Live interface is a crucial step towards becoming a proficient music producer and performer. By understanding the layout and functionality of each component, honing your navigation skills, and implementing efficient workflows, you’ll unlock the full potential of Ableton Live and bring your musical ideas to life with ease and precision.
Whether you’re sketching out ideas in the Session View, refining arrangements in the Arrangement View, or exploring sounds in the Browser, navigating the Ableton Live interface empowers you to express your creativity in limitless ways. So, dive in, explore, and let the music guide you as you navigate the dynamic world of Ableton Live!
