Mastering Visual Communication: A Comprehensive Guide to Easily Inserting Screenshots in Microsoft Word
Introduction:
In the dynamic landscape of document creation and communication, visuals play a pivotal role in enhancing understanding and conveying information effectively. Microsoft Word, a stalwart in the world of word processing, offers a plethora of features to streamline document creation. One such feature that significantly contributes to visual communication is the ability to insert screenshots effortlessly. This comprehensive guide aims to unravel the intricacies of inserting screenshots in Microsoft Word, catering to both beginners and seasoned users seeking to master this essential skill.
The Power of Visuals in Document Creation:
Visual elements, such as images and screenshots, serve as powerful tools for conveying complex information in a concise and comprehensible manner. Whether you’re preparing a report, crafting a presentation, or compiling instructional materials, the inclusion of screenshots can enhance the overall clarity and impact of your document. Microsoft Word recognizes the importance of visual communication and offers a user-friendly mechanism for seamlessly integrating screenshots into your documents.
Step 1: Opening Microsoft Word and Document Preparation:
Begin by launching Microsoft Word and opening the document where you want to insert the screenshot. If you’re starting a new document, create one and save it to your desired location. Ensure that your document is in edit mode, allowing you to make necessary changes.
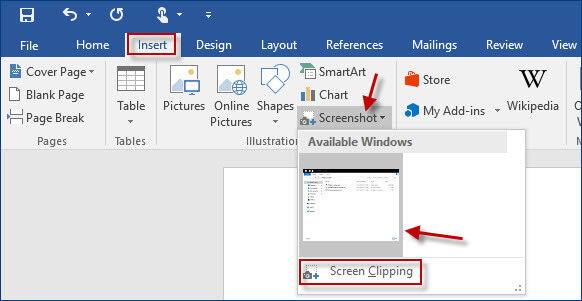
Step 2: Navigating to the Insert Tab:
Navigate to the “Insert” tab located on the Word ribbon at the top of the screen. The Insert tab is a hub for various elements you can integrate into your document, including images, charts, and, of course, screenshots.
Step 3: Selecting the Screenshot Option:
Under the Insert tab, locate the “Screenshot” option. Clicking on this option will reveal a drop-down menu displaying available screenshot options, such as “Screen Clipping” and “Available Windows.” These options provide flexibility in capturing the content you need.
Step 4: Capturing a Screen Clipping:
Choose the “Screen Clipping” option to capture a specific portion of your screen. Upon selecting this option, your screen will temporarily fade, and the cursor will transform into crosshairs. Click and drag to select the area you want to capture. Once released, the selected portion will be inserted directly into your document.
Step 5: Inserting an Available Window:
If you prefer to capture an entire window, choose the “Available Windows” option under the Screenshot menu. This will display a list of currently open windows on your desktop. Click on the window you want to capture, and it will be inserted into your Word document.
Step 6: Customizing Your Screenshot:
Microsoft Word provides additional tools to customize your inserted screenshot. After insertion, you can resize, move, or add captions to the screenshot to enhance its visual appeal and alignment with your document’s content.
Step 7: Advanced Editing with Picture Tools:
For more advanced editing options, click on the inserted screenshot, and the “Picture Tools” tab will appear on the ribbon. Here, you can access features like cropping, color adjustments, and artistic effects to fine-tune the appearance of your screenshot.
Step 8: Updating Screenshots:
In situations where your document undergoes changes, and you need to update the inserted screenshots, Microsoft Word offers a convenient solution. Right-click on the screenshot, select “Update Link,” and Word will automatically refresh the screenshot to reflect the latest changes.
Conclusion:
In conclusion, the ability to insert screenshots seamlessly in Microsoft Word is a skill that empowers users to enhance the visual impact of their documents. By following the steps outlined in this comprehensive guide, you can master the art of capturing and integrating screenshots, transforming your documents into engaging and informative pieces. Visual communication is a key component of effective document creation, and Microsoft Word’s user-friendly features ensure that the process is both accessible and efficient. Embrace the power of screenshots to elevate your document creation game and communicate complex ideas with clarity and precision.


