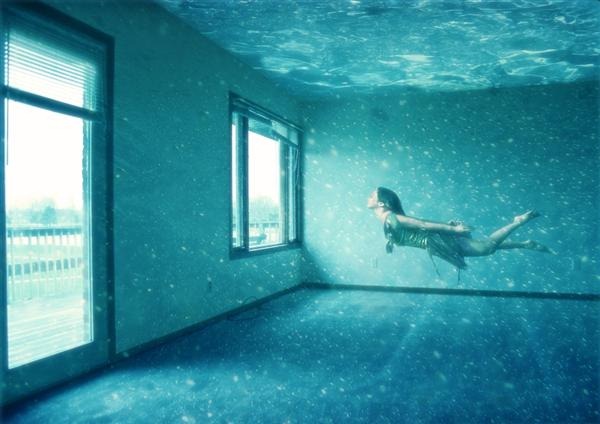
Navigating the Depths of Creativity: Crafting an Underwater Dreamscape in Photoshop
Introduction:
Immersive and ethereal, underwater scenes have long captivated our imaginations with their mysterious allure. The creation of an underwater dreamscape in Photoshop allows digital artists to transcend the limits of reality, transforming ordinary images into mesmerizing aquatic fantasies. In this extensive guide, we will delve into the step-by-step process of crafting a captivating underwater dreamscape, exploring techniques ranging from color grading and lighting adjustments to the incorporation of marine elements that breathe life into the depths of your imagination.
Section 1: Research and Inspiration
Embarking on the journey to create an underwater dreamscape begins with research and gathering inspiration. Dive into the world of marine life, coral reefs, and underwater photography to understand the vibrant colors, lighting conditions, and diverse ecosystems found beneath the waves. Collecting a visual library of reference images will serve as a foundation for your creative vision, allowing you to infuse authenticity into your Photoshop composition.
Section 2: Selecting the Base Image
Choosing the right base image is crucial to the success of your underwater dreamscape. Opt for a photograph with a strong composition and potential for transformation. Scenes featuring landscapes, seascapes, or even portraits can be reimagined beneath the waves. Consider the mood and atmosphere you want to convey, whether it’s a serene lagoon, a bustling coral reef, or the depths of the open ocean.
Section 3: Adjusting Color and Lighting
The key to achieving a convincing underwater dreamscape lies in meticulous color grading and lighting adjustments. Begin by tweaking the overall color temperature to impart a cool, aquatic hue to your image. Experiment with adjusting the highlights, shadows, and midtones to emulate the play of light beneath the water’s surface.
Introduce a subtle blue or green tint to simulate the filtering effect of water, with deeper areas featuring richer, darker tones. Fine-tune the lighting to create depth and highlight focal points, ensuring that your underwater dreamscape feels immersive and cohesive.
Section 4: Adding Water Textures and Distortion
To enhance the underwater illusion, incorporate water textures and distortion effects. Overlay subtle ripple or wave textures onto your image, adjusting their opacity to achieve a realistic integration. Experiment with Photoshop filters like “Ripple” or “Wave” to introduce distortion, mimicking the way light bends underwater.
Consider applying a subtle blur to parts of the image to simulate the natural distortion caused by water. This step adds a layer of visual authenticity, reinforcing the illusion of submersion.
Section 5: Introducing Marine Elements
Bring your underwater dreamscape to life by introducing marine elements into the composition. This can include coral formations, schools of fish, or majestic sea creatures. Utilize stock images or create your own elements to seamlessly integrate them into the scene. Pay attention to scale, perspective, and lighting to ensure a harmonious blend between the original image and the added marine elements.
Experiment with layer blending modes to enhance the integration of marine elements, adjusting opacity levels to achieve a balanced and natural appearance. Use the “Overlay” or “Multiply” blending modes to simulate the interplay of light and shadow beneath the water.
Section 6: Enhancing Depth with Foreground and Background Elements
To amplify the sense of depth in your underwater dreamscape, strategically introduce foreground and background elements. Elements such as seaweed, rocks, or additional marine life can be placed in the foreground, while distant underwater vistas or rays of light penetrating the surface can enhance the background.
Adjust the size, position, and opacity of these elements to create a layered effect, reinforcing the illusion of a vast and immersive underwater environment. Pay attention to the perspective and scale to maintain a cohesive and realistic composition.
Section 7: Fine-Tuning Details and Atmosphere
As you near the completion of your underwater dreamscape, shift your focus to fine-tuning details and enhancing the overall atmosphere. Refine the color balance, contrast, and saturation to achieve a harmonious and visually appealing result. Experiment with atmospheric effects, such as light rays or particles, to add a touch of magic and mystique to your composition.
Consider incorporating subtle vignettes or depth-of-field effects to draw attention to specific areas of the image. These refinements contribute to the overall polish and professionalism of your underwater dreamscape.
Section 8: Adding Final Touches and Reviewing Your Composition
Before finalizing your underwater dreamscape, add any additional touches that elevate the visual impact. This could include lens flares, glows, or reflections that enhance the dreamlike quality of the scene. Take the time to review your composition at various zoom levels, ensuring that the details hold up and the overall effect remains cohesive.
Section 9: Saving and Sharing Your Underwater Dreamscape
Once satisfied with your creation, save your Photoshop project and export the final image in the desired format. Consider saving a high-resolution version for printing or sharing on platforms that support larger file sizes. Share your masterpiece with the world, whether it’s through social media, online portfolios, or as part of a digital art community.
Conclusion:
Crafting an underwater dreamscape in Photoshop is a captivating journey that invites artists to explore the depths of their creativity. By understanding the nuances of color grading, lighting adjustments, and the integration of marine elements, digital artists can transform ordinary images into immersive aquatic fantasies. This comprehensive guide serves as a roadmap for navigating the intricacies of creating a captivating underwater dreamscape, providing a foundation for artists to embark on their own subaquatic adventures. Embrace the magic of Photoshop, let your imagination flow, and plunge into the depths of creativity to bring your underwater dreams to life.


