Unveiling the Art of Color Correction in Final Cut Pro: A Comprehensive Guide
Color correction is a vital aspect of video editing, enabling creators to manipulate the color and tone of their footage to achieve desired aesthetics, correct errors, and evoke specific emotions. Final Cut Pro, renowned for its robust editing capabilities, offers a suite of powerful tools and features dedicated to color correction. In this extensive guide, we’ll delve deep into the intricacies of applying color correction in Final Cut Pro, unraveling techniques, workflows, and expert tips to empower you in your editing journey.
Understanding Color Correction in Final Cut Pro
Before we embark on the practical aspects, it’s essential to grasp the essence of color correction and its significance in the editing process. Color correction involves adjusting the color balance, exposure, contrast, and saturation of video footage to achieve a cohesive and visually appealing look. Whether it’s correcting white balance, matching shots, or creating stylized effects, color correction plays a pivotal role in enhancing the overall quality of your video content.
Step-by-Step Guide to Color Correction in Final Cut Pro
- Import Your Footage: Begin by importing the video clips you wish to color correct into Final Cut Pro. Organize your media in the browser to streamline your editing workflow.
- Create a New Project: Open a new project timeline in Final Cut Pro and drag the desired footage onto the timeline.
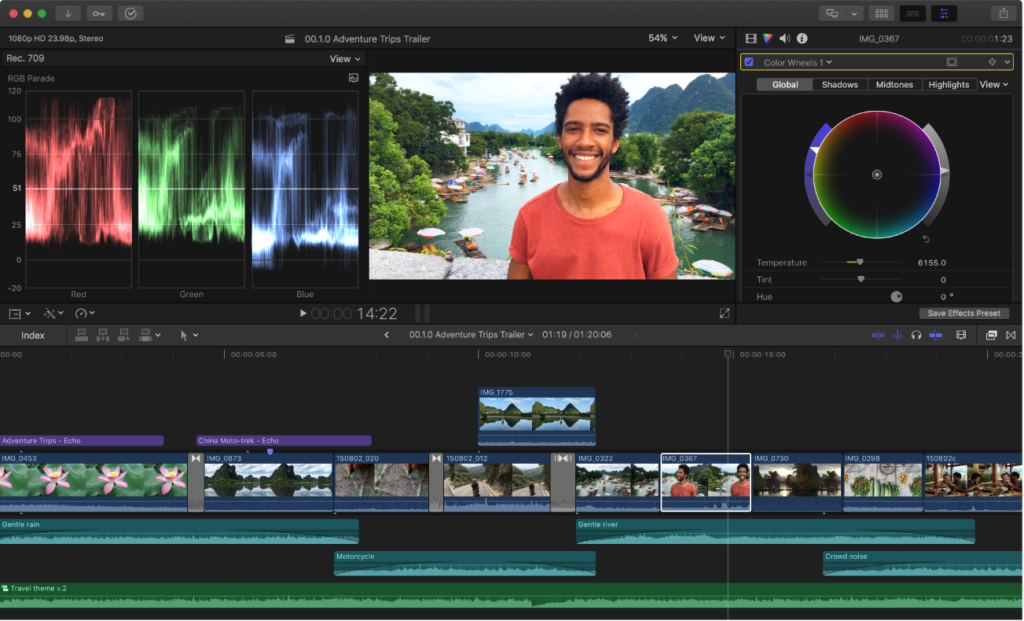
- Access the Color Correction Tools: Navigate to the ‘Color’ workspace by clicking on the Color tab in the top-right corner of the Final Cut Pro interface. This action will reveal the color correction tools and scopes essential for your editing tasks.
- Balance Color: Start by addressing any white balance issues in your footage. Use the Color Wheels or the Auto White Balance tool to adjust the temperature and tint to achieve a neutral balance.
- Adjust Exposure and Contrast: Utilize the Exposure and Contrast controls to fine-tune the brightness and contrast of your footage. Adjust highlights, shadows, and midtones to achieve the desired tonal range.
- Fine-Tune Color with Color Wheels: Dive deeper into color correction by using the Color Wheels to adjust individual color channels – shadows, midtones, and highlights. Correct color casts and enhance color vibrancy to achieve a visually pleasing look.
- Utilize Curves for Precise Control: For advanced users seeking precise control over color and tone, utilize the Curves tool to manipulate the luminance and color channels of your footage. Curve adjustments allow for nuanced adjustments and creative stylization.
- Apply Secondary Color Correction: Target specific areas of your footage for additional adjustments using the Secondary Color Correction tools. Use masks, shapes, and keying techniques to isolate and manipulate colors selectively.
- Utilize Color Masks and Keying: Final Cut Pro offers advanced masking and keying capabilities, allowing you to create complex selections based on color, luminance, or shape. Use masks and keying to isolate subjects, adjust backgrounds, or create stylized effects.
- Utilize Scopes for Accurate Analysis: Leverage the waveform, vectorscope, and histogram scopes to analyze the color and exposure levels of your footage accurately. Scopes provide invaluable feedback and ensure consistency across your edits.
- Preview and Fine-Tune: Continuously preview your color corrections in the Final Cut Pro viewer to assess their impact on your footage. Make iterative adjustments based on visual feedback until you achieve the desired look.
- Export Your Project: Once satisfied with your color corrections, export your project in the desired format, maintaining the color fidelity and integrity of your edits.
Tips and Best Practices for Color Correction
- Shoot in Log or Raw: If possible, shoot your footage in Log or Raw formats to maximize flexibility and dynamic range during color correction.
- Maintain Consistency: Maintain consistency in color correction across all your footage to ensure a cohesive visual narrative. Match shots seamlessly to avoid jarring transitions between scenes.
- Refer to References: Use reference images or videos as a guide for color correction, especially when aiming to achieve a specific look or mood.
- Experiment with Styles: Don’t be afraid to experiment with different color grading styles and looks. Embrace creativity and explore unique color palettes to enhance storytelling and evoke emotions.
- Practice Patience: Color correction is a nuanced process that requires patience and attention to detail. Take your time to finesse your edits and strive for perfection.
Conclusion
Color correction is an art form that can elevate your video content from ordinary to extraordinary. With Final Cut Pro as your tool of choice, you have access to a comprehensive suite of color correction tools and features to unleash your creativity and bring your vision to life. By following the steps outlined in this guide and embracing best practices, you’ll be well-equipped to master the art of color correction and craft visually stunning videos that captivate and resonate with your audience. Let your imagination soar, experiment fearlessly, and let Final Cut Pro be your canvas for artistic expression in the realm of color.


