A Comprehensive Guide to Adding a Printer in Windows 10
In the digital age, printing remains an essential aspect of both personal and professional life. Whether you need to print documents, photos, or other materials, having a printer set up on your Windows 10 computer is crucial for seamless productivity. Fortunately, Windows 10 offers a straightforward process for adding printers, whether they’re connected via USB, wireless network, or Bluetooth. In this extensive guide, we’ll walk you through the various methods and steps involved in adding a printer to your Windows 10 device.
Understanding Printer Connectivity Options: Before diving into the steps of adding a printer, it’s essential to understand the different connectivity options available:
- USB: Printers can be connected directly to your computer using a USB cable. This method is simple and reliable, making it a popular choice for personal printers.
- Wireless Network: Many modern printers support wireless connectivity, allowing them to be accessed by multiple devices over a Wi-Fi network. This option provides flexibility and convenience, especially in shared office environments or households with multiple users.
- Bluetooth: Some printers feature Bluetooth connectivity, enabling them to communicate with your Windows 10 device wirelessly within a short range. While less common than Wi-Fi, Bluetooth can be useful for printing from mobile devices or laptops without Wi-Fi capabilities.
Adding a Printer in Windows 10: Now, let’s explore the step-by-step process of adding a printer to your Windows 10 computer:
Method 1: Adding a Printer Automatically:
- Connect the Printer: If you’re using a USB-connected printer, plug the USB cable into an available port on your computer. For wireless or Bluetooth printers, ensure they’re powered on and connected to the same network or paired with your computer.
- Open Settings: Click on the Start menu, then select the gear icon to open the Settings app.
- Navigate to Devices: In the Settings app, click on the “Devices” category.
- Select Printers & Scanners: On the left sidebar, click on “Printers & scanners.”
- Detect Printers: Windows 10 will automatically detect any printers connected to your computer or available on your network. If your printer is detected, it will appear in the list under “Printers & scanners.”
- Add the Printer: Select your printer from the list, then click the “Add device” button to install it.
Method 2: Adding a Printer Manually: If your printer isn’t automatically detected by Windows 10, you can add it manually using these steps:
- Open Settings: Follow steps 2-4 from Method 1 to navigate to the “Printers & scanners” section in the Settings app.
- Click “Add a Printer or Scanner”: Under the “Printers & scanners” section, click on the “Add a printer or scanner” button.
- Wait for Detection: Windows 10 will search for available printers on your network. This process may take a few moments.
- Select Your Printer: Once detected, your printer will appear in the list of available devices. Click on it to select it.
- Install the Printer: Follow the on-screen instructions to install the printer driver and complete the setup process.
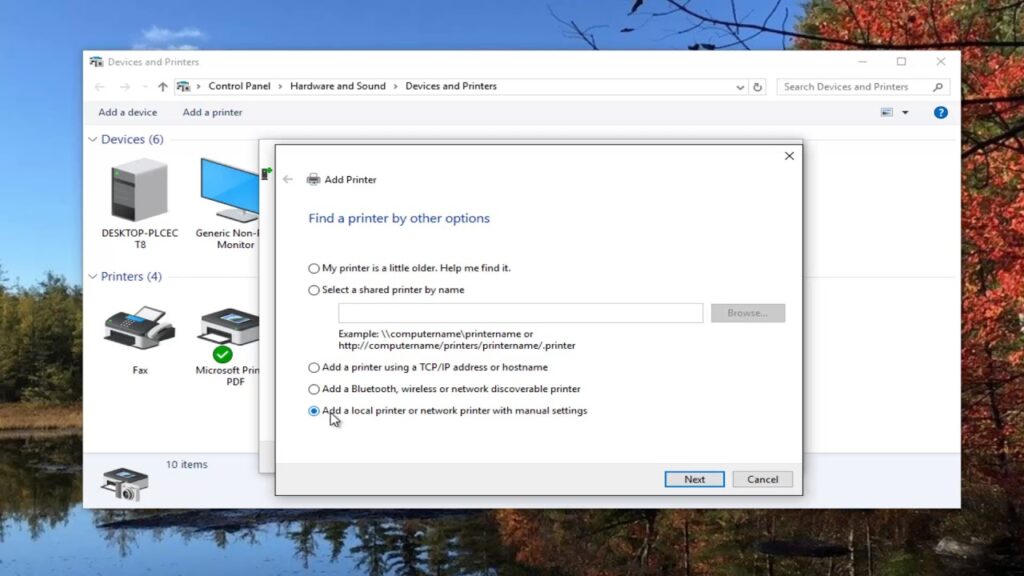
Method 3: Adding a Printer via Control Panel: For more advanced options or troubleshooting, you can add a printer through the Control Panel:
- Open Control Panel: Type “Control Panel” in the Windows search bar and select it from the results.
- Navigate to Devices and Printers: In the Control Panel, click on “Devices and Printers.”
- Add a Printer: Click on the “Add a printer” button at the top of the window.
- Choose a Printer to Add: Windows will search for available printers on your network. Select your printer from the list, then click “Next.”
- Install Printer Driver: Follow the on-screen instructions to install the necessary printer driver and complete the setup process.
Additional Tips for Printer Setup:
- Check Printer Compatibility: Before attempting to add a printer to your Windows 10 computer, ensure that it’s compatible with the operating system. Visit the manufacturer’s website to download the latest drivers if necessary.
- Ensure Network Connectivity: If you’re adding a wireless or Bluetooth printer, make sure it’s connected to the same network as your computer or paired correctly via Bluetooth.
- Troubleshooting: If you encounter any issues during the printer setup process, refer to the manufacturer’s instructions or visit the Windows support website for troubleshooting tips and solutions.
Conclusion: Adding a printer to your Windows 10 computer is a straightforward process, thanks to the intuitive interface and built-in support for various connectivity options. Whether you’re connecting via USB, wireless network, or Bluetooth, Windows 10 provides multiple methods for seamlessly integrating printers into your workflow. By following the steps outlined in this comprehensive guide and leveraging the additional tips provided, you can quickly and effectively set up a printer on your Windows 10 device, enhancing your productivity and convenience in both personal and professional settings.


