How to install a hard drive
Introduction to Installing a Hard Drive
Installing a hard drive involves physically mounting the drive inside your computer and connecting it to power and data cables. This guide covers the installation process for both HDDs (Hard Disk Drives) and SSDs, ensuring compatibility and optimal performance for your storage needs.
Preparation
Before you start installing a hard drive, gather the necessary tools and information:
- Compatibility Check:
- Ensure compatibility between the new hard drive and your computer’s interface (e.g., SATA, NVMe) and physical dimensions (e.g., 3.5-inch, 2.5-inch form factors).
- Verify if your motherboard supports the type of hard drive you intend to install (SATA, NVMe, etc.).
- Purchase Hard Drive:
- Choose a hard drive based on your storage needs (capacity) and performance requirements (HDD for storage, SSD for speed).
- Consider factors like RPM (for HDDs), interface type (SATA, NVMe), and form factor (3.5-inch, 2.5-inch).
- Tools Needed:
- Screwdriver (typically Phillips-head)
- Anti-static wrist strap (recommended to prevent static electricity damage)
- SATA data cable (if installing a SATA drive)
- SATA power cable (if installing a SATA drive)
- Safety Precautions:
- Power off your computer and unplug it from the power source.
- Ground yourself by wearing an anti-static wrist strap or periodically touching a metal part of the case to prevent static electricity discharge.
Step-by-Step Guide to Install a Hard Drive
Step 1: Prepare Your Computer
- Open Computer Case:
- Depending on your computer case, use a screwdriver to remove the side panel. Some cases may have thumbscrews or a latch mechanism for easy access.
- Locate Drive Bays:
- Identify available drive bays inside your computer case. Drive bays are typically located near the front or bottom of the case and may be labeled for HDDs or SSDs.
Step 2: Install the Hard Drive
For Installing a 3.5-inch HDD:
- Prepare Drive Bay:
- If installing into a 3.5-inch drive bay, locate an available bay and remove any drive bay covers or mounting brackets as needed.
- Mount Hard Drive:
- Align the screw holes on the sides of the hard drive with the corresponding holes in the drive bay.
- Use screws provided with the case or hard drive to secure the hard drive in place. Tighten screws evenly to prevent vibration.
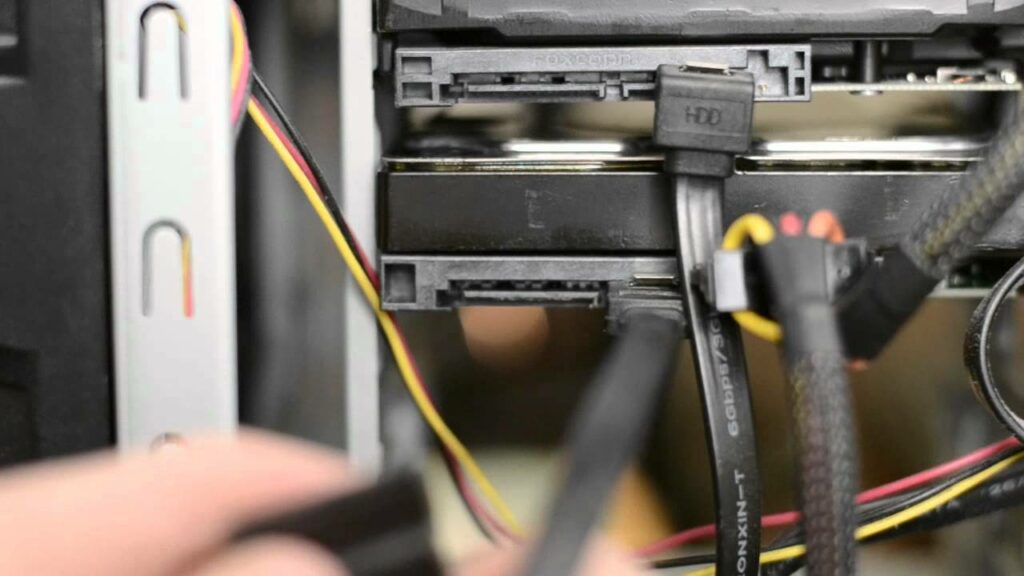
- Connect Cables:
- Connect one end of a SATA data cable to the SATA port on the motherboard.
- Connect the other end of the SATA data cable to the SATA port on the back of the hard drive.
- Power Connection:
- Connect one end of a SATA power cable from the power supply unit (PSU) to the SATA power port on the hard drive.
For Installing a 2.5-inch SSD:
- Prepare Mounting Location:
- If your case does not have specific 2.5-inch drive bays, you may need a 2.5-inch to 3.5-inch adapter bracket to mount the SSD securely in a 3.5-inch bay.
- Mount SSD:
- Place the SSD into the adapter bracket if necessary. Align the bracket’s screw holes with those in the drive bay.
- Use screws to secure the SSD and adapter bracket to the drive bay. Ensure a snug fit to prevent movement.
- Connect Cables:
- Connect one end of a SATA data cable to the SATA port on the motherboard.
- Connect the other end of the SATA data cable to the SATA port on the SSD.
- Power Connection:
- Connect one end of a SATA power cable from the PSU to the SATA power port on the SSD.
Step 3: Close Your Computer Case
- Replace Side Panel:
- Carefully slide the side panel back onto the case and secure it with screws or latches. Ensure all screws are tightened to prevent vibrations.
- Connect Cables and Power On:
- Reconnect all cables to your computer, including monitor, keyboard, and mouse.
- Plug your computer back into the power outlet and power it on.
Step 4: Initialize and Format the Hard Drive
- Access Disk Management:
- In Windows, right-click on the Start menu and select “Disk Management.” In macOS, open “Disk Utility.”
- Locate the new hard drive (it may appear as unallocated space or uninitialized) and initialize it if prompted.
- Format the Drive:
- Right-click on the unallocated space or uninitialized drive and select “New Simple Volume” (Windows) or “Erase” (macOS).
- Follow the on-screen instructions to format the drive with a file system (e.g., NTFS for Windows, APFS or HFS+ for macOS) and assign a drive letter or name.
Step 5: Verify Installation
- Check Drive Recognition:
- After formatting, verify that the new hard drive appears in File Explorer (Windows) or Finder (macOS) with the correct capacity and file system.
- Test Drive Functionality:
- Copy files to and from the new hard drive to ensure it functions correctly and is accessible.
Troubleshooting
If your computer doesn’t recognize the new hard drive or encounters issues after installation, consider the following troubleshooting steps:
- Check Connections: Ensure all SATA and power cables are securely connected to the hard drive and motherboard/PSU.
- Update Drivers: Install any necessary drivers or firmware updates for the new hard drive from the manufacturer’s website.
- Check BIOS/UEFI Settings: Ensure the new hard drive is detected in BIOS/UEFI setup. Verify SATA port settings and boot order if necessary.
Conclusion
Installing a hard drive is a straightforward process that enhances your computer’s storage capacity and performance capabilities. By following this step-by-step guide and taking necessary precautions, you can successfully install a new hard drive and enjoy expanded storage for various applications and data.
Always refer to the specific instructions provided by your computer case and hard drive manufacturers for detailed guidance and recommendations specific to your hardware.