How to install Windows 8
Installing Windows 8 might seem like a daunting task, especially if you’re not particularly tech-savvy. However, fear not! With the right guidance and a bit of patience, you can successfully install Windows 8 on your computer. In this comprehensive guide, we’ll walk you through the entire process step by step, ensuring that you have a smooth and hassle-free experience.
Before we dive into the installation process, let’s make sure you have everything you need:
- System Requirements: Check if your computer meets the minimum system requirements for Windows 8. Typically, you’ll need at least a 1 GHz processor, 1 GB of RAM (for 32-bit) or 2 GB of RAM (for 64-bit), 16 GB of available hard disk space (for 32-bit) or 20 GB (for 64-bit), and DirectX 9 graphics device with WDDM 1.0 or higher driver.
- Windows 8 Installation Media: You’ll need either a Windows 8 installation DVD or a bootable USB drive containing the Windows 8 setup files.
- Backup Your Data: Before proceeding with the installation, it’s crucial to back up all your important files and documents. While the installation process shouldn’t affect your existing files, it’s always better to be safe than sorry.
- Product Key: Make sure you have a valid product key for Windows 8. You’ll need this during the installation process.
- Internet Connection: While not mandatory, having an internet connection during the installation process can be helpful for downloading updates and drivers.
Once you’ve gathered all the necessary items, you’re ready to begin the installation process. Follow these steps:
Step 1: Insert the Installation Media
If you’re using a DVD, insert the Windows 8 installation DVD into your computer’s DVD drive. If you’re using a bootable USB drive, insert it into a USB port on your computer.
Step 2: Boot From the Installation Media
Restart your computer. As it boots up, you’ll need to access the boot menu or BIOS settings to set your computer to boot from the installation media. The method for accessing the boot menu or BIOS settings varies depending on your computer’s manufacturer, so refer to your computer’s manual for instructions.
Once you’ve accessed the boot menu or BIOS settings, select the option to boot from the DVD or USB drive.
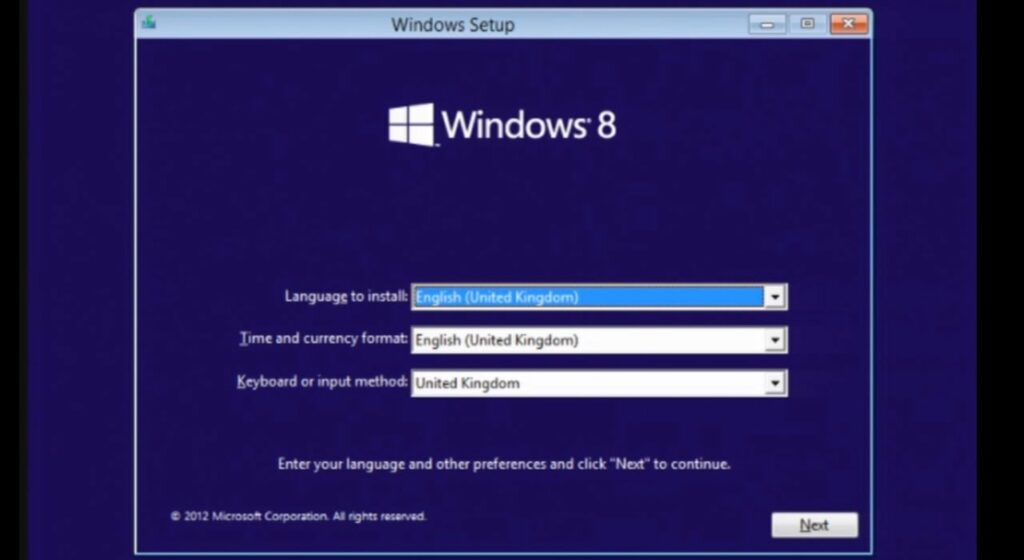
Step 3: Start the Installation Process
After booting from the installation media, you’ll see the Windows 8 installation screen. Select your language, time, currency, and keyboard preferences, then click “Next.”
Step 4: Enter Your Product Key
Enter your Windows 8 product key when prompted. You can usually find this key on a sticker on your computer or in the confirmation email if you purchased Windows 8 digitally.
Step 5: Accept the License Terms
Read and accept the Microsoft Software License Terms.
Step 6: Choose the Installation Type
You’ll be prompted to choose between an upgrade installation and a custom installation. If you’re upgrading from a previous version of Windows, choose the upgrade option. If you’re performing a clean installation or installing on a new hard drive, choose the custom option.
Step 7: Select the Installation Location
If you chose the custom installation option, you’ll need to select the partition where you want to install Windows 8. If you’re installing on a new hard drive, you’ll need to create a new partition.
Step 8: Wait for the Installation to Complete
Once you’ve selected the installation location, the installation process will begin. This can take some time, so be patient and wait for the process to complete.
Step 9: Set Up Your User Account
After the installation is complete, you’ll be prompted to set up your user account. Enter your desired username and password, then follow the on-screen instructions to customize your settings.
Step 10: Install Drivers and Updates
After setting up your user account, it’s a good idea to install any necessary drivers and updates. You can do this through the Windows Update utility in the Control Panel.
Step 11: Enjoy Windows 8!
Congratulations, you’ve successfully installed Windows 8 on your computer! Take some time to explore the new features and functionalities of Windows 8, and enjoy using your newly upgraded operating system.
In conclusion, installing Windows 8 may seem like a complex process, but by following these step-by-step instructions, you can easily install Windows 8 on your computer and enjoy all the benefits of Microsoft’s latest operating system. Remember to back up your data before starting the installation process, and don’t hesitate to seek help if you encounter any difficulties along the way. Happy computing!


