How to navigate the Start screen in Windows 8
Navigating the Start screen in Windows 8 can be both exciting and challenging for newcomers to the operating system. With its dynamic tiles and customizable layout, the Start screen serves as the central hub for accessing apps, programs, settings, and more. In this comprehensive guide, we’ll explore everything you need to know about navigating the Start screen in Windows 8, from basic navigation to advanced customization options.
Understanding the Start Screen:
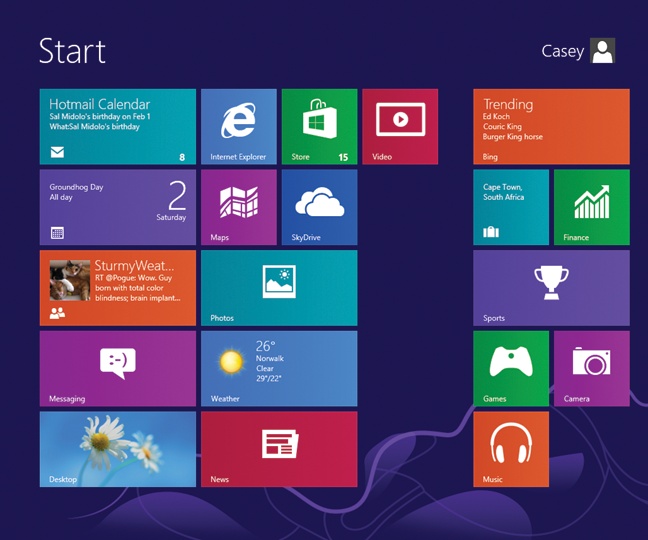
When you first boot up Windows 8, you’re greeted with the Start screen—a vibrant, tile-based interface designed to provide quick access to your favorite apps and information. Here’s a breakdown of the key elements:
- Tiles: The Start screen is comprised of colorful tiles, each representing an app, program, or feature. These tiles are dynamic and can display real-time updates, such as new emails, calendar appointments, or news headlines.
- Charms Bar: Accessible by swiping in from the right edge of the screen or pressing Win + C, the Charms Bar houses essential functions like Search, Share, Start, Devices, and Settings.
- App Bar: When you right-click or swipe up on a tile, you’ll reveal the app bar, which contains additional options and commands specific to the selected app.
- Live Tiles: Many tiles on the Start screen are “live,” meaning they display real-time information or updates. You can customize which tiles are live and adjust their size.
Basic Navigation:
Now, let’s delve into the basic navigation techniques for efficiently maneuvering around the Start screen:
- Mouse/Touchpad: Move your mouse cursor to the lower-left corner of the screen or swipe up from the bottom edge to reveal the Start button. Clicking or tapping on it will bring you back to the Start screen.
- Scrolling: Use the scroll wheel on your mouse or swipe horizontally on a touchscreen to scroll left or right through the Start screen.
- Search: Access the Search charm by swiping in from the right edge of the screen or pressing Win + Q. Here, you can search for apps, settings, files, or information across your system.
- Pin and Unpin Tiles: To pin an app to the Start screen, right-click or long-press on the app’s icon and select “Pin to Start.” Conversely, to remove a tile, right-click or long-press on it and choose “Unpin from Start.”
- Grouping Tiles: You can organize your tiles into groups to keep related apps together. To create a new group, drag a tile to an empty space on the Start screen, and when a vertical bar appears, release the tile.
- Customizing Tile Sizes: Right-click or long-press on a tile, then select “Resize” to choose from different tile sizes: Small, Medium, Wide, or Large. This allows you to prioritize and highlight important apps.
Advanced Customization:
For users who want to personalize their Start screen even further, Windows 8 offers a range of advanced customization options:
- Background: You can customize the background of the Start screen by right-clicking or tapping and holding on an empty area, then selecting “Personalize.” Here, you can choose from various background colors and patterns.
- Organizing Tiles: Arrange and group your tiles to suit your workflow. Simply drag and drop tiles to reposition them or move them between groups.
- Name Groups: Right-click on a group header and select “Name Group” to give it a custom name. This helps you quickly identify and locate specific sets of apps.
- Live Tile Settings: Some apps allow you to customize their live tile behavior. Right-click or tap and hold on a live tile, then select “Turn live tile off” to disable live updates or “Turn live tile on” to enable them.
- Custom Tile Icons: While Windows 8 doesn’t natively support custom tile icons, third-party tools like TileIconifier allow you to create custom icons for your Start screen tiles.
Tips for Efficient Navigation:
To streamline your navigation experience on the Start screen, consider implementing these handy tips:
- Use Keyboard Shortcuts: Learn and utilize keyboard shortcuts like Win + D to quickly access the desktop, Win + Q to open the Search charm, or Win + I to open the Settings charm.
- Group Similar Apps: Organize your tiles into logical groups based on categories like Productivity, Entertainment, Utilities, etc., to make finding apps easier.
- Utilize Semantic Zoom: Pinch or use Ctrl + Mouse Wheel to zoom out and get an overview of your Start screen. This makes it easier to rearrange tiles and manage groups.
- Customize Layouts for Different Devices: If you’re using Windows 8 on multiple devices, consider customizing the Start screen layout to suit each device’s screen size and orientation.
- Experiment with Different Tile Sizes: Play around with different tile sizes to find the optimal layout for your Start screen. Some apps may benefit from larger, more prominent tiles, while others may be better suited to smaller ones.
Conclusion:
Navigating the Start screen in Windows 8 may initially feel unfamiliar, but with practice and exploration, you’ll quickly adapt to its dynamic interface and discover its efficiency-boosting features. Whether you’re customizing tile sizes, organizing groups, or accessing essential functions through the Charms Bar, mastering the Start screen is key to unlocking the full potential of Windows 8. So, dive in, experiment, and make the Start screen your own personalized gateway to productivity and creativity in the world of Windows 8.


