How to Protect Cells in Excel
Protecting cells in Excel is a crucial feature for ensuring data integrity, preventing accidental changes, and maintaining the structure of your worksheets. Excel offers various methods and techniques to protect cells, ranging from basic cell locking to advanced protection settings. In this comprehensive guide, we will delve into the different ways to protect cells in Excel, explore practical applications, troubleshoot common issues, and outline best practices.
Table of Contents
- Introduction to Cell Protection in Excel
- Why Protect Cells in Excel?
- Basic Concepts of Cell Protection
- Cell Locking and Worksheet Protection
- Types of Protection
- How to Lock Cells in Excel
- Locking Specific Cells
- Locking All Cells
- Locking Formulas
- How to Protect a Worksheet
- Applying Worksheet Protection
- Setting Passwords
- Customizing Protection Settings
- Advanced Cell Protection Techniques
- Protecting Specific Ranges
- Allowing Users to Edit Specific Cells
- Using VBA for Cell Protection
- Practical Applications of Cell Protection
- Protecting Financial Models
- Securing Data Entry Forms
- Preventing Unauthorized Changes
- Troubleshooting Common Issues
- Forgotten Passwords
- Unintended Locked Cells
- Compatibility Issues
- Best Practices for Cell Protection
- Clear Communication
- Regular Updates and Reviews
- Balancing Protection and Usability
- Conclusion
1. Introduction to Cell Protection in Excel
Excel is a powerful tool for data management, analysis, and presentation. However, the same power that makes Excel versatile can also make it prone to accidental changes or unauthorized edits. Protecting cells in Excel is a way to safeguard your data and ensure that only authorized users can make changes to specific parts of your worksheet.
What is Cell Protection?
Cell protection in Excel involves locking cells and protecting the worksheet to prevent unauthorized edits. By default, all cells in an Excel worksheet are locked, but this protection is not enforced until you protect the worksheet.
2. Why Protect Cells in Excel?
Cell protection is essential for several reasons:
- Data Integrity: Ensures that critical data is not accidentally altered or deleted.
- Security: Protects sensitive information from unauthorized access.
- Structured Workflow: Maintains the layout and structure of complex worksheets, preventing users from making structural changes.
- Controlled Data Entry: Limits data entry to specific cells, reducing the risk of errors.
3. Basic Concepts of Cell Protection
Understanding the basic concepts of cell protection in Excel is crucial before applying protection settings.
Cell Locking and Worksheet Protection
- Cell Locking: This property is applied to individual cells, indicating whether they should be protected when the worksheet is protected.
- Worksheet Protection: This feature enforces the protection of locked cells, making them read-only.
Types of Protection
Excel offers several types of protection:
- Worksheet Protection: Prevents changes to the content and structure of a worksheet.
- Workbook Protection: Restricts actions such as adding, deleting, or moving sheets within a workbook.
- Range Protection: Allows specific users to edit certain ranges within a protected worksheet.
4. How to Lock Cells in Excel
Before protecting a worksheet, you need to determine which cells to lock.
Locking Specific Cells
Steps:
- Select the cells you want to lock.
- Right-click and select Format Cells.
- Go to the Protection tab.
- Check the Locked box.
- Click OK.
Locking All Cells
By default, all cells are locked. To enforce this:
- Protect the worksheet (details in the next section).
Locking Formulas
Steps:
- Select the cells containing formulas.
- Right-click and select Format Cells.
- Go to the Protection tab.
- Check the Locked and Hidden boxes.
- Click OK.
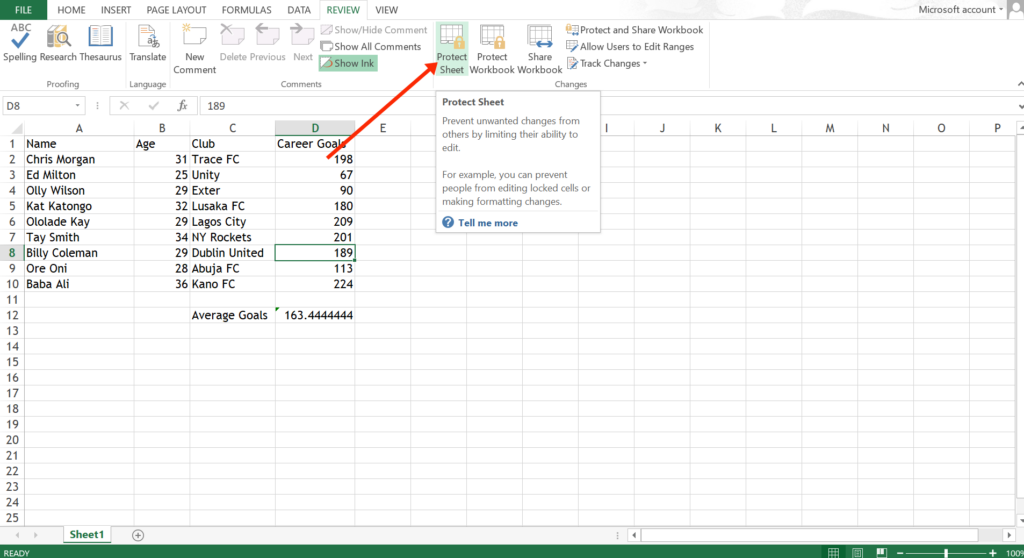
5. How to Protect a Worksheet
After locking the desired cells, you need to protect the worksheet to enforce the cell protection.
Applying Worksheet Protection
Steps:
- Go to the Review tab on the Ribbon.
- Click on Protect Sheet.
- Choose the actions you want to allow users to perform (e.g., select unlocked cells).
- Enter a password if desired.
- Click OK.
Setting Passwords
Setting a password is optional but recommended for additional security. Ensure the password is strong and memorable.
Customizing Protection Settings
Excel allows you to customize what actions users can perform on a protected worksheet. For example, you can allow users to format cells, insert columns, or sort data while still protecting the content.
6. Advanced Cell Protection Techniques
For more complex scenarios, Excel offers advanced protection techniques.
Protecting Specific Ranges
Steps:
- Go to the Review tab.
- Click on Allow Users to Edit Ranges.
- Define the range and set permissions.
- Click Protect Sheet.
Allowing Users to Edit Specific Cells
You can allow certain users to edit specific cells even within a protected worksheet by setting permissions in the “Allow Users to Edit Ranges” dialog box.
Using VBA for Cell Protection
For advanced users, VBA (Visual Basic for Applications) can automate cell protection.
Example VBA Code:
Sub ProtectCells()
 Dim ws As Worksheet
 Set ws = ThisWorkbook.Sheets("Sheet1") ' Protect the worksheet
 ws.Protect Password:="password", UserInterfaceOnly:=True ' Lock specific range
 ws.Range("A1:C10").Locked = True
 End Sub
7. Practical Applications of Cell Protection
Protecting Financial Models
Financial models often contain complex formulas and data that must remain unchanged. Protecting these cells ensures the integrity of the calculations.
Steps:
- Lock cells containing formulas.
- Protect the worksheet.
Securing Data Entry Forms
Data entry forms can be protected to ensure that users can only enter data in designated cells.
Steps:
- Unlock cells designated for data entry.
- Protect the worksheet.
Preventing Unauthorized Changes
To prevent unauthorized changes to critical data:
- Lock the necessary cells.
- Set a strong password when protecting the worksheet.
8. Troubleshooting Common Issues
Forgotten Passwords
If you forget the password for a protected worksheet:
- Solution: Use a password recovery tool or consult with IT support. Unfortunately, there is no built-in method in Excel to recover a forgotten password.
Unintended Locked Cells
If you find that cells are unintentionally locked:
- Solution: Unprotect the worksheet, unlock the necessary cells, and then reapply protection.
Compatibility Issues
Older versions of Excel may have compatibility issues with cell protection features:
- Solution: Ensure all users are using a compatible version of Excel. If necessary, save the workbook in a compatible format.
9. Best Practices for Cell Protection
Clear Communication
Ensure all users are aware of which cells are protected and why. This can prevent confusion and accidental changes.
Regular Updates and Reviews
Regularly review and update the protection settings to ensure they align with the current requirements of your worksheet.
Balancing Protection and Usability
While protecting cells is important, it’s also crucial to balance protection with usability. Ensure that necessary actions can still be performed by users without compromising the integrity of the worksheet.
10. Conclusion
Protecting cells in Excel is a vital skill for anyone working with important or sensitive data. By understanding and applying the various methods of cell protection, you can ensure the integrity and security of your data, maintain the structure of your worksheets, and prevent unauthorized changes. Whether you are managing financial models, data entry forms, or any other type of Excel worksheet, the techniques and best practices outlined in this guide will help you protect your data effectively.
Through a combination of basic and advanced protection methods, practical applications, and troubleshooting tips, you can master cell protection in Excel and enhance the overall security and functionality of your spreadsheets. Remember to regularly review your protection settings, communicate clearly with users, and balance protection with usability to achieve the best results.


