The Ultimate Guide to Saving Documents in Microsoft Word
Saving documents is a fundamental aspect of using Microsoft Word, ensuring that your hard work is preserved and accessible for future reference or sharing. Whether you’re drafting a report, crafting a letter, or compiling research notes, knowing how to save your document effectively is essential for maintaining productivity and organization. In this comprehensive guide, we’ll explore the intricacies of saving documents in Microsoft Word, empowering you with the knowledge and skills to safeguard your work with confidence and ease.
Understanding the Importance of Saving:
Before delving into the technicalities of saving documents in Microsoft Word, it’s crucial to recognize the importance of this process. Saving your work not only preserves your document in its current state but also protects against unexpected data loss due to software crashes, power outages, or other unforeseen events. Additionally, saving allows you to create multiple versions of your document, track changes over time, and collaborate with others more effectively. By making saving a habitual part of your workflow, you can ensure the integrity and longevity of your work.
Basic Document Saving:
Saving a document in Microsoft Word is a straightforward process that can be accomplished in just a few simple steps. Here’s how to do it:
- Navigate to the “File” Tab: Once you’ve finished drafting your document or made significant edits, navigate to the “File” tab located in the top-left corner of the Word interface. Clicking on this tab will reveal a dropdown menu with various options.
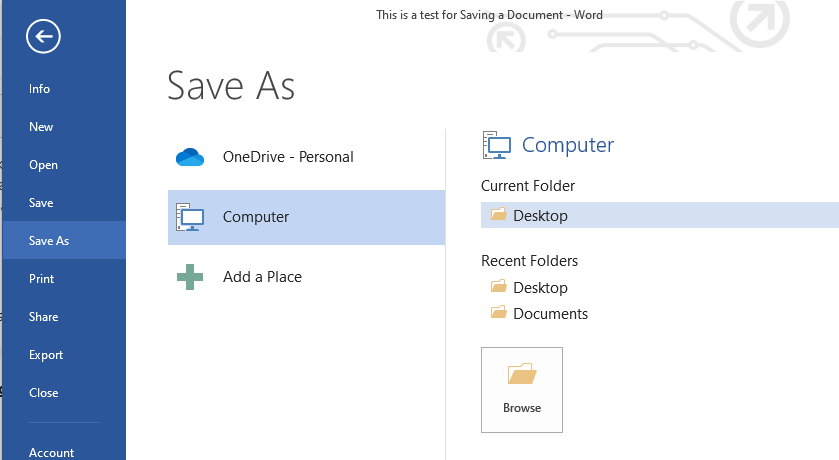
- Select “Save” or “Save As”: In the File menu, you’ll find the “Save” and “Save As” options. If you’re saving the document for the first time or want to save it with a new file name or location, choose “Save As.” If you’ve already saved the document previously and want to overwrite the existing version with your changes, select “Save.”
- Specify File Name and Location (If Using “Save As”): If you chose the “Save As” option, Word will prompt you to specify a file name and location for your document. Choose a descriptive file name that reflects the content of your document and select a folder or directory on your computer where you want to save it. You can also choose the desired file format, such as .docx or .pdf, before saving.
- Click “Save”: Once you’ve entered the file name and selected the save location (if using “Save As”), click the “Save” button to save your document. Word will confirm that your changes have been saved, and your document is now safely stored on your computer.
Advanced Saving Options:
While the basic saving process suffices for most scenarios, Word offers several advanced saving options to cater to specific needs and preferences. Here are some additional features you may explore:
- AutoSave:
Word’s AutoSave feature automatically saves your document at regular intervals, helping to prevent data loss in the event of a software crash or system failure. AutoSave is enabled by default for documents stored on OneDrive or SharePoint, but you can also enable it for local files by clicking on the “AutoSave” toggle in the top-right corner of the Word interface.
- Save Versions:
Word allows you to save multiple versions of your document, enabling you to track changes over time and revert to previous versions if needed. To save a version of your document, navigate to the “File” tab, select “Save As,” and choose the “Save a Version” option. You can then provide a description for the version and specify whether it’s a major or minor version.
- Save to Cloud Storage:
In addition to saving documents locally on your computer, Word allows you to save documents directly to cloud storage services such as OneDrive, Dropbox, or Google Drive. This enables you to access your documents from any device with an internet connection and collaborate with others more seamlessly.
Best Practices for Document Saving:
While saving documents in Microsoft Word may seem like a straightforward task, adopting best practices can help streamline your workflow and ensure the safety and integrity of your work. Here are some tips to consider:
- Save Early, Save Often:
Get into the habit of saving your document frequently, especially after making significant edits or additions. This minimizes the risk of data loss and ensures that your work is always up to date.
- Use Descriptive File Names:
When saving your document, choose a file name that accurately reflects its content and purpose. Descriptive file names make it easier to locate and identify documents later on, saving you time and frustration.
- Backup Your Documents:
In addition to saving documents locally on your computer, consider implementing a backup strategy to protect against data loss. This could involve regularly backing up your files to an external hard drive, cloud storage service, or network drive.
Conclusion:
Saving documents in Microsoft Word is a fundamental aspect of the writing process, ensuring that your work is preserved and accessible for future reference or sharing. By mastering the basic saving process and exploring advanced options, you can safeguard your documents with confidence and ease. Whether you’re a student, professional, or creative writer, incorporating best practices for document saving into your workflow can enhance productivity, organization, and peace of mind. So, the next time you finish drafting a document in Word, remember to click “Save” and rest assured that your hard work is secure and ready for whatever the future may hold.


