Unlocking Seamless Migration with Windows Easy Transfer: A Comprehensive Guide

Transitioning to a new operating system can be a daunting task, especially when it involves migrating files, settings, and user accounts. Fortunately, Windows 7 offers a user-friendly solution called Windows Easy Transfer, designed to simplify the migration process and ensure a seamless transition from older Windows versions. In this comprehensive guide, we’ll explore the ins and outs of using Windows Easy Transfer to migrate files and settings to Windows 7, empowering you to effortlessly bring your digital world into the next generation.
Understanding Windows Easy Transfer:
Before delving into the migration process, let’s grasp the essence of Windows Easy Transfer. Developed by Microsoft, Windows Easy Transfer is a built-in utility designed to facilitate the transfer of files, folders, user accounts, and settings from one computer to another, or from one Windows operating system to another. Whether you’re upgrading to Windows 7 from an earlier version of Windows or moving to a new computer, Windows Easy Transfer streamlines the migration process, saving you time and effort.
Preparing for Migration:
Preparation is key to ensuring a smooth migration experience. Before initiating the migration process with Windows Easy Transfer, take the following preparatory steps:
- Assess Migration Scope: Determine the scope of migration by identifying the files, settings, and user accounts you wish to transfer to Windows 7. This includes personal documents, photos, videos, music, email accounts, browser favorites, and application settings.
- Backup Important Data: Prioritize data integrity by backing up important files and folders to an external hard drive, USB flash drive, or cloud storage service. This serves as a safety net in case of unexpected issues during the migration process.
- Update Applications: Ensure that all installed applications on your current system are up to date, as outdated software may not be fully compatible with Windows 7. Check for updates using the respective application’s update mechanism or download the latest versions from the official websites.
- Download Windows Easy Transfer: While Windows Easy Transfer is included with Windows 7, it may require downloading on older Windows versions. Visit the Microsoft website or use Windows Update to download and install Windows Easy Transfer if necessary.
Performing Migration with Windows Easy Transfer:
With the groundwork laid, let’s dive into the migration process using Windows Easy Transfer:
- Open Windows Easy Transfer: Click on the Start button and type “Windows Easy Transfer” in the search box. Select “Windows Easy Transfer” from the search results to launch the utility.
- Choose Migration Method: Windows Easy Transfer provides two migration methods: using a transfer cable or network connection, or creating a custom Easy Transfer file (ETT) to transfer later. Select the appropriate method based on your preference and available resources.
- Select Transfer Options: Specify whether you’re transferring data from an old computer to a new computer, or from an old operating system to Windows 7 on the same computer. Choose “This is my old computer” if migrating from a previous Windows version, or “This is my new computer” if setting up a new Windows 7 installation.
- Choose Transfer Method: Depending on your selected migration method, follow the on-screen instructions to connect the computers using a transfer cable, network connection, or by saving the Easy Transfer file to an external storage device.
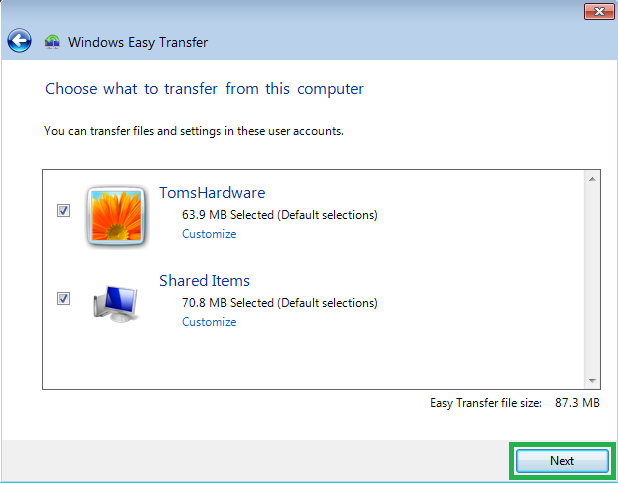
- Customize Transfer: Windows Easy Transfer allows you to customize the migration by selecting specific files, folders, user accounts, and settings to transfer. Review the list of items to be transferred and deselect any items you wish to exclude from the migration.
- Initiate Transfer: Once the transfer options are configured, click “Transfer” to initiate the migration process. Windows Easy Transfer will begin copying files, settings, and user accounts to the destination computer or Windows 7 installation.
- Complete Migration: After the transfer is complete, Windows Easy Transfer will display a summary of transferred items and any additional instructions. You can then review the transferred data on the destination computer or Windows 7 installation to ensure everything migrated successfully.
Post-Migration Tasks:
With the migration complete, there are a few additional tasks to ensure a seamless transition to Windows 7:
- Verify Data Integrity: Double-check transferred files, folders, and settings on Windows 7 to ensure data integrity and completeness. Verify that all essential files and settings were successfully migrated.
- Reinstall Applications: Reinstall any applications that were not transferred by Windows Easy Transfer. Use the installation media or download the latest versions from the official websites.
- Configure Settings: Customize Windows 7 settings to your preferences, including desktop background, theme, screen resolution, and system preferences. Adjust settings for installed applications as needed.
- Perform Updates: Install Windows updates and patches to ensure your system is up to date and secure. Check for updates using Windows Update or the Microsoft Update Catalog.
Conclusion:
With Windows Easy Transfer as your ally, migrating files and settings to Windows 7 becomes a breeze. By following the comprehensive guide outlined above, you can seamlessly transition to Windows 7 while preserving your valuable data, settings, and user accounts. Whether you’re upgrading from an older Windows version or setting up a new Windows 7 installation, Windows Easy Transfer empowers you to bring your digital world along for the ride, ensuring continuity and familiarity in your computing experience.


