Unveiling the Invisible: A Comprehensive Guide to Revealing Hidden Files, Folders, and Drives in Windows 7
Introduction:
Windows 7, a widely used operating system known for its stability and user-friendly interface, often conceals certain files, folders, and drives by default to prevent users from inadvertently modifying critical system files. However, there are times when users need to access and manipulate these hidden elements for various reasons. This comprehensive guide will navigate you through the methods to reveal hidden files, folders, and drives in Windows 7, empowering you with the knowledge to unveil the invisible and take control of your system’s hidden components.
I. Using File Explorer:
- Open File Explorer:
- Launch File Explorer by pressing the “Windows key + E” or by clicking on the File Explorer icon in the taskbar.
- Navigate to the Folder:
- Go to the folder where you suspect hidden files or folders might be located.
- View Tab:
- Click on the “View” tab in the File Explorer ribbon at the top.
- Check Hidden Items:
- In the “Show/hide” group, check the “Hidden items” checkbox. This action will reveal hidden files and folders in the selected directory.
II. Using Control Panel:
- Open Control Panel:
- Press the “Windows key + R” to open the Run dialog, type “control,” and press “Enter” to open the Control Panel.
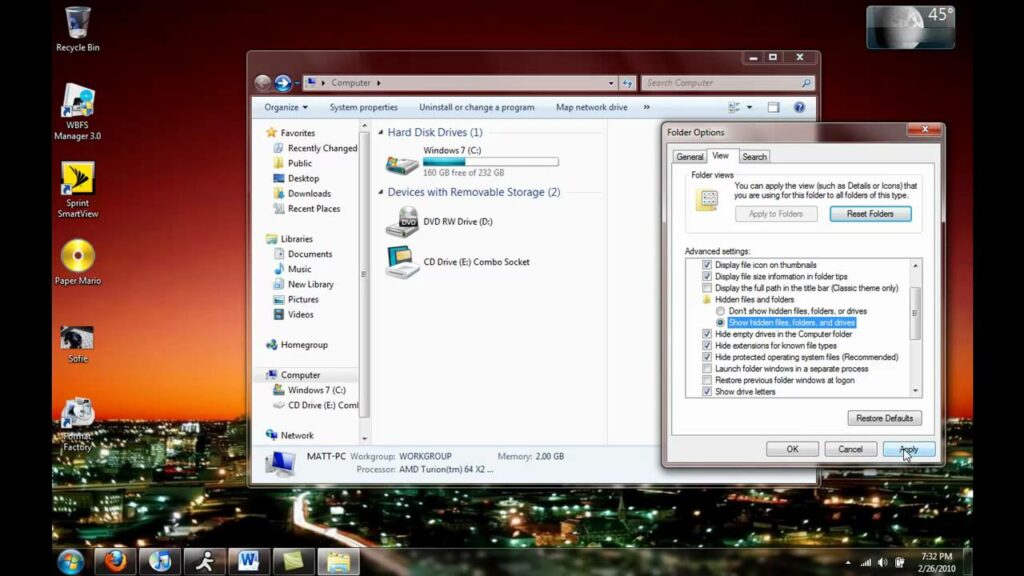
- Folder Options:
- In the Control Panel, navigate to “Appearance and Personalization” and select “Folder Options.”
- View Tab:
- In the “Folder Options” window, go to the “View” tab.
- Show Hidden Files:
- Under the “Advanced settings” section, select “Show hidden files, folders, and drives.”
III. Using Command Prompt (CMD):
- Open Command Prompt:
- Press the “Windows key + S,” type “cmd,” and press “Enter” to open the Command Prompt.
- Navigate to the Drive:
- Use the “cd” command to navigate to the drive where hidden files are located. For example:cmd
cd D:
- Use the “cd” command to navigate to the drive where hidden files are located. For example:
- List Hidden Files:
- Use the “dir” command with the “/a” switch to list all files, including hidden ones:cmd
dir /a
- Use the “dir” command with the “/a” switch to list all files, including hidden ones:
IV. Editing Registry Entries:
- Open Registry Editor:
- Press the “Windows key + R” to open the Run dialog, type “regedit,” and press “Enter” to open the Registry Editor.
- Navigate to Registry Key:
- Go to the following registry key:
HKEY_CURRENT_USER\Software\Microsoft\Windows\CurrentVersion\Explorer\Advanced
- Go to the following registry key:
- Set Hidden Value:
- Double-click on “Hidden” in the right pane and set its value to “1” to show hidden files, folders, and drives or “2” to not show them.
V. Group Policy Editor (Professional and Ultimate Editions):
- Open Group Policy Editor:
- Press the “Windows key + R,” type “gpedit.msc,” and press “Enter” to open the Local Group Policy Editor.
- Navigate to Group Policy Setting:
- Go to “User Configuration” -> “Administrative Templates” -> “Windows Components” -> “Windows Explorer.”
- Toggle Hidden Files:
- Double-click on “Hide these specified drives in My Computer” and set it to “Disabled” to show hidden drives.
Conclusion:
Navigating the intricacies of revealing hidden files, folders, and drives in Windows 7 enhances your ability to manage and customize your computer environment. Whether using the intuitive features of File Explorer, accessing advanced settings in the Control Panel, leveraging command-line tools like Command Prompt, tweaking registry entries, or utilizing the Group Policy Editor for professional and ultimate editions, Windows 7 provides a spectrum of options for users with varying levels of technical expertise. By following this comprehensive guide, you are now equipped to master the art of unveiling the invisible components of your Windows 7 system, giving you greater control over your digital workspace.