How to Use Photoshop’s ‘Blend If’ Sliders to Seamlessly Transfer Textures Across Uneven Lighting
How to Use Photoshop’s ‘Blend If’ Sliders to Seamlessly Transfer Textures Across Uneven Lighting
When it comes to creating realistic composites in Photoshop, its success often depends on how effectively textures interact with the lighting conditions that are already there. The Blend If slider is one of the most effective tools for accomplishing this goal, but it is also one of the most misused. The Blend If tool, in contrast to more fundamental blending modes or tweaks to opacity, operates by targeting tonal ranges. This gives you the ability to integrate textures into highlights, midtones, or shadows with pinpoint accuracy. When dealing with uneven lighting, when simple overlays might seem unnatural or flat, this approach becomes very useful since it allows for more dramatic effects. You are able to control precisely where a texture emerges and where it vanishes if you have a solid grasp of how tonal separation works and how Photoshop interprets the luminance of individuals pixels. This results in an effect that is far more natural and smooth, and it matches the way lighting behaves in the actual world. The ability to grasp Blend If provides you with a technical edge, whether you are improving surfaces, adding grunge, or combining items. This makes the application of texture a regulated and logical procedure, as opposed to a haphazard job. The purpose of this tutorial is to examine how to make efficient use of it to achieve professional-level outcomes.
Getting a Better Understanding of the Blend If Sliders Technology
The fact that Blend If relies on tonal values rather than colors or the opacity of layers is what gives it its exceptional efficiency when it comes to mixing textures. Blend If gives you the ability to select which of the brightness values present in an image should be seen and which should be concealed. The brightness values of each pixel in an image range from black to white. When it comes to the sliders, there are two distinct categories: the current layer and the underlying layer. You have the ability to instruct Photoshop to conceal portions of a texture layer depending on the brightness of the layer that is beneath it or on the brightness of the layer that is above it by changing these sliders. This results in a dynamic interaction between layers that reacts to the lighting conditions that are already present in the picture. Blend If is a tool that automates the process of masking regions accurately, as opposed to manually masking areas. When dealing with complicated lighting conditions, such as shadows thrown over rough surfaces or unequal exposure across a subject, this method is extremely valuable since it allows for effective light management.
Getting to the Blend If Panel and Finding Your Way Around It
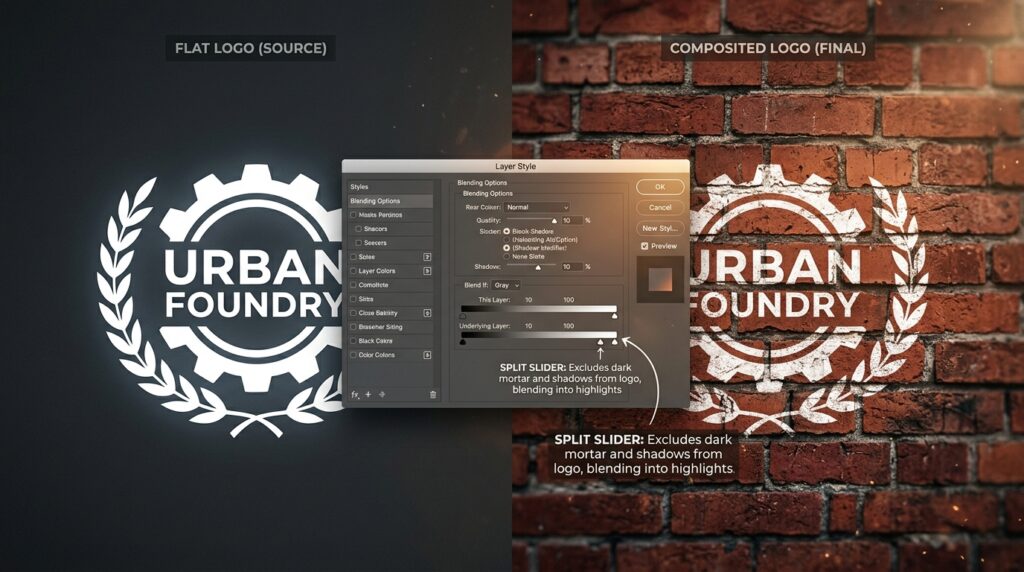
You must first visit the Layer Style dialog in order to begin utilizing Blend If. This is the location where these controls are placed. You may do this by double-clicking on a layer in the Layers panel, which will display a sophisticated interface that has a variety of blending settings. There are sliders for the Blend If feature located at the bottom of this panel. These sliders are complemented by gradient bars that depict different tonal ranges. When implemented appropriately, the interface may seem to be simple, but it really has a huge influence. It is possible to shift each slider to the left or right in order to conceal certain tonal ranges from view. You may create a seamless transition rather than a hard cutoff by holding down a modifier key, which enables you to divide the slider. This split feature is essential for producing natural blending because it softens the edges where the texture fades in or out. This is because it removes the sharp edges. Before implementing more complex approaches, it is necessary to have a solid understanding of this panel first.
Implementing Realistic Integration Through the Use of Highlight and Shadow Targeting
The capability of Blend If to separate highlights and shadows simultaneously during the application of textures is among the most significant features of this program. For instance, if you are applying a texture to a surface that has brilliant highlights, you may use the slider to prevent the texture from appearing in those bright places during the application process. This allows the texture to accentuate darker places while preserving the illumination that was originally there. In the other direction, you may remove texture from shadows in order to keep the depth and contrast intact. In real-world settings, where the intensity of the light influences how details are viewed, this selective visibility simulates the way textures behave in certain settings. By making careful adjustments to the sliders, you can make certain that the textures do not dominate the picture but rather compliment the lighting structure of the image. When using just the basic blending modes, it is impossible to obtain this level of control.
Improving Transitions by Utilizing Split Sliders in Order to Achieve Smooth Blending
When working with Blend If, one of the most typical mistakes that people make is depending on single-point slider changes, which may result in edges that are harsh and unnatural. The answer is to divide the sliders, which will result in a progressive transition between sections that are visible and areas that are secret. If you want to do this, you will need to hold down a modifier key and move one side of the slider separately. The ultimate result is a feathery blend that incorporates the texture into the appearance of the picture without any noticeable gaps. Because it eliminates rapid shifts that might destroy the perception of reality, this method is vital when dealing with uneven lighting because it prevents abrupt changes. The presence of smooth transitions guarantees that the texture will fade in a natural manner throughout the various tonal ranges. Additionally, this method lowers the need for extra masking, which results in time savings while preserving their accuracy. In order to take your compositing approach to the next level, mastering split sliders is an essential step.
Utilizing Layer Masks in conjunction with Blend If to Achieve Advanced Control
Blend If is a strong tool on its own, but when combined with layer masks, it enables a great level of customization that was previously unavailable. Layer masks provide you the ability to manually adjust certain regions, whereas Blend If manages tonal mixing automatically. This hybrid method is perfect for complicated photos in which the lighting conditions at different points throughout the frame are dramatically different. For example, you might use Blend If to remove a texture from highlights on a global scale, and then use a mask to selectively reinstate it in certain sections of the image. Automation and human control are both provided by this combination, which guarantees that every aspect of the process is in accordance with your creative goals. Moreover, it enables non-destructive editing, which means that you may make adjustments to the mask as well as the sliders at any moment without compromising the quality of the image. It is common practice in the field of professional compositing and retouching to follow this technique.
The process of adjusting the scale and perspective of the texture before blending
In order to confirm that your texture is in accordance with the size and perspective of the underlying picture, it is essential to check this before using Blend If. When the texture seems deformed or out of place, even the most perfect blending will fail to achieve the desired effect. Resizing, rotating, and distorting the texture in order to bring it into alignment with the surface it is being applied to is what this process entails. The transformation controls allow for subtle modifications, while the perspective tools may assist in matching angles. After the texture has been included into the lighting environment in a natural way, Blend If may be used to make the adjustment. If you skip this step, you will most likely end up with composites that are not realistic since the texture will not interact with the picture in the proper manner. Accurate alignment guarantees that the blending process will increase realism rather than revealing inconsistencies, which would otherwise be the case.
Utilizing Blend If for a Wide Variety of Textures with Blend If
Blend If is versatile enough to handle a broad variety of materials, which is necessary since various textures call for different blending tactics. For instance, grunge textures are often most effective when applied to shadows and midtones, but tiny surface features may need to be apparent throughout a wider tonal range in order to be effective. To ensure that metallic textures retain their reflected brilliance, it may be necessary to preserve their highlights with great care. If you want your fabric textures to mix in seamlessly with your skin or clothes, you may need to use gentler transitions. Having an understanding of the properties of each kind of texture enables you to make more informed decisions on how to change the sliders. Blend If is a flexible tool that may be used for a variety of creative purposes, including picture modification, digital art, and product visualization, because to its versatility.
The Importance of Avoiding Common Errors When Blending Textures
When used improperly, Blend If has the potential to generate subpar outcomes, despite its powers. Excessive adjustment of the sliders is a typical problem that may result in the loss of an excessive amount of information and the formation of gaps in the texture that are not natural. Ignoring the direction in which the illumination is coming from the underlying picture is another error that may result in shading that is uneven. If you fail to separate the sliders, you may also end up with abrupt shifts that contradict the sense of reality. Moreover, the use of textures without taking into consideration the harmony of colors might result in the composite seeming unconnected. In order to avoid these potential hazards, it is essential to make modifications gradually and to regularly examine the picture while zooming in and out at various levels. It is essential to exercise subtlety while dealing with tonal mixing since even minute adjustments may have a large effect on the final product.
Methods that do not cause damage to the workflow in order to improve its efficiency
The concept of efficiency in Photoshop encompasses not only the achievement of speed but also the preservation of flexibility throughout the editing process. You are able to return and make adjustments to the parameters at any step of the process since Blend If permits non-destructive editing. Especially in professional processes, where several changes are often required, this is a really helpful feature. When you retain textures on separate layers and use Blend If rather than making permanent alterations, you are able to maintain the integrity of the original picture. Taking this method also makes it simpler to experiment with a variety of blending tactics and textures without having to commit to a specific solution. By enabling you to modify textures individually while preserving all transformations and modifications, smart objects may further improve the workflow that you are already using. By combining these methods, you can assure that the editing process will be simplified and flexible, which will promote the production of high-quality products.