The Hidden Method to Rasterize Complex Vector UI Mockups Without Blurry Edges
The Hidden Method to Rasterize Complex Vector UI Mockups Without Blurry Edges
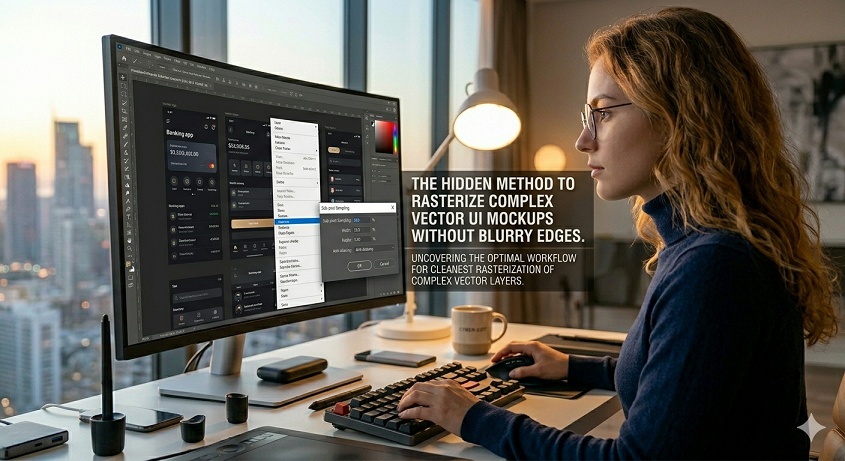
When it comes to preparing assets for usage on the web, thumbnails, or visuals that are optimized for efficiency, rasterizing complicated vector user interface mockups is often a crucial step. Nevertheless, throughout this process, designers regularly come across fuzzy edges and a loss of information, which compromises the sharpness of user interface components and decreases the overall professional quality of their images. When it comes to features that are very detailed, such as icons, typography, and interface lines, this issue is most obvious. When it comes to preventing blur, having a solid grasp of how vector data interacts with rasterization settings and pixel grids is essential. It is possible for designers to maintain the sharpness of even the most complex mockups by carefully choosing the document resolution, scaling choices, and export parameters. Because of a consistent approach, assets are able to maintain their clarity regardless of the screen size or resolution they are shown on. Moreover, it eliminates the need for recurrent adjustments or upscaling, both of which may result in a decrease in quality. By becoming proficient in these approaches, it is possible to make a smooth transition from vector to raster without sacrificing the visual quality of the image. When it comes to current user interface design, efficient rasterization promotes both speed and precision.
An Understanding of the Reasons Behind the Blurry Rasterized Vectors
Edges that are blurry are the result of vector forms being transformed into raster pixels without the appropriate alignment or resolution being adhered to. Vector graphics do not rely on the resolution of the display, which means that they may be scaled indefinitely without sacrificing quality. Once they have been rasterized, however, they are limited to the pixel grid of the picture that is being targeted. In the event that the vector pathways and pixel boundaries are not aligned properly, partial pixel coverage will occur, which will lead to borders that are blurry or jagged. An additional factor that makes the issue worse is a low document resolution or inappropriate scaling that occurs during the rasterization process. Understanding the underlying reason is necessary in order to find a solution to the problem. To prevent blurring, it is necessary to pay attention to both the resolution and the route alignment. When it comes to maintaining sharpness, the first step is to have an understanding of how pixels interact with vector data sets. Being aware of these mechanics enables precise control to be exercised throughout the conversion process.
Rasterization: Establishing the Optimal Resolution for the Process
When it comes to crisp rasterized assets, resolution is the very basis. It is important to work at a high resolution while creating user interface mockups since this guarantees that tiny features such as icons, lines, and text will stay clear after conversion. A popular method involves rasterizing the image at a size that is twice or even three times larger than the size that will be shown, and then scaling it down to the final dimensions. This technique maintains the edge definition while simultaneously reducing pixelation. The resolution of the document should also be adjusted so that it is compatible with the media that will be used for output, whether that medium is the web, mobile, or print. The use of post-rasterization sharpening is eliminated and artifacts are reduced when the resolution is adjusted appropriately. If you make an initial investment in ideal resolution, you can assure excellent consistency. Rasterization at a high resolution is very necessary in order to provide professional-looking graphics.
Bringing Vector Paths into Harmony with the Pixel Grid
When it comes to maintaining edge sharpness, pixel alignment is an extremely important factor. Through the process of rasterization, partly filled pixels that have a hazy appearance are produced when vector pathways are not aligned to the pixel grid. This problem may be mitigated to a lesser extent by ensuring that objects snap to the closest pixel border. Pixel-snapping options and alignment tools that automatically alter pathways are available in a variety of design applications currently available. The visual clarity of the user interface may be improved by aligning important elements such as buttons, icons, and borders. The importance of this cannot be overstated when it comes to sharp edges and thin lines. It is less necessary to do corrective editing after rasterization if the alignment is done correctly. In addition to this, it guarantees that the finished item exactly represents the vector design that was first created. In order to get professional-quality outcomes, pixel-perfect accuracy is absolutely necessary.
Figuring Out Which Rasterization Method and Anti-Aliasing Techniques Are Best
Rasterization settings, which may include anti-aliasing parameters, have a considerable influence on the output’s level of contrast and clarity. When anti-aliasing is used, edges are smoothed out by mixing colors between the object and the backdrop. However, if the parameters are not adjusted properly, excessive blur might occur. Selecting a strategy that minimizes smoothing while maintaining edge definition is an essential step in the process. There are certain applications that provide you the option to choose anti-aliasing settings such as standard, crisp, or none at all, depending on the amount of detail that you desire. It is helpful to establish the optimum method by testing various settings on pieces that are indicative of the whole. Through the use of the appropriate rasterization technology and anti-aliasing, it is possible to guarantee that edges will continue to be crisp and visually correct. Making adjustments to these settings is necessary in order to get high-quality outcomes.
Non-destructive rasterization via the use of smart objects
In order to enable non-destructive editing, vector elements must first be converted into smart objects before rasterization proceeds. This indicates that the original vector data is maintained, which enables alterations to be made to the scale or effects without causing blur occurrences. Additionally, the application of layer styles, masks, or transformations is simplified with the help of smart objects, all while preserving the clarity of the edges. The ability to maintain flexibility while providing crisp output is achieved via the use of rasterization inside the smart object container. When dealing with pieces or templates that are repeated rather often, this method is really helpful. The danger of lasting quality loss is decreased when non-destructive processes are used. Using smart objects in complicated mockups allows for more accuracy as well as greater variety.
Performing Subtle Sharpening Following the Rasterization Process
Even when the resolution and alignment are perfect, there is still a possibility of light softening. Enhancing edge definition without generating artifacts may be accomplished by the use of modest sharpening. The use of techniques such as high-pass filtering and selective sharpening allows for the preservation of smooth gradients and textures while simultaneously targeting key regions. Aim to prevent over-sharpening since it might result in the formation of halos or edges that are not natural. Maintaining professional visual standards and enhancing the sharpness of user interface elements are both accomplished via controlled sharpening. For the purpose of ensuring clarity, this stage serves as the ultimate refining. The sense of quality may be improved by strategic sharpening without affecting the effectiveness of the original design. Paying close attention to the specifics is essential here.
Setting Export Options to Optimise Performance for Web and Digital Use
In order to maintain the quality of the rasterized mockup, the export parameters need to be improved once it has been generated. Edge deterioration and color shifts may be avoided by selecting the appropriate file format, compression level, and color profile when working with them. Compression choices that are either lossless or of high quality are suggested for user interface elements, but transparency should be maintained where necessary. Export previews are a useful tool for ensuring that edges retain their sharpness across a variety of resolutions. In order to maintain professional standards, export settings should be consistent across all projects. In order to guarantee that files are web-ready, optimization must be performed without compromising the visual quality. In order to finish the rasterization operation, certain export practices are required.
Development of a Repetitive Workflow in Order to Achieve Consistent Quality
The creation of a disciplined methodology for the rasterization of sophisticated vector user interface mockups guarantees that the outcomes in numerous projects are consistent with one another. It is possible for designers to easily reproduce the process if they document resolution standards, alignment procedures, and anti-aliasing settings. Work that is repetitious may be reduced and quality can be maintained with the help of templates, smart objects, and preset export settings. The process should be reviewed and improved on a regular basis in order to meet any new software upgrades or needs for the project. When it comes to production, consistency helps reduce mistakes and saves a substantial amount of time. Not only does a repeatable process help scalability, but it also promotes professional output. It is possible for designers to rasterize even the most complex user interface mockups without sacrificing edge sharpness if they make an investment in a dependable technology.


