How to Export Transparent WebP and Animated GIF Sequences with Clean Edge Mattes Without Haloing
How to Export Transparent WebP and Animated GIF Sequences with Clean Edge Mattes Without Haloing
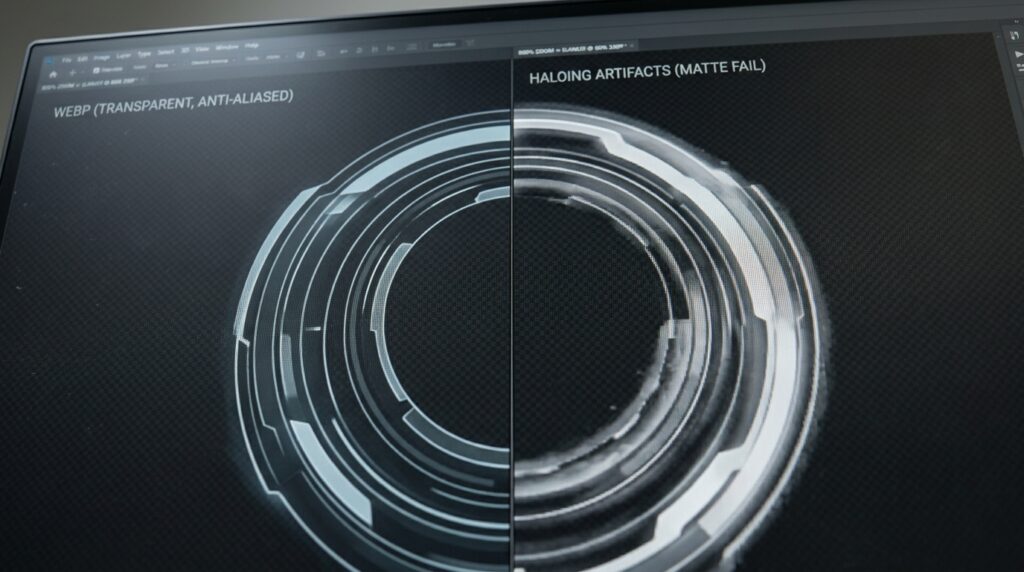
When exporting an animation or transparent image from Photoshop, you need to carefully manage transparency, edge mattes, color reduction, and file format options. Transparent WebP files and animated GIF sequences both potentially keep transparency, but each handles alpha information differently, which can result in unsightly edges around objects, logos, icons and animated graphics. These outlines (or halos as they are often called) are caused by the compositing or exporting of colors of edge pixels against the wrong background. Artwork created on a white background may create a dark fringe when placed on a black website background, whereas artwork prepared on a black background may have a pale outline on lighter backgrounds. Photoshop has various tools to assist with these challenges, such as layer masks, defringe operations, matte settings, and specific export options. It is important to understand the interaction of antialiasing with transparency because the edge pixels typically carry partially transparent color information that helps smooth out curved and diagonal designs. But if that data is improperly processed, the produced image could look rough, discolored or distinctly separated from its background. A good procedure starts with a clean source document, proceeds through the proper transparency and animation settings, and ends with evaluating the produced files on different backgrounds. Designers can use these techniques in a methodical way to develop translucent WebP visuals and animated GIFs with smoother edges, reduced file sizes and more uniform visual quality across websites and digital interfaces.
Understanding Transparency, Alpha Channels and Edge Haloing
Transparency is the amount of a pixel’s color that is visible in the final composite, when an image is composited over a background. Formats like PNG and WebP use alpha transparency to express the opacity of pixels, which enables smoothing of the edges of forms and text by using partially transparent pixels. Antialiasing requires these intermediate pixels because they provide visually smooth transitions between the foreground artwork and the surrounding transparency. Problems occur, however, when edge colors are estimated relative to a background that is different from the background on which the image will ultimately appear. For instance, a white logo taken from a white canvas may have almost white edge pixels which can still be seen when overlayed on a dark background. This creates a faint halo, although the center area of the logo appears properly translucent. The way transparency works in animated GIFs is also different . GIFs can only have one color that is translucent , while WebP can have a range of alpha values . Therefore, partially transparent edge pixels need to be approximated using palette colors, dithering or background-dependent matte blending. Knowing these differences can help you figure out which repair procedure is right for each format. So a clean export is not just a matter of picking the right file type, but also of making sure that the original edge pixels have appropriate colors for the background you want.
How to Prepare Photoshop Layers for Clean Transparent Exports
Before exporting the graphic, be sure to check the photoshop document to make sure the transparency is real and there are no stray background pixels. Open the Layers panel and hide any background layer that you don’t want to be part of the final image. The translucent areas should be showing Photoshop’s checkerboard pattern, and not a solid color. If the artwork was taken from a photograph or a colored background, again check the layer mask for any contamination on the edges. A mask may look right at normal viewing size, but it may include faint background colors surrounding hair, rounded objects, fine typography, or intricate silhouettes. Where applicable use Select and Mask to refine mask. Depending on subject alter edge detection, feathering, contrast and shift-edge settings. Too much feathering can lead to a soft fringe, too much contrast can lead to sharp outlines. A little mask tweaking may be all that’s needed for simple drawings, but more intricate photographic cutouts usually require more elaborate modification. “If possible, keep the original layer and do the adjustments on a duplicate or an editable mask.” It is also important to set a temporary dark layer and a temporary bright layer under the artwork to show any halos that could be hard to see on the checkerboard. Such a preparation minimizes the probability of encountering edge problems only after the image has been uploaded to a web site or included into an animation.
Defringe and Matte Controls for Removing Background Color Bleed
Background contamination is when the pixels around an isolated object retain color information from the original context. You can use the Defringe command in Photoshop to extend cleaner colors from inside the item out to the boundaries so that you can remove a thin border of undesired background color. To test this technique, duplicate the required layer, pick the artwork, then select Layer, then Matting, where you will find the command Defringe. Choose a modest pixel width because severe defringing can distort thin outlines, eliminate minor details or change the perceived shape of the object. The right value depends on the image resolution and thickness of the contaminated border. Photoshop’s Remove White Matte and Remove Black Matte commands can also be useful if the artwork has been composited against white or black, respectively. These alternatives work best when the original contamination is the same as the relevant matte hue. They may be ineffective or produce artifacts when the source has complex colors or when multiple lighting conditions are present. After rectification, look at curving edges, thin lines and tight spaces at 100 percent magnification. If the effect is hurting essential details, undo it and tweak the mask or use more localized modifications. Defringe and matte removal are correction tools, not universal solutions, thus the final outcome should always be examined against the real backgrounds on which the artwork will appear.
Export Transparent WebP Files Handling Alpha Correctly
WebP enables transparency using alpha information, making it suited for web visuals that require clean edges and reasonably compact files. Depending on the installed version and setup, there is normally an available WebP workflow in Photoshop to export WebP via Save a Copy or other appropriate export path for supported versions. First, make sure that the document is truly transparent and that the background layer is turned off. Select WebP, and see the available encoding and quality options. Lossless WebP keeps the pixel values better, while lossy WebP reduces the file size by estimating the picture information. Lossy compression, depending on the encoder and its parameters, might create slight edge aberrations or color changes, especially around high contrast forms and fine detail. For logos, interface icons, and visuals with hard edges, compare the lossless output to a high-quality lossy version to decide which is appropriate. Be sure that the export technique you select maintains alpha transparency, not flattening the image against a background. After export, reopen the file in a suitable application or browser and place it on both light and dark backgrounds. This test can assist expose halos that can be difficult to spot within Photoshop. Also, check the real file size and transparency, as a seemingly correct preview does not guaranty that all export settings were applied as intended.
How to Make Animated GIFs Without Jagged or Discolored Edges
Animated gifs take a little extra work, because the format has a limited palette and no full per-pixel alpha transparency. Photoshop usually creates an animated GIF using a frame-based or timeline approach, depending on how the animation was compiled. Check each frame before exporting to make sure that the subject remains consistent and that no unnecessary background pixels appear as the artwork travels. If available, open the Save for Web (Legacy) box and pick GIF as the export format. Check the color pallet, dithering method, transparency option, and matte setting. The palette controls which colors can be used to represent the animation . Dithering can approximate colors not accessible in the palette . More dithering helps hide color banding, but it can also introduce texture and increase the file size. GIF transparency is binary, therefore pixels are usually all transparent or all opaque. Partially transparent antialiased edges must be represented by palette colors or matte mixing. That is the reason why a GIF can appear less fluid than a transparent WebP version of the same artwork. Test the animation on the background you wish to use and make sure the sequence of frames plays correctly. In general, if you need a graphic to look clean on many different background colors and the target device supports animated WebP, then transparent WebP is the better choice.
GIF Transparency: What Matte Color Should You Choose
The matte setting is particularly significant when exporting GIF animations because it defines how the edge pixels are merged before applying the limited representation of transparency. If the artwork will be placed on a white webpage, a white matte will help the edges blend in seamlessly with that background. If the animation is to be used on a dark interface, it may be a cleaner result if you use a matte that matches the actual interface color. The problem is when the chosen matte does not fit the display environment in the end. When exported with a white matte, pale outlines could appear on black, navy or translucent backgrounds. A dark matte can create black fringes on lighter backgrounds. In the Photoshop Save for Web (Legacy) dialog box, select the Matte option and choose a color suited for the placement. If your image is going to appear on a number of unrelated backdrops, don’t assume that one matte will suit all. You might want to produce a WebP version with real alpha transparency, or several GIF versions for different backdrop colors. Animations should also be consistent between frames . If not , changing the color of edges can result in flickering outlines when playing the animation . Inspect a few typical frames, including those with the most intricate edges and the most motion. A carefully chosen matte helps with visual integration, but it cannot give the flexible semitransparent edges provided in formats that support full alpha transparency.
Optimizing Edge Quality, Color Palettes and File Size
You want clean borders and tiny file sizes, especially if your graphics are animated and meant for fast-loading web pages. Resizing a graphic can have a big impact on file size, but resize before the final edge inspection, as downsampling can introduce new partially transparent pixels. When using WebP, compare lossy and lossless encoding to see if the smaller file has apparent artifacts around outlines, text or high contrast transitions. For GIF, see how many colors are in the palette, then select a setting that retains the most vital visual information . A palette with too few colors can cause banding or inaccurate edge colors, yet a bigger palette could increase file size without improving every section of the animation. Dithering can help spread out inaccuracies in color approximation . But too much dithering can make flat pictures look noisy . Cropping the unneeded clear margins can help achieve reducing dimensions and improving loading efficiency. Animated files can reduce storage requirements by removing extraneous frames and choosing appropriate frame durations, as long as the animation is still visually accurate. Be careful not to repeatedly resize and export the same compressed file, as artifacts can build up in later processing stages. Keep a good master document, and produce your final documents from the master. This makes comparing export settings easier without ruining the original art work.
Troubleshooting Recurring Halos and Transparency Artifacts
If the halos still exist after export, see if the fault is with the source artwork, the transparency settings, the compression method, or the background used for the preview. First, put the exported file on a contrasting background in Photoshop or a browser. If the fringe is visible only in the exported version, it may be a matte or encoding problem. If the fringe is evident even in the source document, it typically needs mask refining or edge cleaning. Next, compare the same artwork exported as a transparent PNG or lossless WebP. If the alternate format appears OK, but the GIF does not, the issue could be with GIF’s transparency and palette limitations, and not necessarily a bad source layer. Check the artwork at 100 percent magnification and see if the halo follows the exact contour, appears as a one pixel outline or changes color around different edges. Uniform fringe is generally a telltale sign of background contamination, while irregular abnormalities can be caused by compression, limited palette, or incorrect frame processing. If the image was flattened against a colored background before this, just turning on transparency during export will not restore the original edge colors. Refine the mask, fix the polluted pixels, and re-export. Back to the layered source. For animations, check the initial and last frames, as well as frames with the most movement. These techniques isolate the source and avoid unnecessary tweaks that could harm the graphic.
Final Quality Control for Clear Web Graphics and Animations
To summarize, the only way to be sure to export correctly is to inspect the actual files, not just rely on Photoshop’s display. Export separate delivery files for each format needed. Save the editable master document with its original layers, masks and animation timeline intact. Open the WebP and GIF files in a web browser or other application that supports transparency and animation features. Test against light, dark and colored backgrounds to reveal matte contamination and edge artifacts. For animated GIFs, check that playback, frame timing, looping and transparency work as expected. For WebP, make sure that the program or website you are using supports the specific type of WebP that is being sent, especially if it is animated. Compare the exported size and visual quality to the original artwork. Check little elements such as thin borders, rounded corners, hair, and writing. Test file size and loading behavior if the visuals are to be used on a public website. utilize WebP for visuals that require seamless transparency and are tiny, and utilize GIF for operations where its compatibility or animation qualities are explicitly required. GIF can’t handle complete alpha transparency, therefore borders may require a matte for the backdrop. With good layer preparation, good matte handling, careful format selection, and rigorous testing, Photoshop exports can provide crisper edge transitions without distracting halos or needless file-size increases.