How to Convert Your Old Wired Mechanical Keyboard to Wireless Using a Hidden Bluetooth Micro-Controller
How to Convert Your Old Wired Mechanical Keyboard to Wireless Using a Hidden Bluetooth Micro-Controller
A mechanical keyboard is highly valued due to the tactile feedback it provides, its durability, and the typing experience it provides. Older wired mechanical keyboards, on the other hand, do not offer the convenience of wireless connectivity, which restricts their portability and ability to create clutter-free setups. By utilizing a hidden Bluetooth micro-controller, it is possible to transform a wired keyboard into a wireless one. This is a practical solution that gives older devices a new lease on life. There is a way to create a fully functional wireless mechanical keyboard without compromising its original feel or aesthetics. This can be accomplished through careful planning, soldering, and configuration of the firmware. This allows you to combine the tactile joy of a mechanical build with the modern convenience of wireless technology.
Gaining an Understanding of the Operation of Bluetooth Micro-Controllers
The Bluetooth micro-controllers are small circuit boards that are designed to simulate the signals that are sent from a USB keyboard over a wireless connection. In order to translate key presses into Bluetooth signals that are compatible with laptops, tablets, and smartphones, they connect to the existing keyboard matrix and work in conjunction with it. The firmware of these microcontrollers is typically capable of handling multiple profiles, and they frequently include onboard rechargeable batteries, voltage regulation circuits, and other components. Understanding the capabilities of the controller you have chosen is essential because it determines whether or not it is compatible with the layout of your keyboard, how well it rolls over keys, and how well it manages the battery for you.
Finding the Appropriate Bluetooth Micro-Controller for Your Needs
When choosing a controller, it is important to consider the size of the keyboard, the layout, and your own personal preferences. Examples of well-known microcontrollers include the Adafruit Bluefruit, the Kiibohd, and the BQ Bluetooth modules. Each of these microcontrollers provides varying degrees of firmware customization. Be certain that the controller is compatible with the key matrix of your keyboard, that it has sufficient pins to accommodate all of the keys, and that it has the appropriate voltage regulation for the switches. It is even possible for some microcontrollers to support hot-swappable configurations, which enables future upgrades to be made without the need for desoldering. This provides additional flexibility for long-term use.
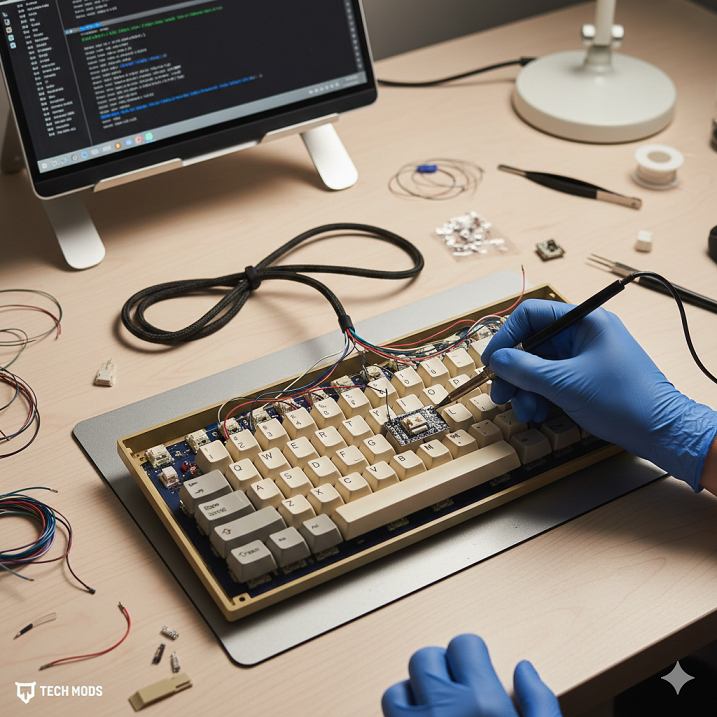
Without risking injury, disassemble your mechanical keyboard.
First, carefully disassemble your keyboard before proceeding with the installation of the micro-controller. To access the printed circuit board (PCB) and wiring, remove the keycaps and unscrew the case. Make sure that the reconnection is accurate by either documenting the original wiring layout or taking clear photographs. Mechanical switches are delicate, and poor handling can cause damage to the printed circuit board (PCB) or the contacts on the switch. In order to ensure a safe disassembly process and to avoid making mistakes that could be expensive during the conversion process, it is essential to prepare a clean workspace with the appropriate tools, such as screwdrivers, spudgers, and anti-static mats.
Diagramming the Matrix of Your Keyboard
Each individual mechanical keyboard is equipped with a one-of-a-kind matrix that connects rows and columns of switches. In order to correctly wire the microcontroller, it is necessary to map this matrix. It is possible to determine the row and column connections for each key by employing a multimeter or a continuity tester. There are microcontrollers that offer preconfigured layouts for popular keyboards; however, manual mapping is required for personal keyboards or layouts that are not standard. Accurate matrix mapping ensures that every key functions correctly after the Bluetooth conversion and prevents ghosting or missed keypresses from occurring.
Assembly of the Keyboard PCB with the Micro-Controller through Soldering
The subsequent step, which comes after the mapping of the matrix, is the soldering of the microcontroller. In order to prevent short circuits, it is necessary to locate the pins on the microcontroller that correspond to each row and column, and then carefully connect the wires. To prevent damage to the printed circuit board (PCB), use solder of a high quality and keep your hand steady. Ensure that the polarity connections on keyboards that contain diodes are correct in order to prevent backwards key presses. Due to the fact that poor connections can result in intermittent key failures or keys that are unresponsive in the wireless configuration, soldering requires patience and precision.
Integration of a Battery That Can Be Recharged
The use of a power source is necessary for a hidden Bluetooth conversion. Choose a rechargeable lithium-polymer battery that is small enough to fit inside the case of your keyboard. By connecting the battery to the power input of the microcontroller, you can ensure that the voltage is regulated correctly and that the battery is able to be charged. Some microcontrollers come equipped with integrated charging circuits that come equipped with micro-USB or USB-C ports, making it easy to recharge the device. The keyboard’s aesthetic is maintained in a manner that is comparable to that of its wired counterpart thanks to the proper integration of the battery, which enables extended wireless usage while maintaining a low profile.
Making Adjustments to the Firmware
Firmware is responsible for determining how the microcontroller interprets key presses and how it communicates with Bluetooth devices. Numerous controllers offer the capability to be customized in terms of key mapping, debounce settings, and the pairing of multiple devices. Before you close the keyboard case, make sure that the firmware is loaded through a USB connection, and then test each key to ensure that it is responding accurately. Certain microcontrollers also support Bluetooth Low Energy (BLE), which reduces the amount of power that is consumed, thereby extending the battery life without compromising the responsiveness of the device. The configuration of the firmware ensures that typing is smooth and that wireless operation is reliable.
Examining the Connectivity from Bluetooth
Pair the keyboard with the devices you intend to use it with before you complete the assembly. Verify that each key has been correctly registered, and look for any instances of latency or missed inputs. When the keyboard is put to sleep or the battery is changed, check to see that it disconnects and reconnects in the correct manner. Testing not only ensures that your wireless conversion functions dependably across mobile devices, tablets, and laptops, but it also prevents post-assembly troubleshooting that might require disassembly.
Putting the Keyboard Case Back Together and Securing Its Components
After any and all connections have been checked, the keyboard case should be carefully closed. In order to prevent movement that could potentially cause damage to solder joints or short circuits, the micro-controller and battery should be secured. When it comes to securing components, you can make use of double-sided tape, foam padding, or custom brackets that have been 3D printed. The structural integrity of the keyboard can be preserved through proper internal organization, which also makes it easier to access for any future maintenance or firmware updates when they are required.
Preserving the overall health and performance of the battery
Maintaining the integrated battery on a regular basis is necessary in order to ensure its longevity. Avoid deep discharges and make sure to charge the battery at regular intervals. In order to avoid overheating lithium-polymer cells, it is important to monitor the temperature while they are being charged. In order to maintain consistent wireless performance and to prevent unexpected downtime during typing sessions, it is important to maintain the health of these batteries.
Converting a wired keyboard to a wireless one has a number of advantages.
It is possible to achieve a clutter-free desk setup, improved portability, and modern functionality by converting an old wired mechanical keyboard to a wireless keyboard. This can be accomplished without having to replace a keyboard that you adore. The tactile satisfaction of mechanical switches is combined with the convenience of Bluetooth connectivity, and it is compatible with a variety of mobile platforms and devices. The conversion is not only a satisfying technical project for enthusiasts, but it also helps them improve their knowledge of electronics, soldering, and firmware programming for their devices.
The Most Advanced Advice for Enthusiasts
Multi-device pairing, hot-swappable key mapping, and custom RGB lighting integration are some of the advanced features that some micro-controllers offer to users who are looking for more advanced functionality. The utilization of modular micro-controllers can make it possible to implement firmware updates and advanced macros, thereby transforming your converted keyboard into a wireless input device that is fully programmable. By incorporating these enhancements, the keyboard is transformed from a straightforward wireless conversion into a feature-packed, cutting-edge peripheral that can be customized to your workflow and preferences.
Final Thoughts Regarding the Conversion of Wireless Keyboards
If you want to modernize older devices in a way that is practical, rewarding, and cost-effective, you can convert a wired mechanical keyboard into a wireless setup by using a hidden Bluetooth micro-controller. Any enthusiast is capable of constructing a fully functional wireless keyboard if meticulous planning, precise soldering, firmware configuration, and careful attention to power management are all taken into consideration. The end result is a mechanical keyboard that is not only clean, portable, and high-performance, but also retains its tactile charm while becoming seamlessly integrated with modern devices. This results in an increase in both productivity and the aesthetics of the desk.


