Using ‘Sample All Layers’ with the Clone Stamp to Rebuild Textures on Transparent Canvases
Using ‘Sample All Layers’ with the Clone Stamp to Rebuild Textures on Transparent Canvases
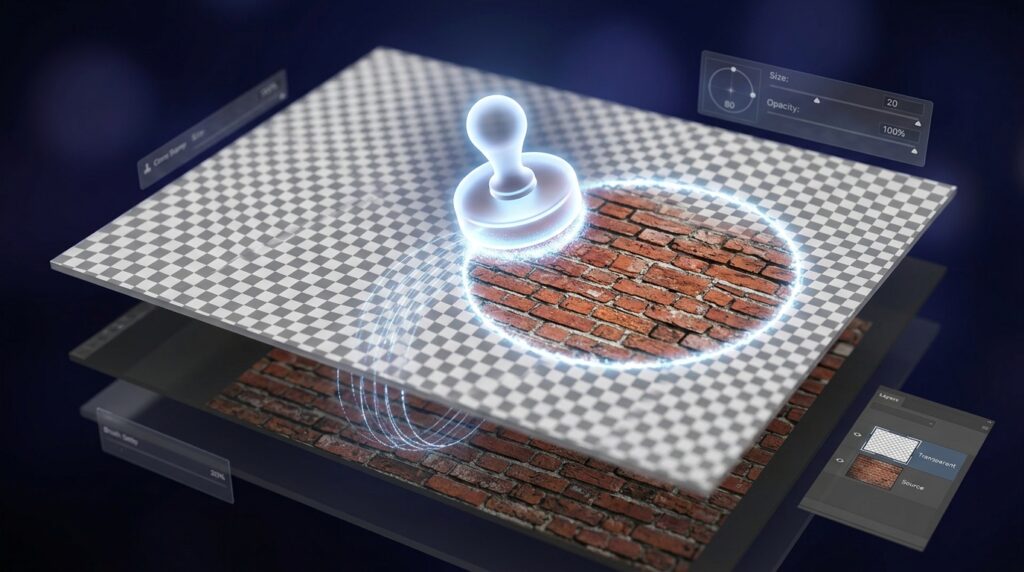
When working on damaged surfaces, participating in compositing projects, or performing object cleaning chores, texture reconstruction is an essential component of expert Photoshop retouching. Editors prefer to work in a non-destructive manner by putting retouching work on empty transparent layers rather than directly changing the source picture. This is the case in many professional processes. Using this method gives for additional flexibility during changes while still preserving the original data. Reconstructing realistic textures on translucent canvases, on the other hand, needs more than just copying pixels from one place to another. Combining the Clone Stamp tool with the “Sample All Layers” option, which enables the sampling of texture data from visible layers while painting into an empty layer, results in a considerable increase in the tool’s overall capabilities. Using this method, it is possible to do seamless retouching without rendering the underlying picture permanently altered. In order to create fixes that are plausible, it is vital to have a solid understanding of how the behavior of sampling interacts with transparency, layer structure, and texture alignment. This workflow, when utilized appropriately, generates results that are clean, editable, and highly realistic in quality when it comes to texture reconstruction.
Gaining an Understanding of the Clone Stamp Sampling Process
In order to transmit pixel information from one region of a picture to another, the Clone Stamp tool duplicates the information from the first region. In most cases, cloning takes place immediately on the active layer, which has the potential to permanently obliterate the data from the original picture. However, in order for the Clone Stamp to operate properly while operating on a translucent layer, it is necessary for it to have access to information from layers that are behind it. Through the use of the “Sample All Layers” option, Photoshop is able to read visible pixel information across the whole document while simultaneously inserting the cloned result onto the layer that is empty. Consequently, this results in a process for editing that is non-destructive, in which texture corrections are kept separate from the original picture. In order to preserve flexibility and maintain picture integrity throughout the retouching process, it is vital to have a solid understanding of the distinction that exists between source sampling and destination painting throughout the process.
The Reasons Why Transparent Retouching Layers Make Workflow Flexibility Improvements
When working in professional editing settings, the use of transparent retouching layers offers a number of major benefits. Adjustments may be made, masked, lowered in opacity, or deleted altogether without causing any damage to the original file. This is because cloned texture data resides separately from the source picture. The ability to maintain numerous retouching processes inside the layer structure is another way in which this separation makes cooperation more effective. Through the use of transparent layers, editors are able to separate texture fixes from alterations to tonal or color values, which makes further revisions much simpler. This non-destructive technique helps simplify complicated undertakings by lowering the likelihood of making errors that cannot be undone and allowing more controlled testing. When it comes to commercial retouching, where updates are regular and accuracy is essential, it is particularly crucial to maintain editable texture fixes.
The Enabling of the ‘Sample All Layers’ Function for Non-Destructive Cloning
It is possible to determine how Photoshop acquires source information during the cloning process by adjusting the “Sample All Layers” setting, which can be found inside the Clone Stamp tool settings. In the event that the tool is activated, it will sample visible content from all active layers rather than just the layer that is currently chosen. During the process of cloning onto an empty transparent layer, this is a necessary step since the layer in question does not include any unique source pixels. Once enabled, the Clone Stamp has the ability to recreate textures on its own while maintaining the integrity of the underlying picture. In addition, editors have the ability to choose alternate sample modes, such as sampling just the layers that are now active and below them, depending on the structure of the document. Gaining an understanding of these sampling characteristics guarantees that the reconstruction of textures will continue to be accurate and effective in processes that include several layers.
Reconstructing the Surface Texture That Is Missing Naturally
Texture restoration needs more than just duplicating random pixels since convincing repairs rely on keeping natural surface variation and directional information. This is because of the significance of texture reconstruction. When reconstructing sections that have been destroyed or deleted, the texture that was sampled must be in harmony with the patterns, lighting, and perspective of the surrounding area. Cloning from the same source area multiple times can result in the creation of visible duplication artifacts, which reduces the level of realism. In order to prevent this from happening, editors should make regular changes to sample points and progressively distribute themselves around the affected area. It is possible to improve individual fixes separately without impacting the data of surrounding levels when using the Clone Stamp tool, which makes it particularly useful when working with translucent layers. In order to keep the texture continuity uniform over the restored surface, careful sampling and progressive blending are both helpful.
Finding a Balance Between Surface Direction and Perspective
When it comes to recreating textures, directional consistency is one of the areas that is most often neglected. Fabric, wood grain, concrete, and brushed metal are all examples of surfaces that include patterns that adhere to certain orientations and perspective angles inside their surfaces. When you clone texture without paying attention to these directions, you run the risk of producing obvious inconsistencies that immediately reveal the need for adjustments. It is important for editors to examine how the texture flows throughout the object when using the “Sample All Layers” tool and align cloned sections in accordance with the results. Depending on the intricacy of the surface, it may be necessary to make adjustments to the brush alignment, rotation, and scaling aspects. For the purpose of creating realistic repairs that blend in seamlessly with the surrounding image, it is essential to maintain directional continuity.
Using Layer Masks in conjunction with the Clone Stamp
The combination of transparent retouching layers with layer masks results in an even greater degree of flexibility. Masks allow for selective visibility adjustments to be made without destroying the texture information, as opposed to permanently erasing unwanted cloned areas. This comes in especially handy when reconstructing complex surfaces, which calls for a combination of subtle and subtle blending. For the purpose of refining transitions and removing harsh edges, editors have the ability to gradually reveal or hide portions of cloned texture. Additionally, Layer Masks make it simpler to experiment with different reconstruction strategies without having to commit to making edits that are permanent. When applied to high-end retouching projects, the combination of cloning and masking results in a workflow that is more flexible and precise, allowing for the successful implementation of advanced texture reconstruction techniques.
Techniques for Maintaining Texture Consistency Over Large Areas
It is necessary to exercise careful consistency management when performing large-scale texture reconstruction tasks, such as removing objects or repairing damaged backgrounds. Cloned regions can be quickly exposed if they are not handled carefully, and this can happen when repeating patterns, lighting mismatches, or abrupt tonal changes occur. When working on larger surfaces, it is helpful to maintain realism by working in smaller sections and evaluating the image at multiple zoom levels. It is possible to make adjustments to isolated corrections independently throughout the process when using transparent cloning layers, which is an advantage. In order to improve organization and control, editors can also group retouching layers that are related to one another. In order to ensure that reconstructed areas continue to appear visually integrated within the original image, it is important to maintain consistency in terms of texture density, contrast, and lighting.
Strategies for Avoiding the Most Common Errors in Non-Destructive Cloning
It is possible for cloning on transparent layers to be less effective due to a number of common mistakes. If you forget to enable “Sample All Layers,” the cloning process will frequently remain empty or incomplete. This is due to the fact that the active transparent layer does not contain any source data. An excessive amount of opacity may result in transitions that are harsh or unrealistic, while an excessive amount of a single sample point may result in the creation of repetitive patterns that appear artificial. During the reconstruction process, another common problem is the disregard for the direction of the lighting and the perspective of the texture. Another thing that editors should try to avoid doing is flattening retouching layers too early, since this eliminates flexibility in the process. Maintaining plausible and professional results in texture restoration requires careful sampling, progressive adjustments, and systematic layer management. These are all crucial components.